Shopify B2B Setup and Configuration
Step-by-step guide to setting up Shopify B2B features for corporate gifting with Send To Many, including vaulted payment methods, catalog pricing, payment terms, and permissions.
This guide walks through every step of setting up Shopify's B2B features to work with Send To Many for corporate gifting. It covers associating B2B customers with Sends, configuring vaulted payment methods, catalog pricing, payment terms, deposits, and the permissions required to charge vaulted cards on aggregate invoices.
Shopify B2B is now available on all Shopify plans. Previously, B2B features required Shopify Plus.
1. Associating a B2B Customer with a Send
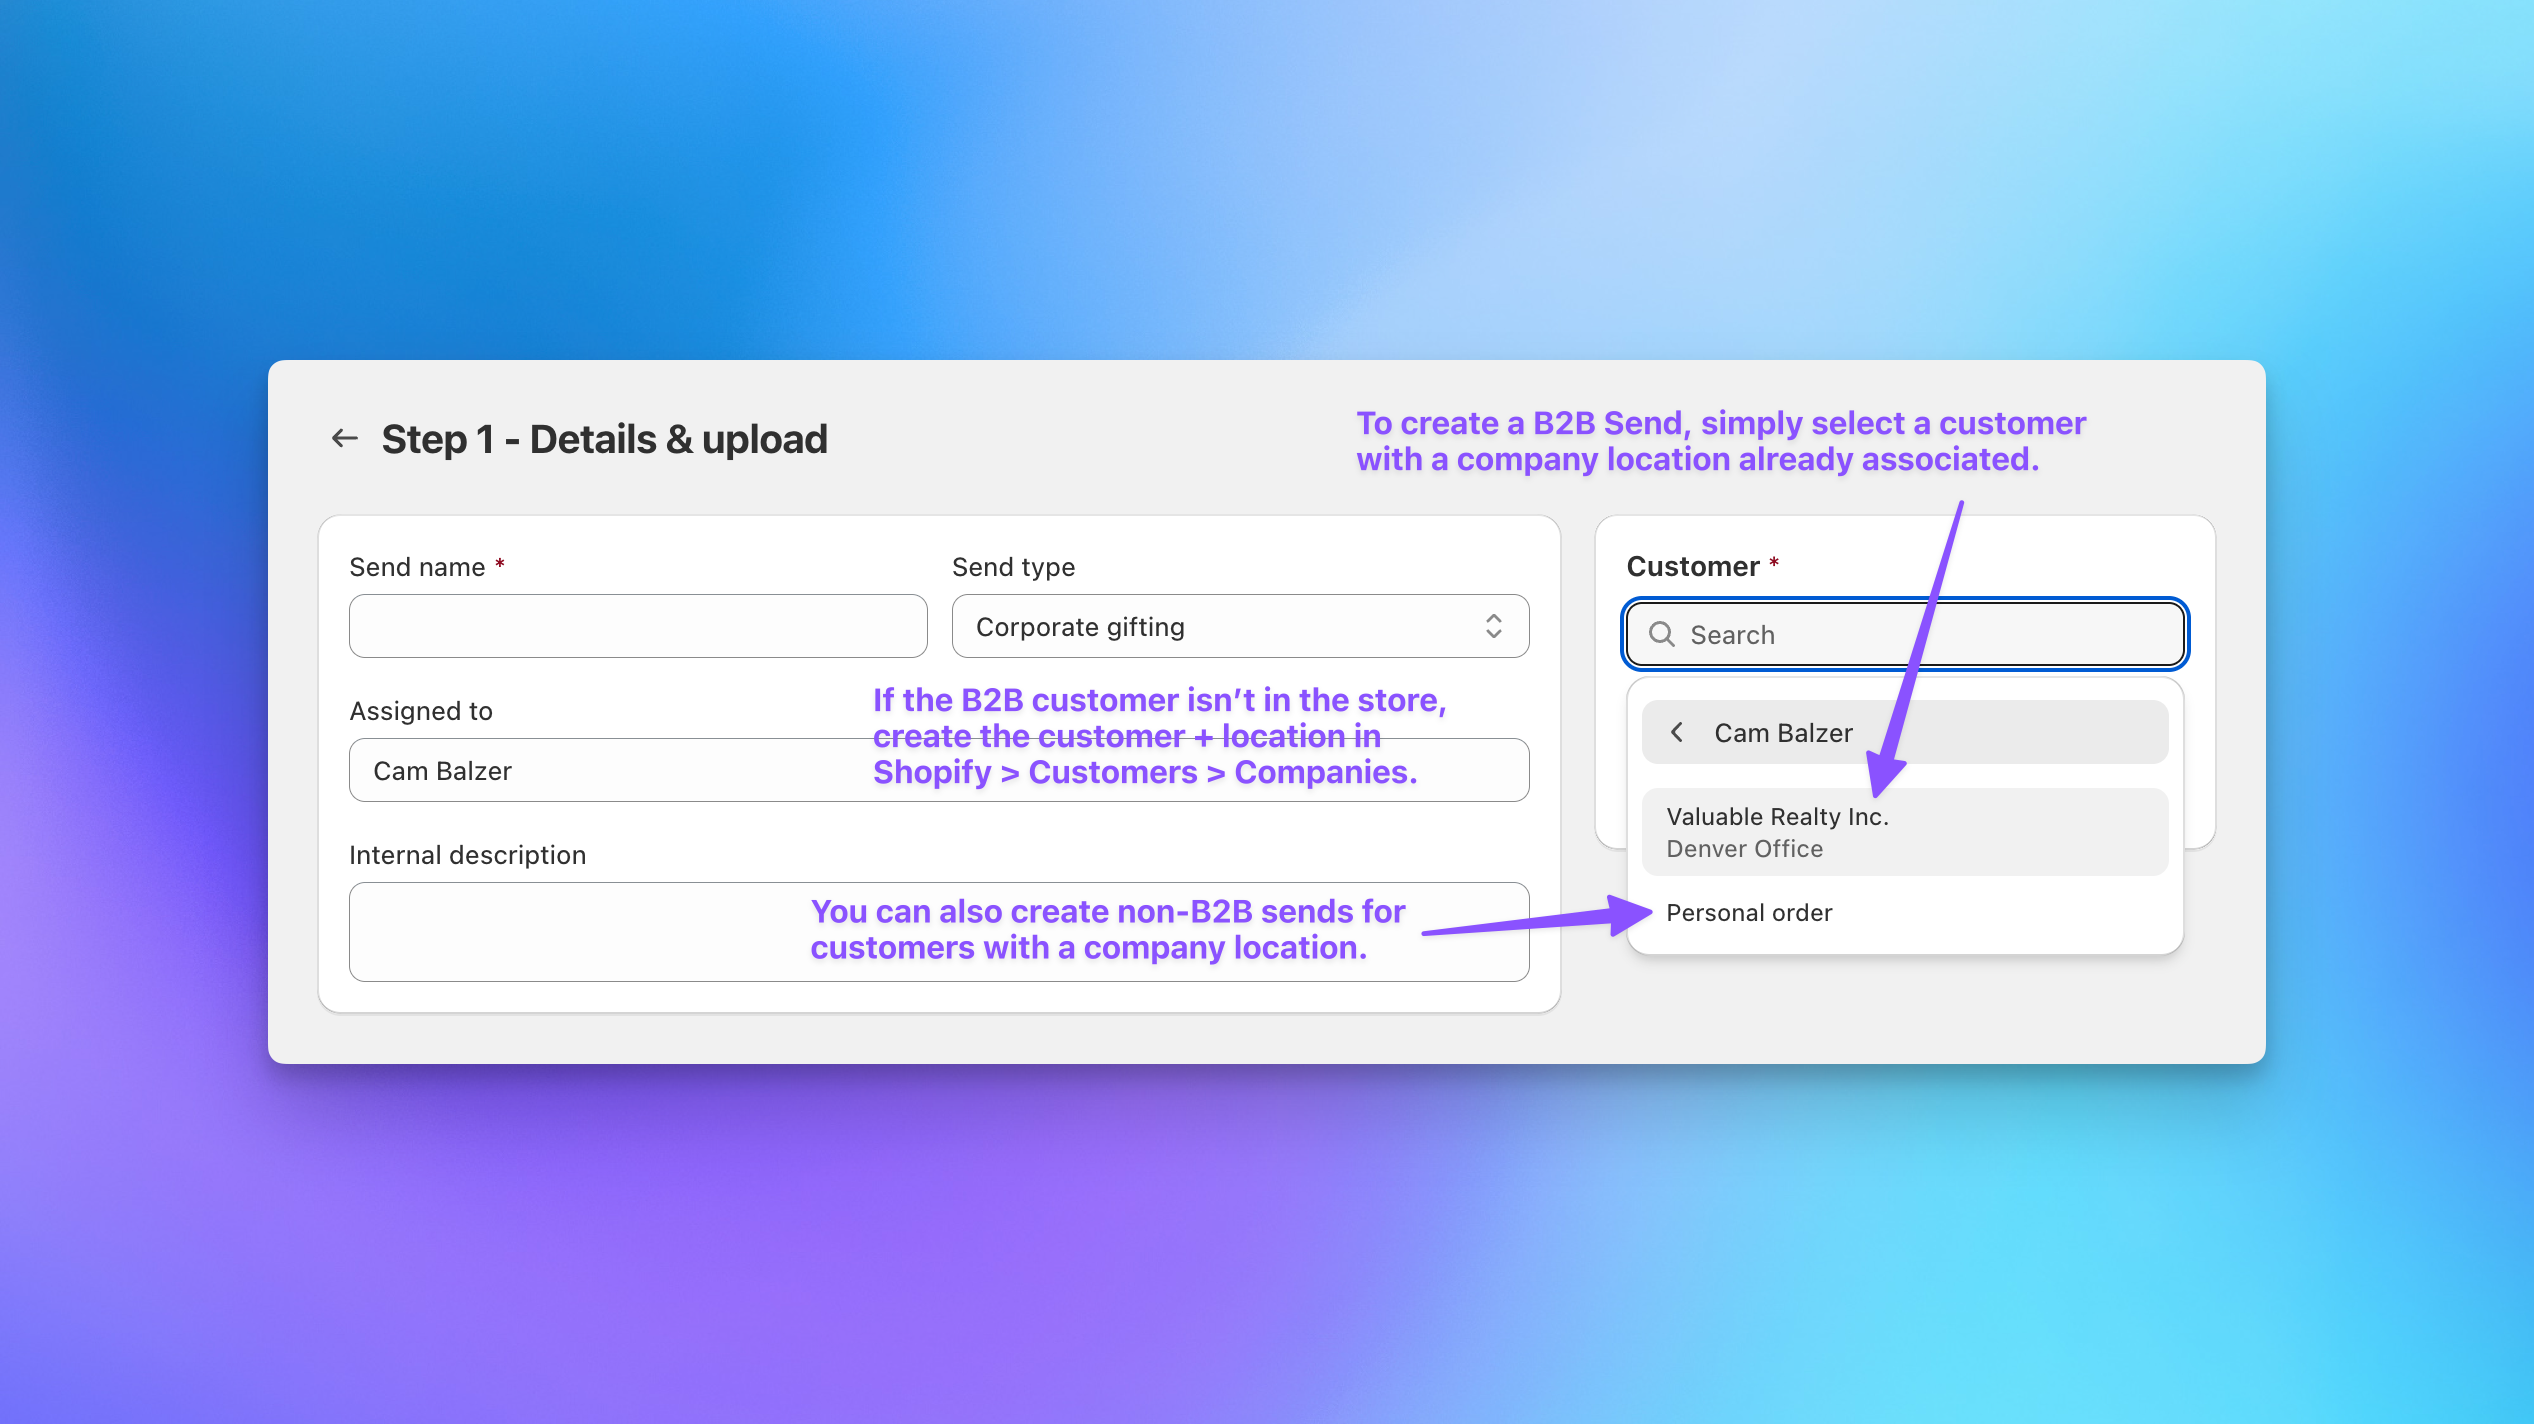
When creating a Send in Send To Many, select a customer that already has a company and location associated in Shopify.
If the B2B customer is not yet set up:
- Go to Shopify Admin > Customers > Companies.
- Create the company.
- Add at least one location.
- Assign the customer contact to that location.
To create a B2B Send, the customer must be associated with a company location.

2. Confirming the Selected Company Location
Once a B2B customer is selected, you will see the company name, location, and billing address tied to that location.
All of the following are tied to the location, not just the company:
- Payment terms
- Catalog pricing
- Vaulted payment methods
- Checkout behavior
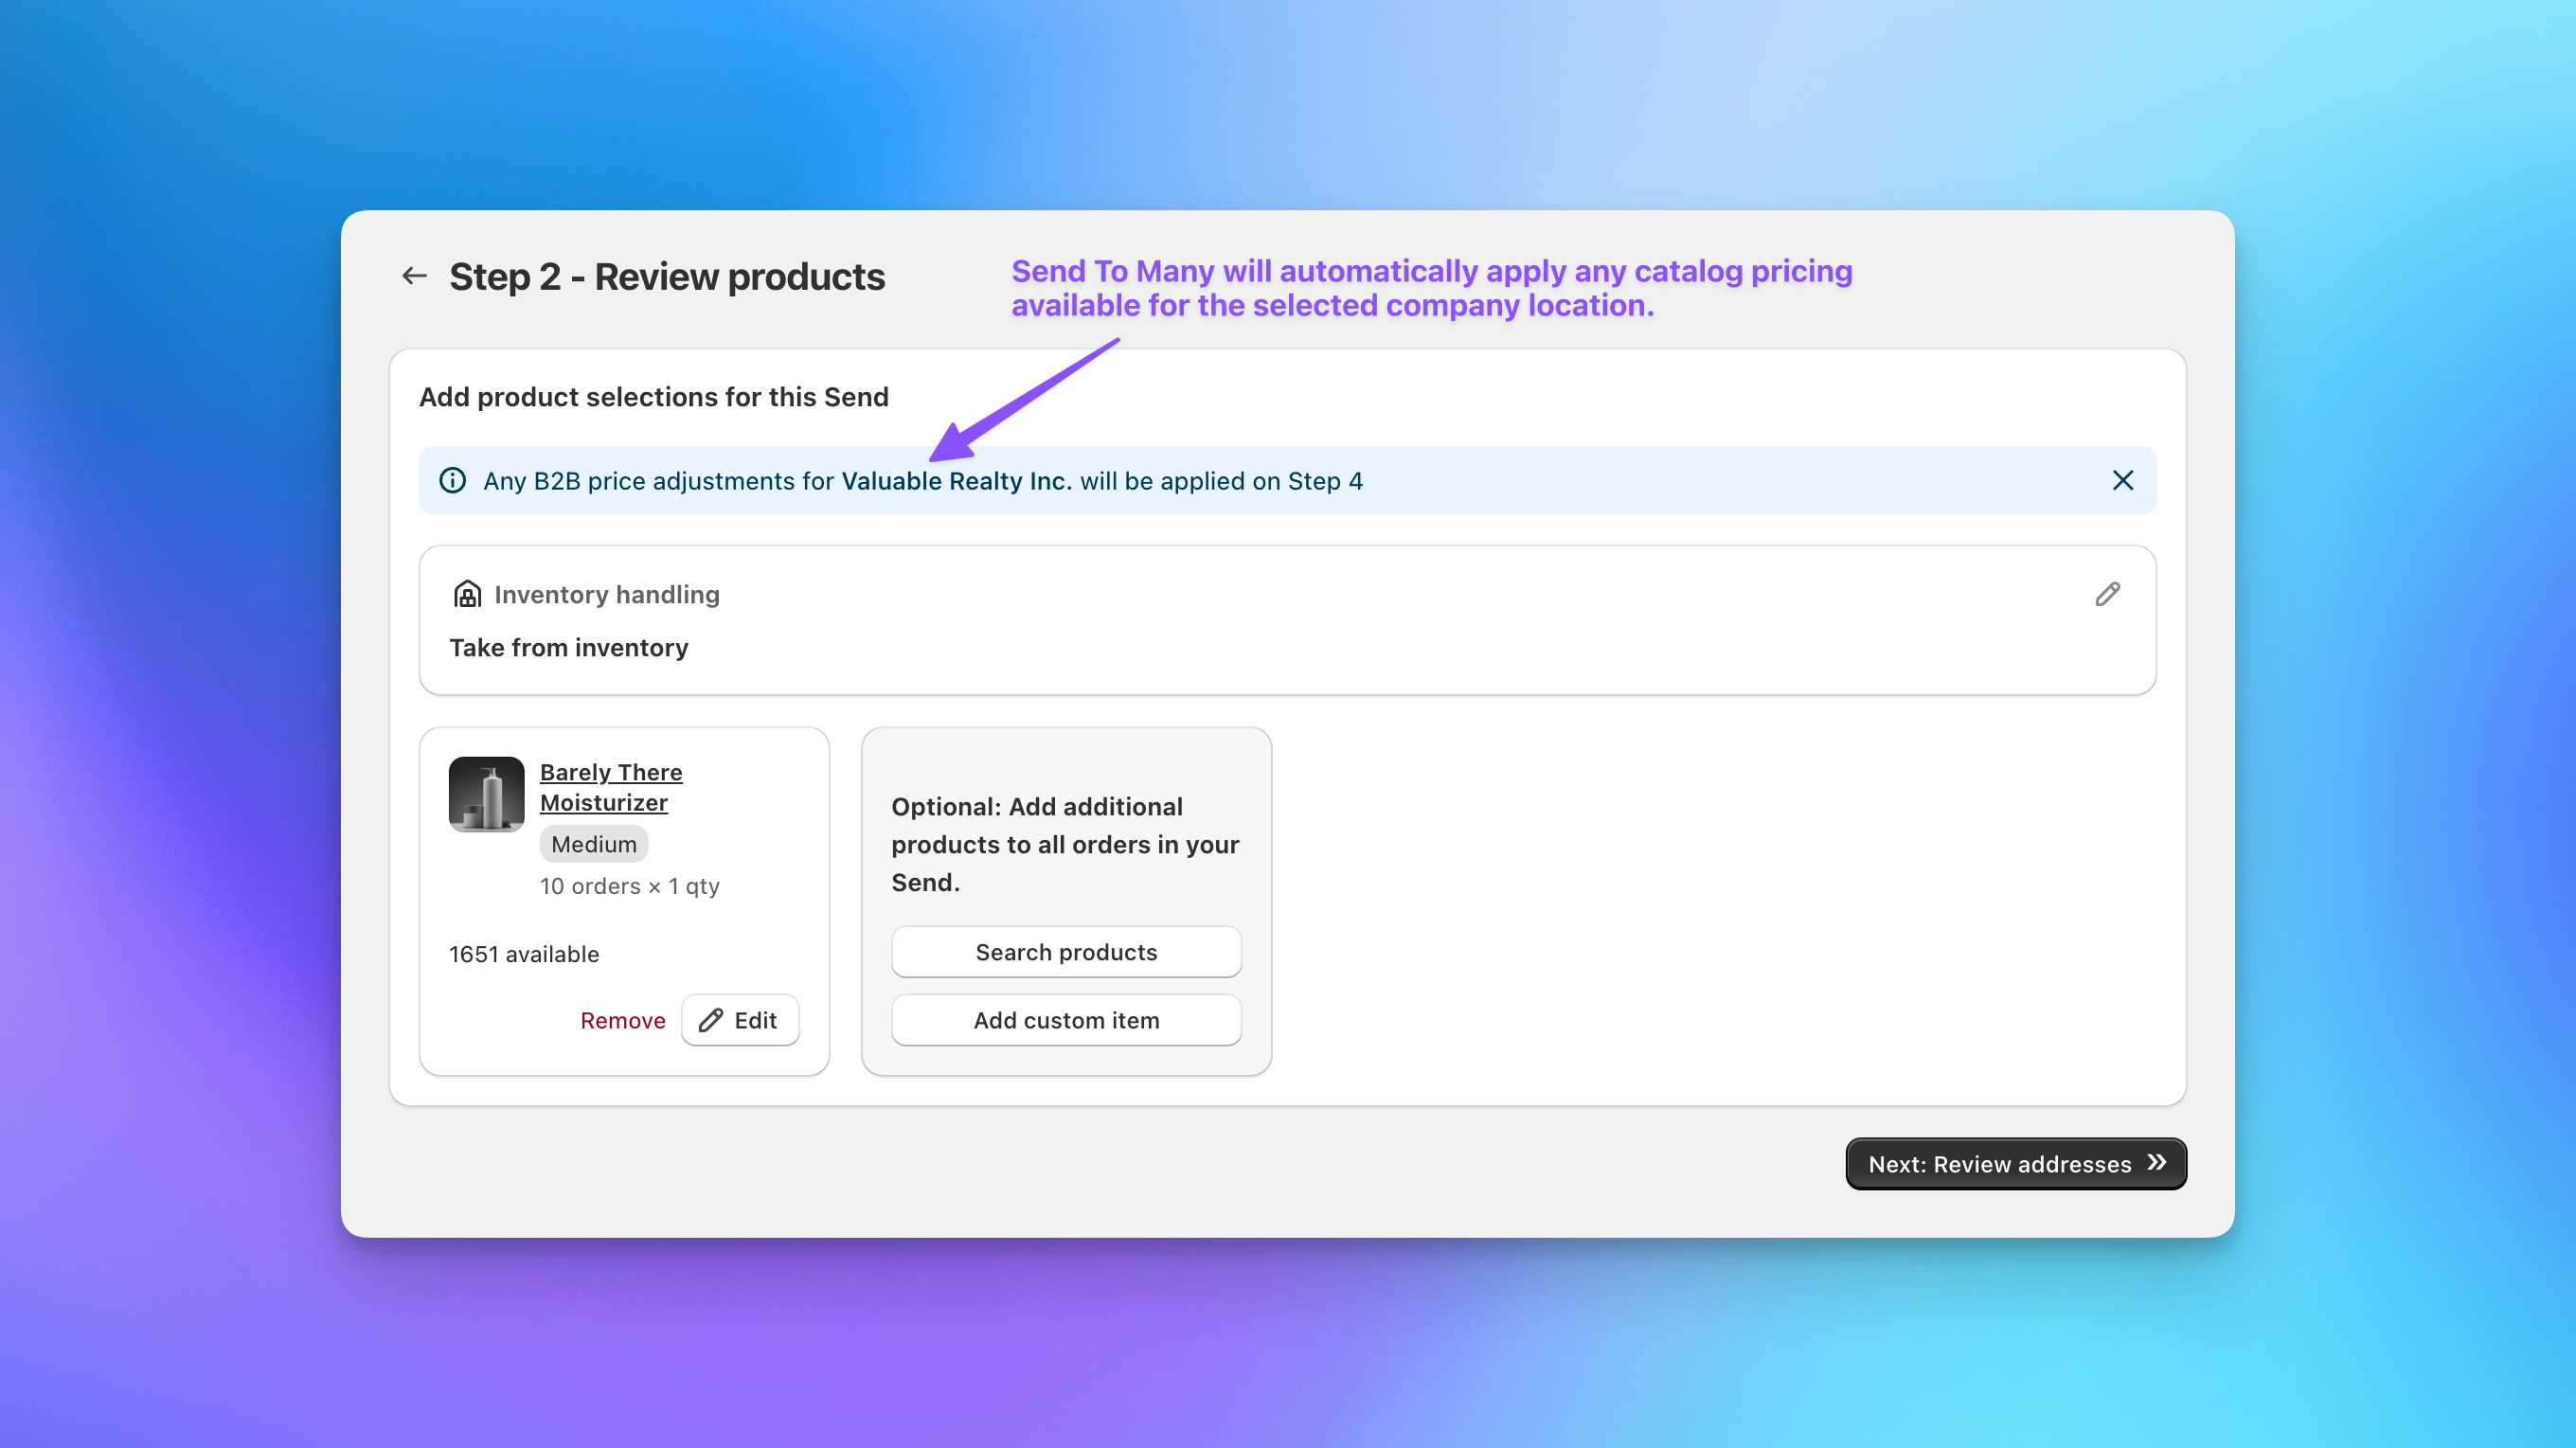
3. B2B Catalog Pricing Applies Automatically
Send To Many respects Shopify B2B pricing. Catalog pricing assigned to the company location and any price adjustments defined in B2B are applied automatically when the draft order is generated.
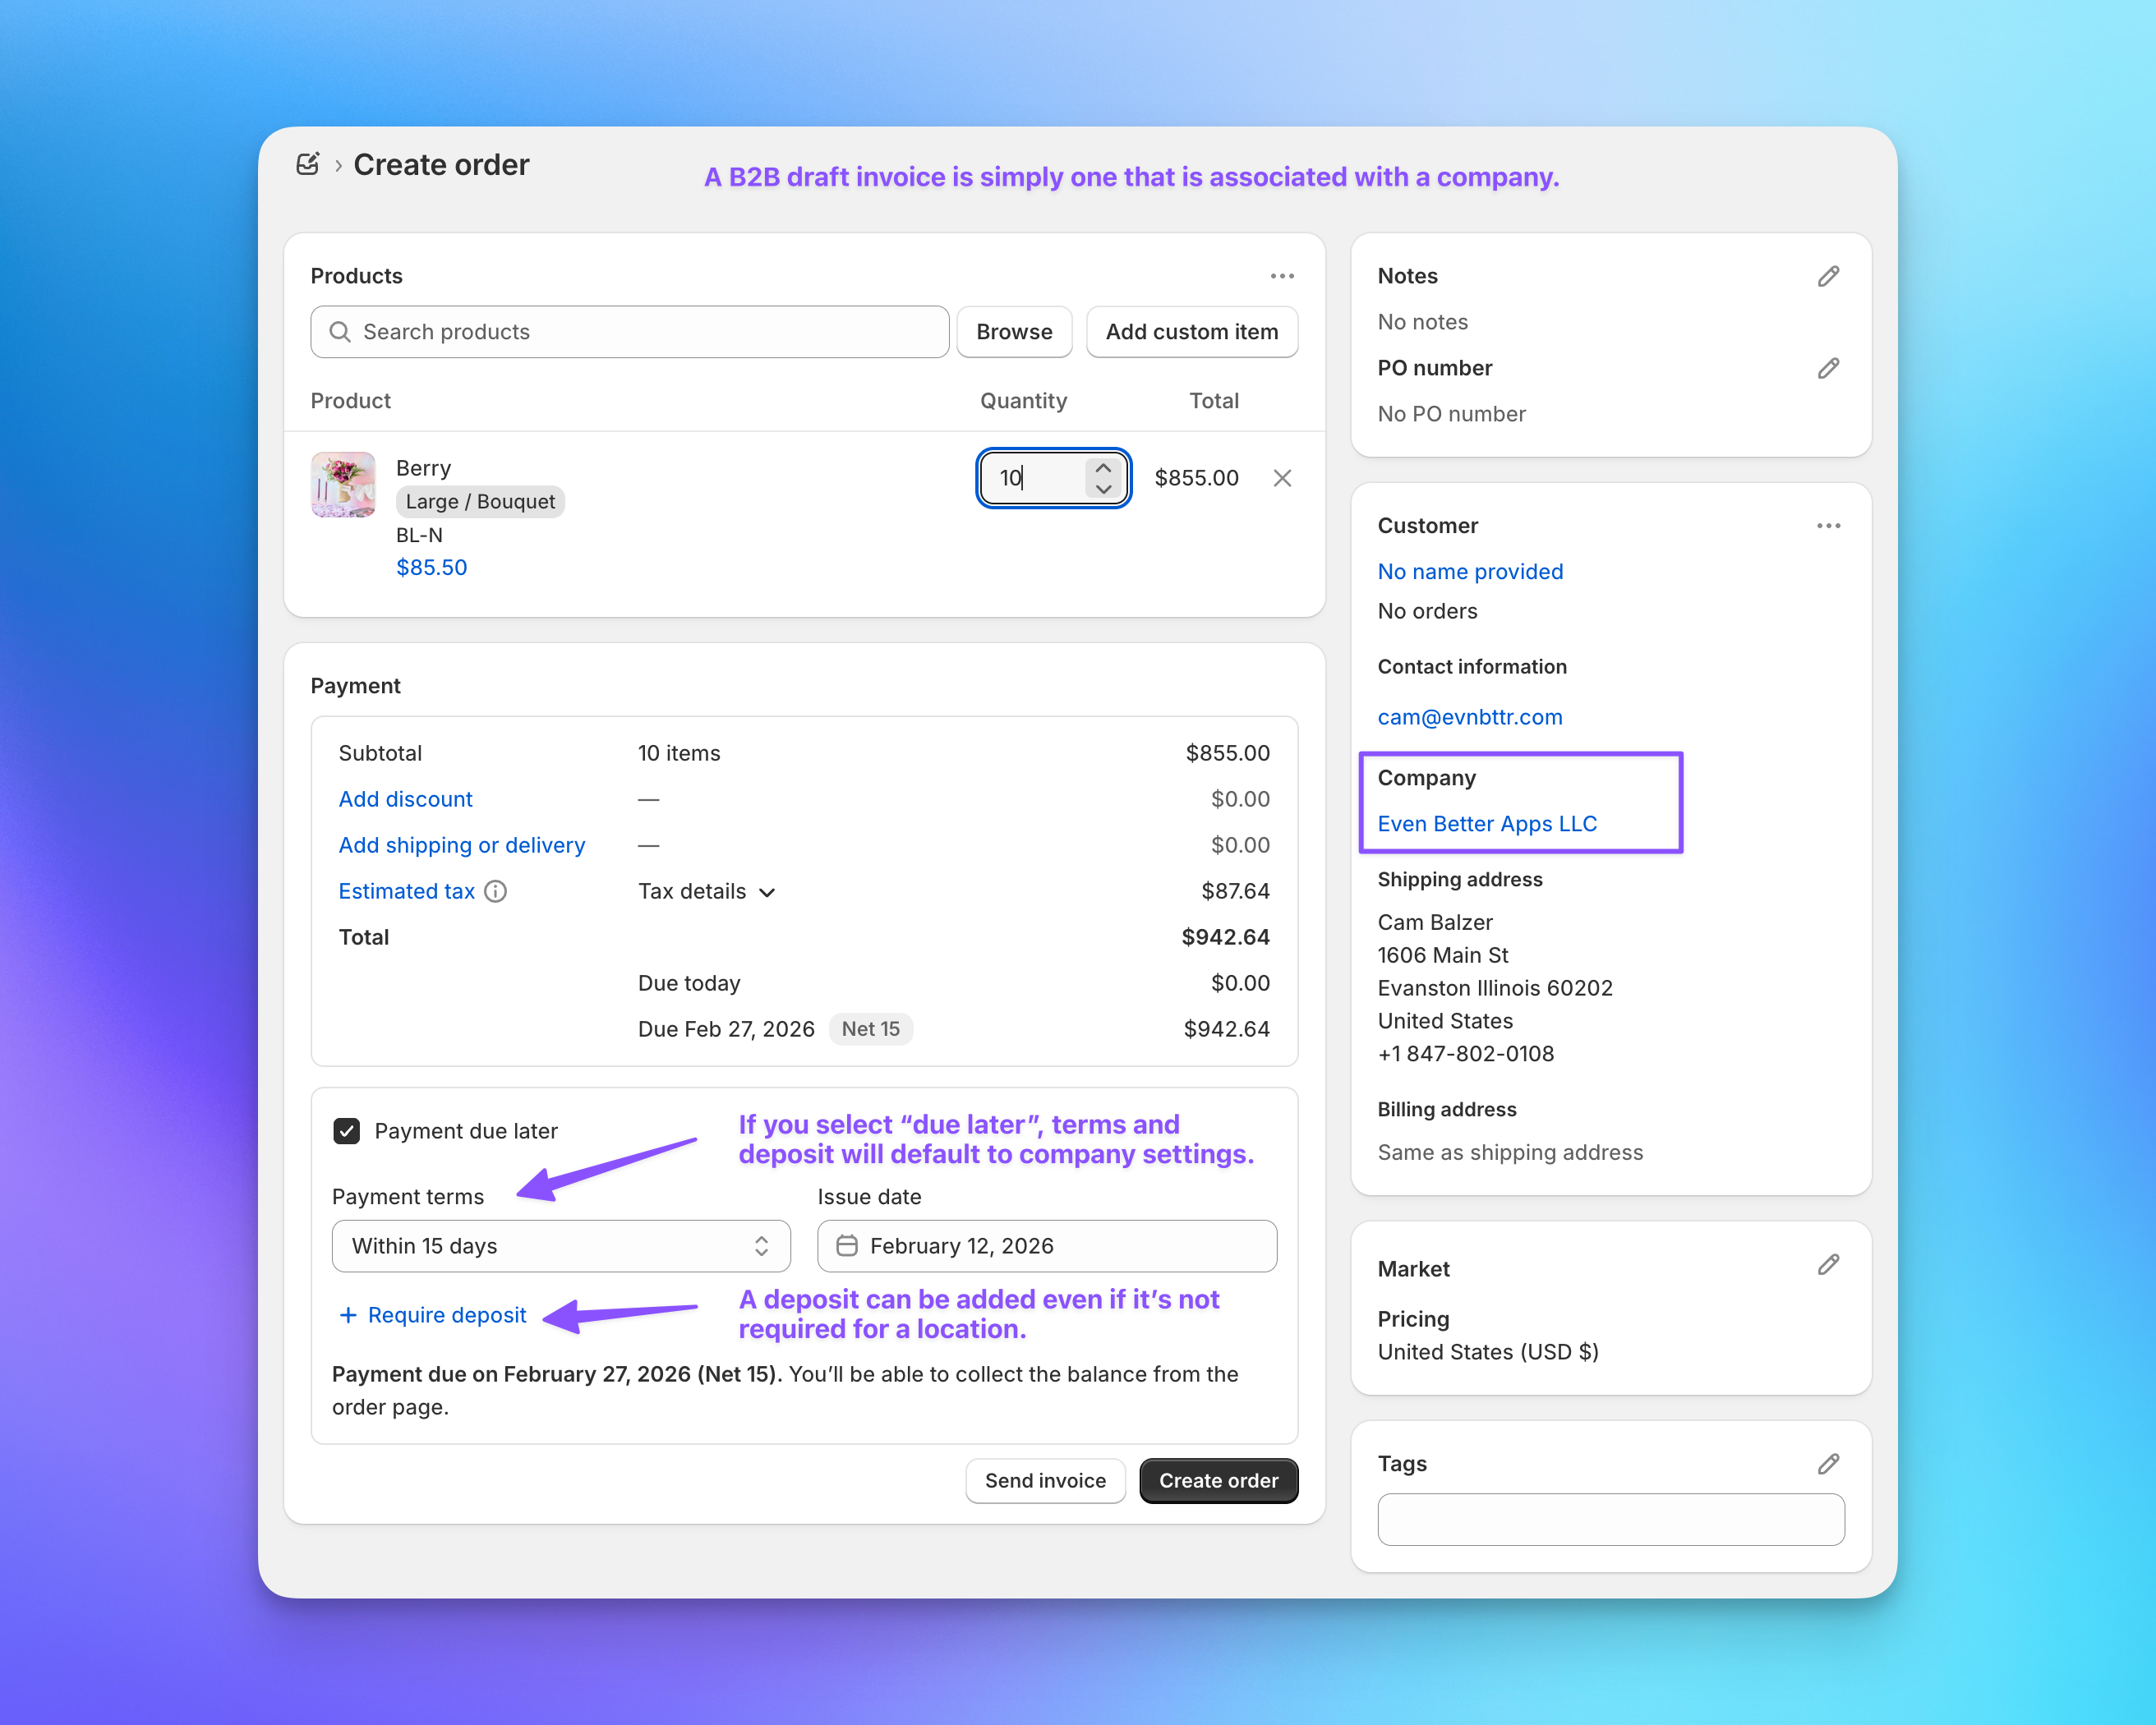
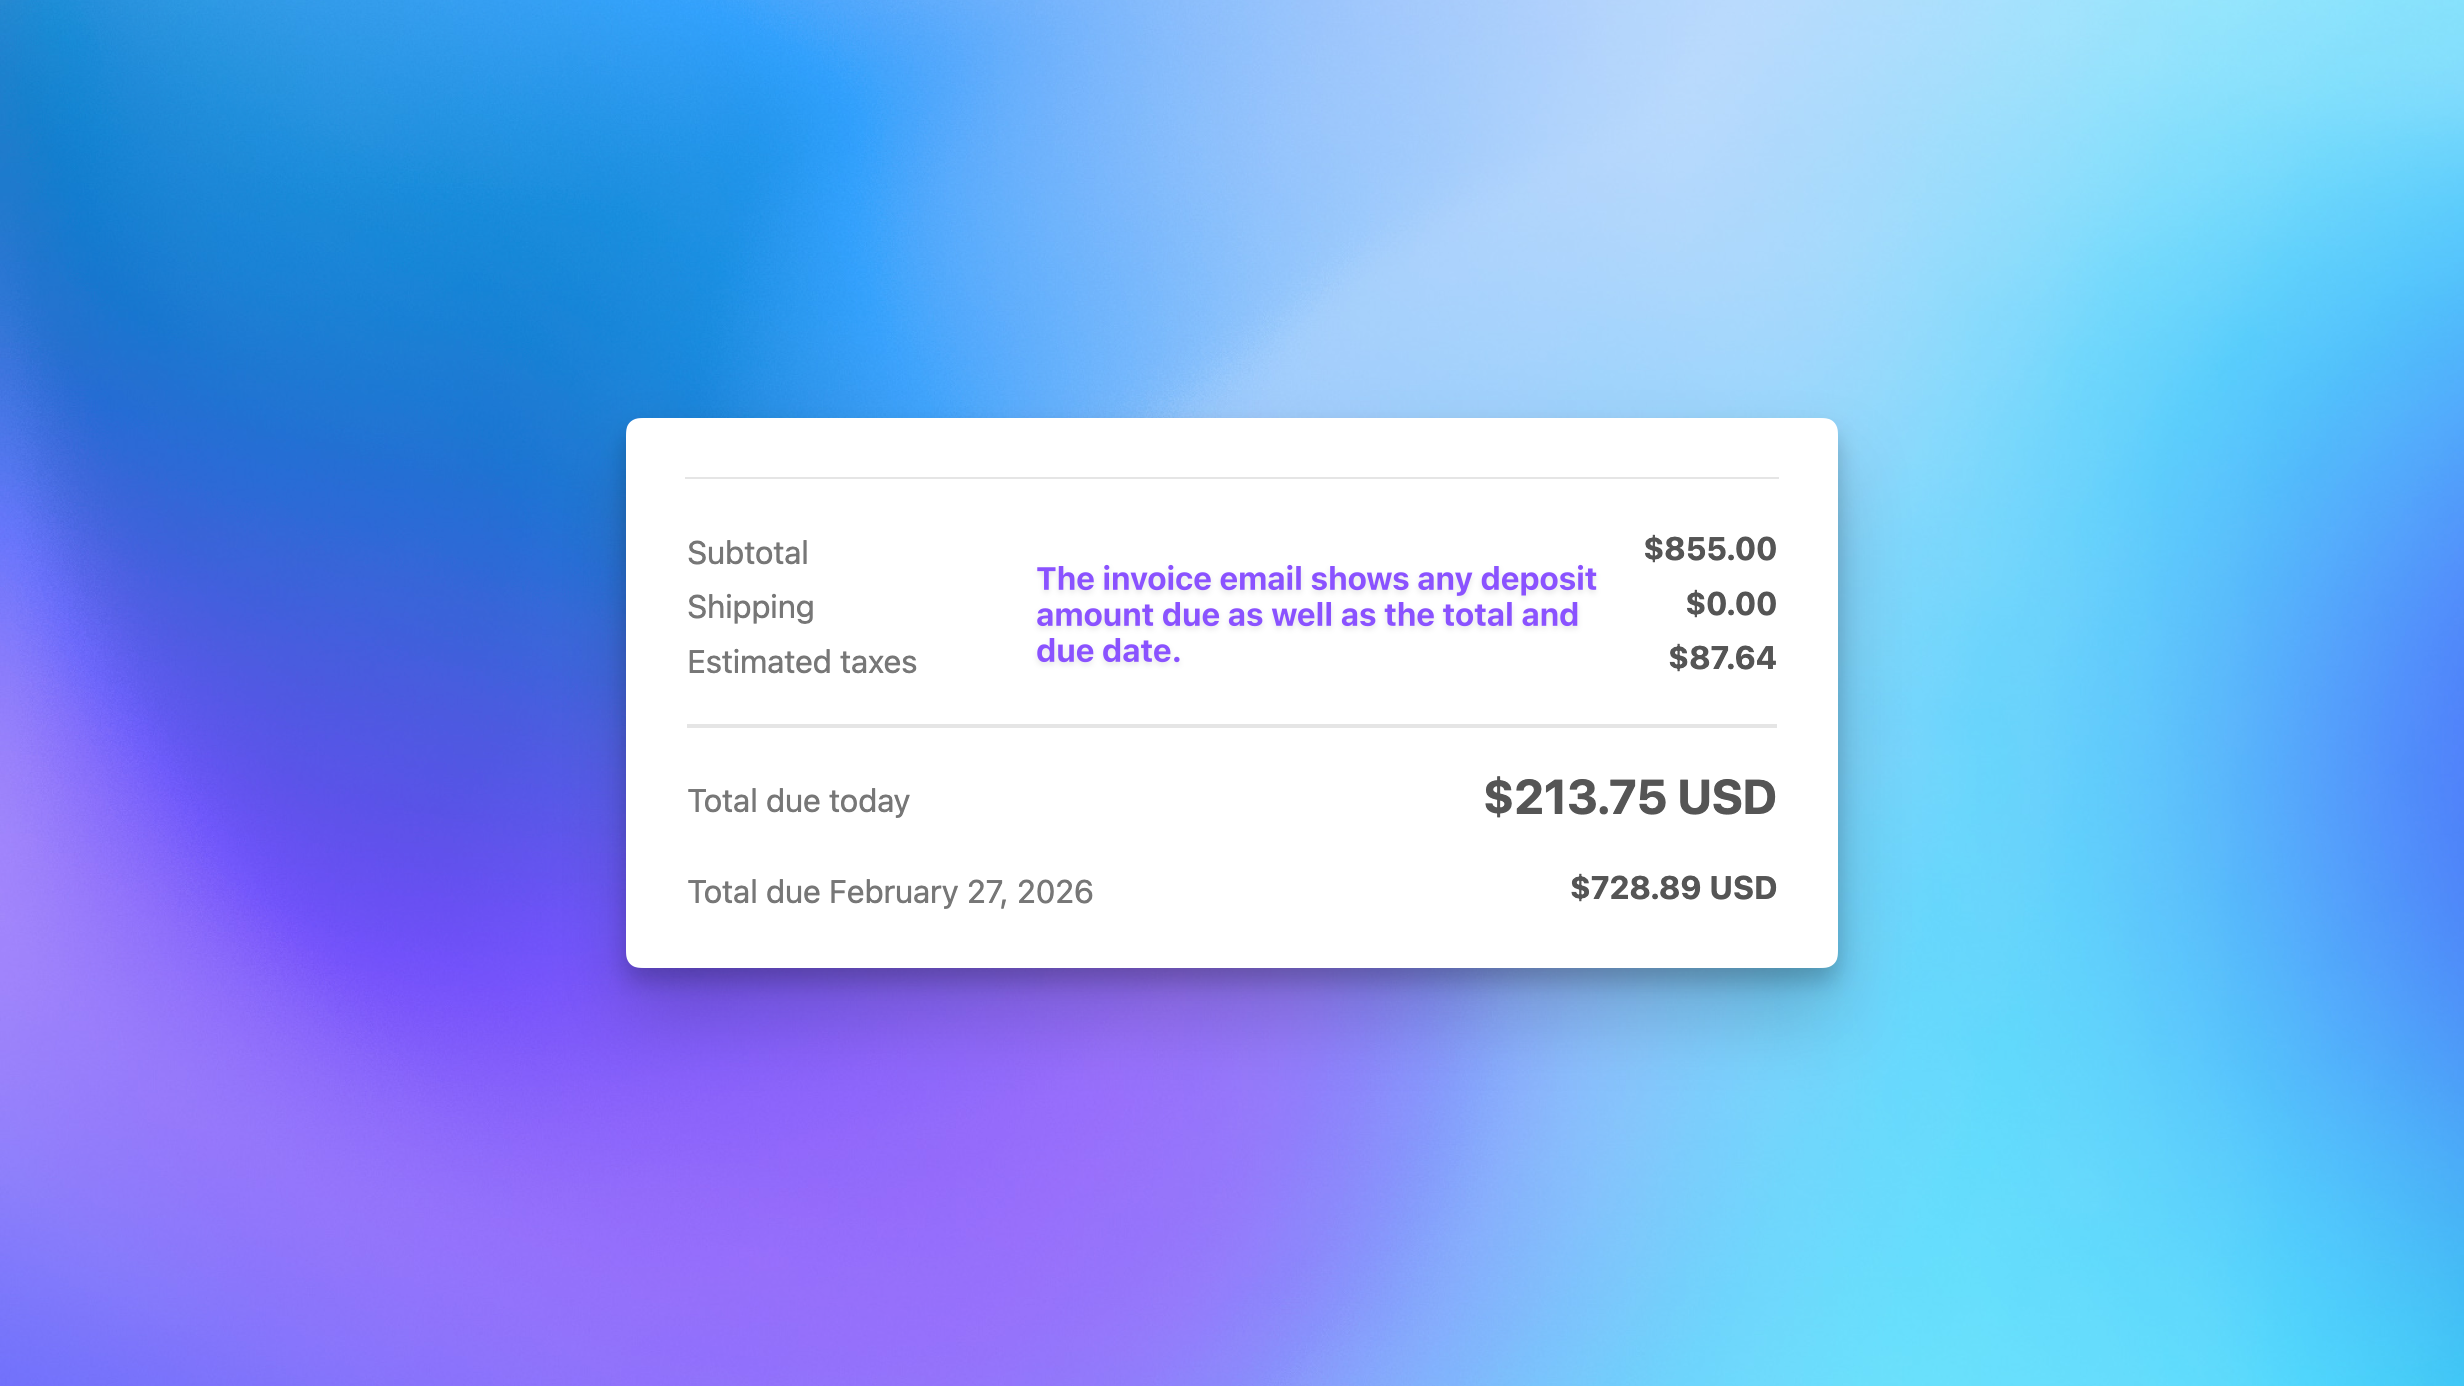
4. Draft Orders with Payment Terms and Deposits
When Send To Many generates the aggregate draft order for the Send, it is automatically associated with the customer's company location. Any catalog discounts are applied. If you select "Payment due later", default terms are applied.
From the draft order, you can:
- Add or change payment terms (for example, Net 15 or Net 30).
- Add or change a deposit requirement (for example, 25%), unless a deposit is already required for the location.
- Shopify calculates the total due today and the remaining balance due later.
5. Reserving Inventory Before Sending an Invoice
Before sending an aggregate draft invoice, you can reserve inventory and hold items until a specific date and time. This is helpful when you are awaiting deposit payment, working through internal approvals, or protecting limited inventory.
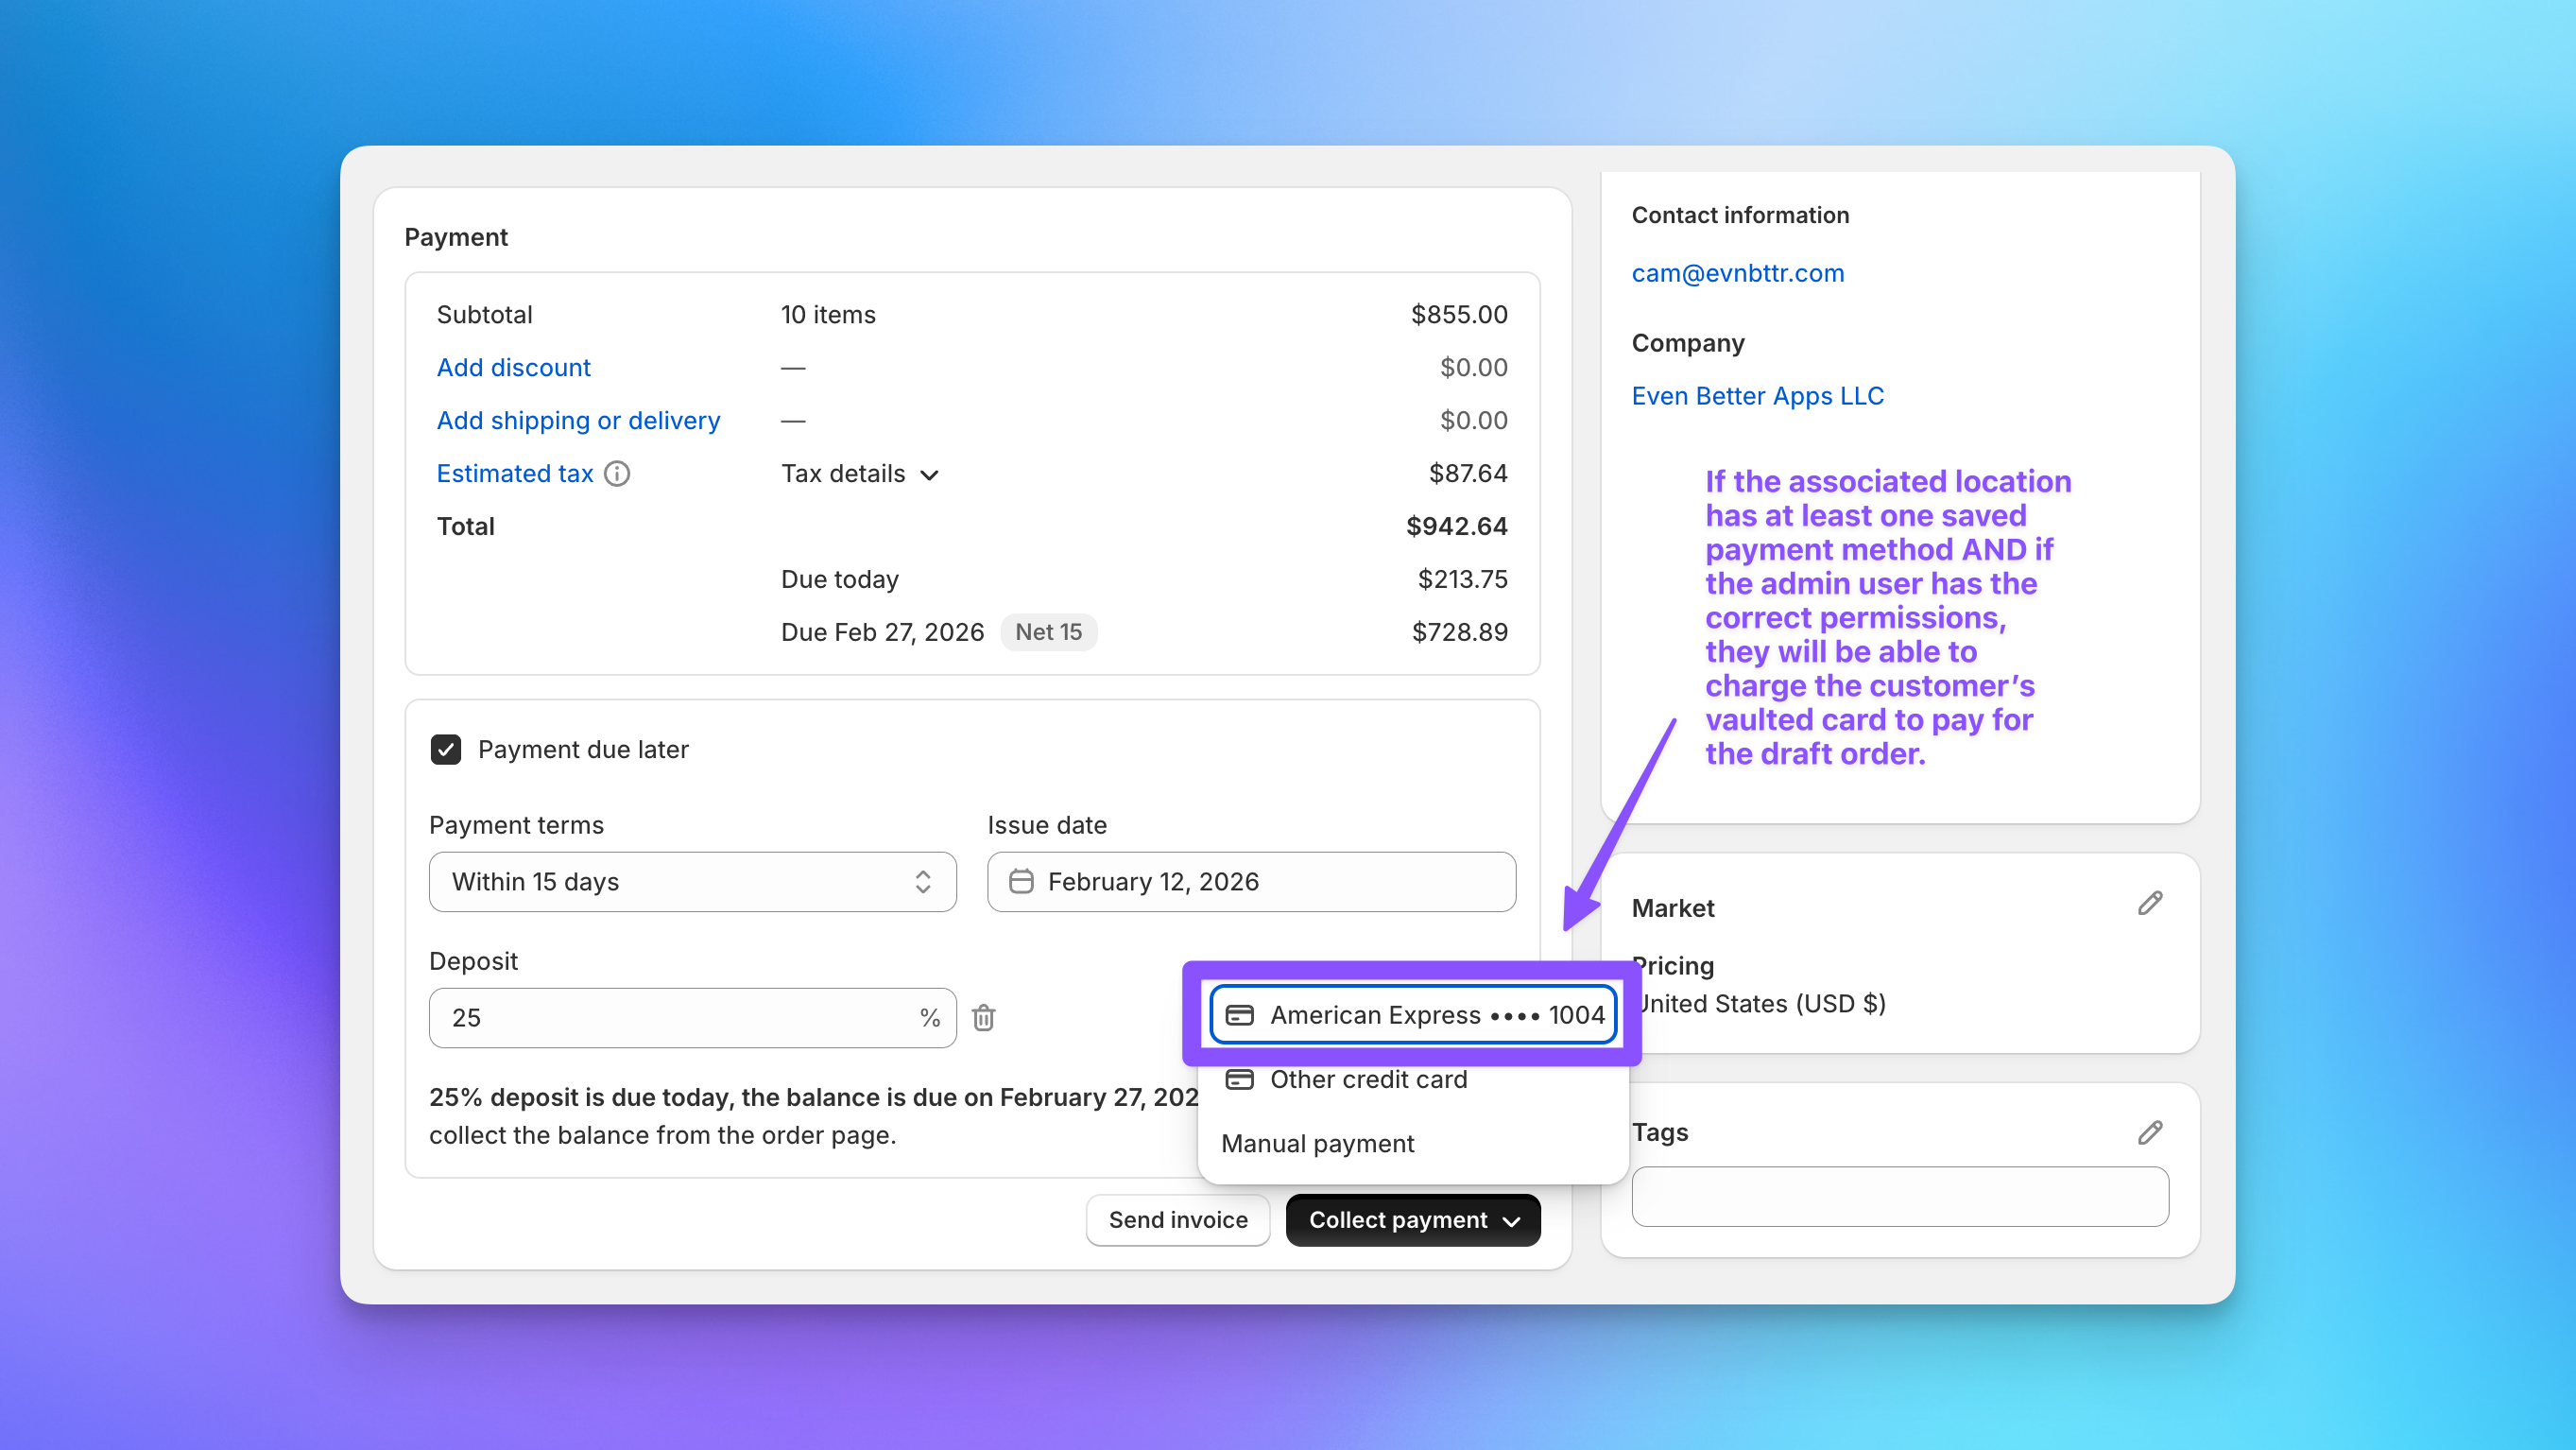
6. Charging a Vaulted Card or Sending an Invoice
If the company location has a saved payment method and the admin has proper permissions, you can charge the vaulted card directly from the draft order.
Alternatively, you can send an invoice email from the draft order page and let the customer pay through checkout.
7. B2B Checkout with Vaulted Cards
Whether the customer receives an invoice email or places an order directly from the storefront while logged into their B2B account, vaulted cards are available at checkout.
At checkout:
- Payment terms are shown.
- Deposit requirements are displayed.
- Previously saved cards tied to the location are available.
- The call-to-action reads "Confirm order" instead of "Pay now".
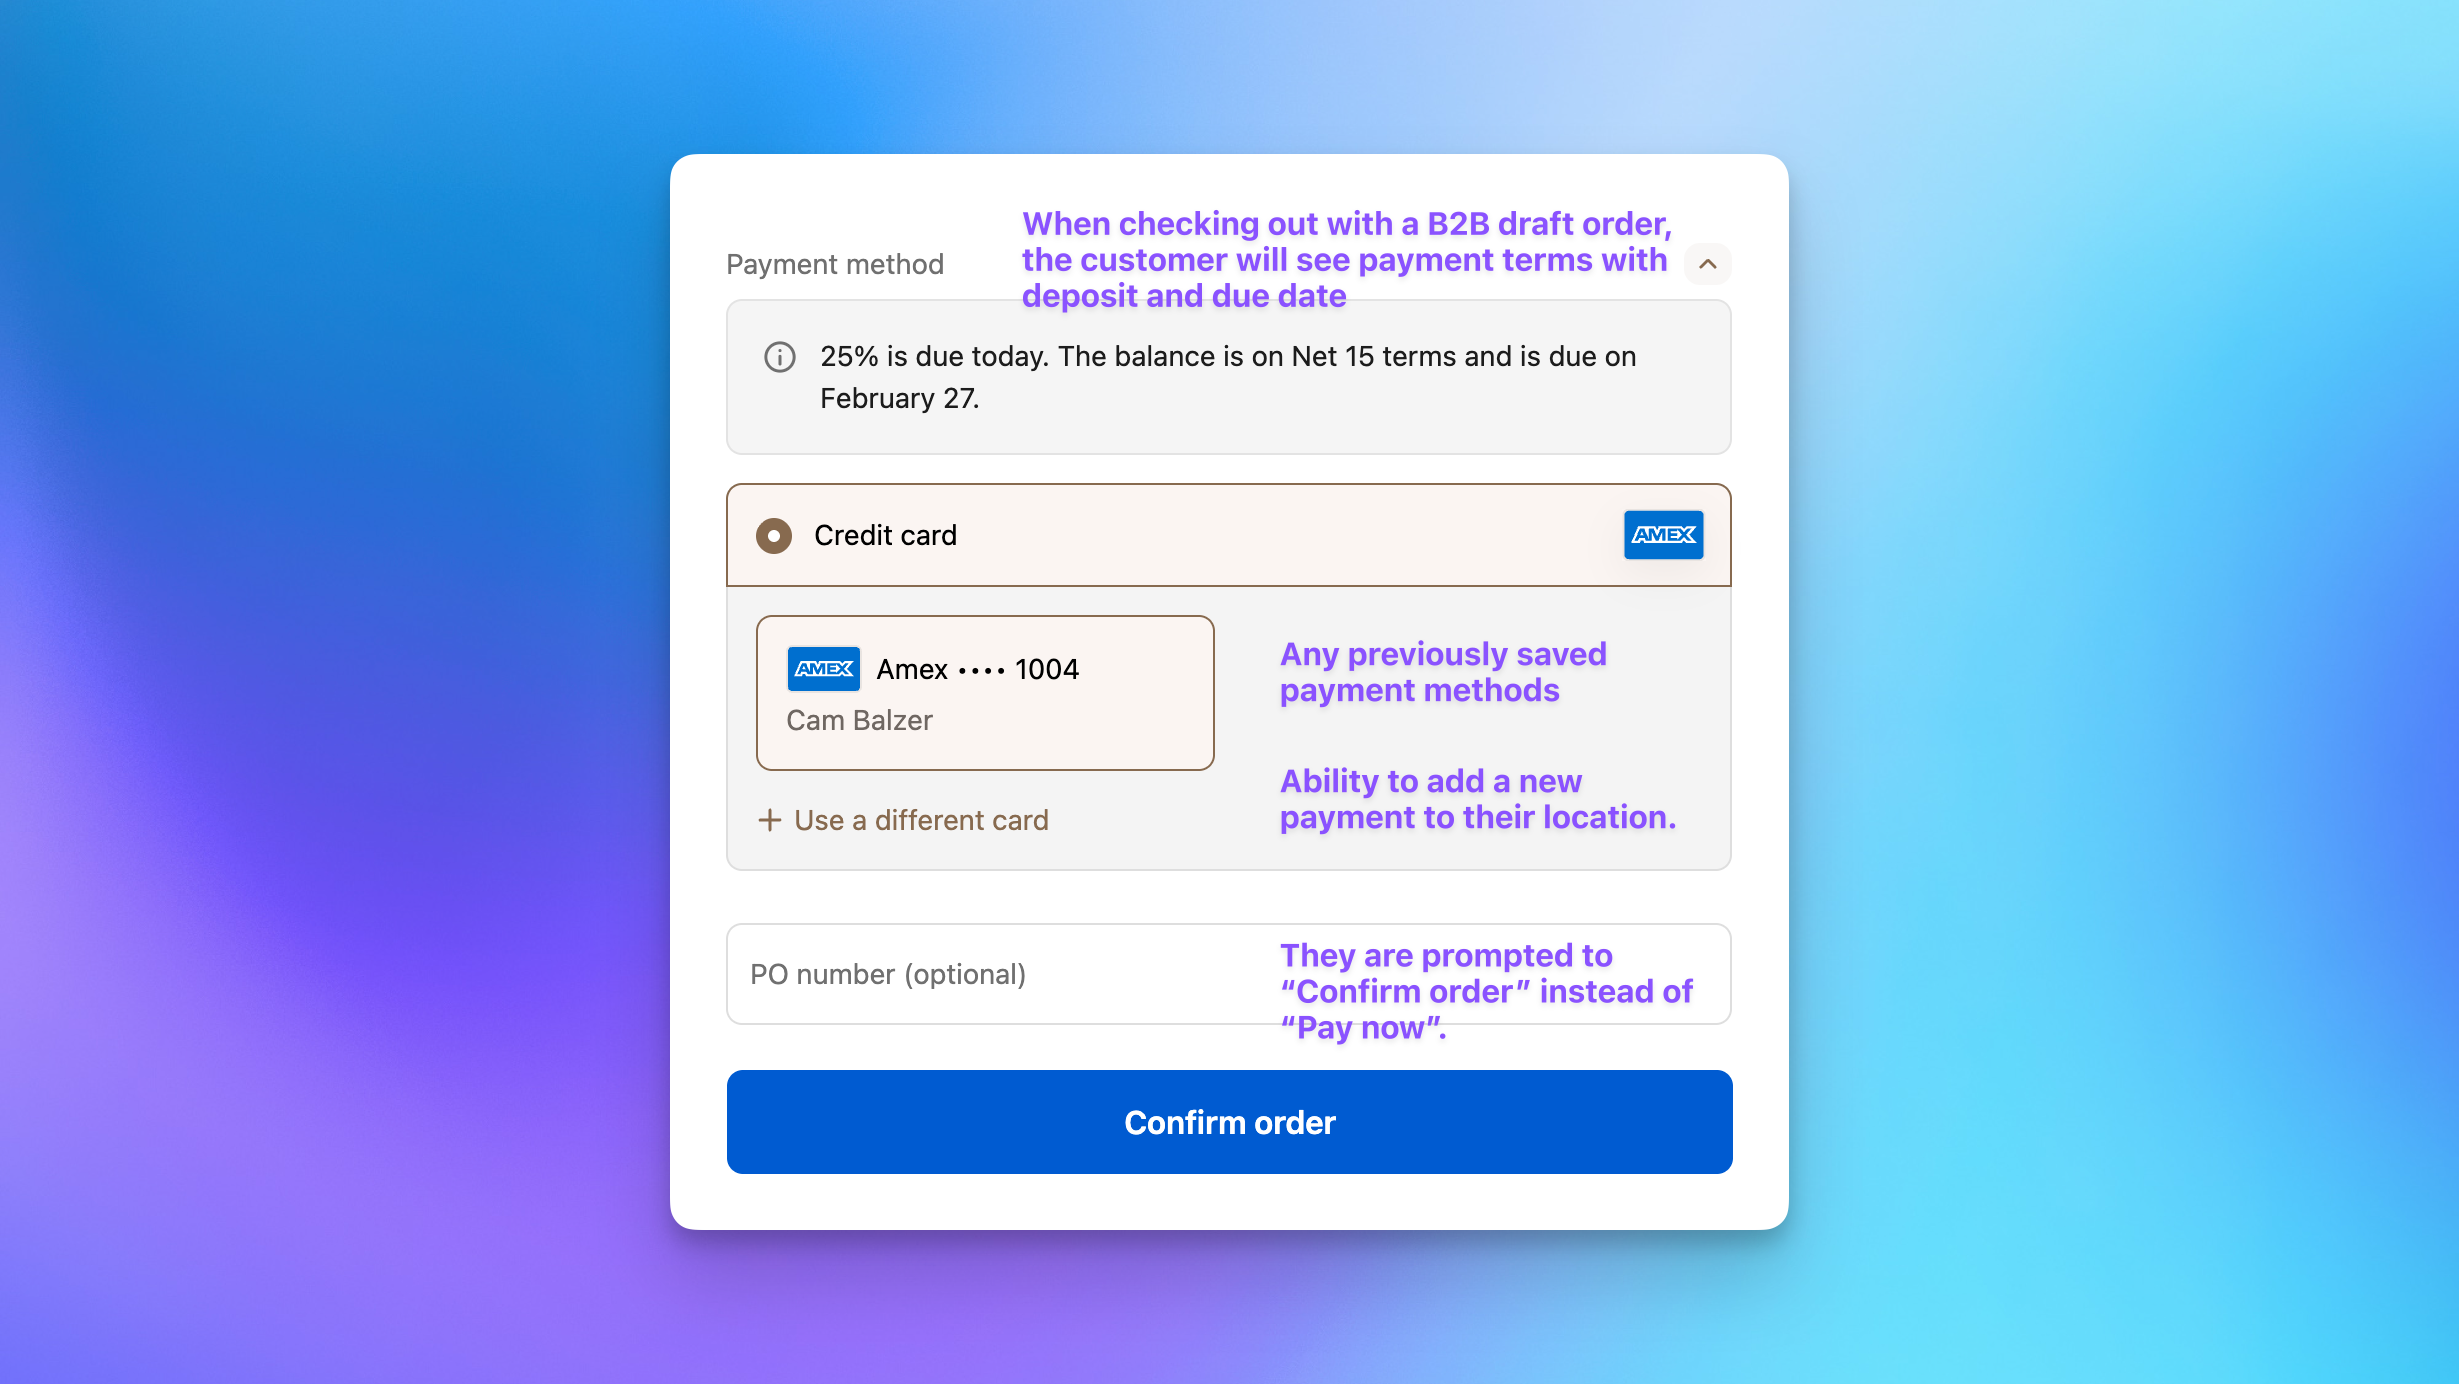
8. Saving a Card During Checkout
If the customer does not already have a saved payment method associated with their location, they can add one during checkout. The card is vaulted and becomes available for future transactions. Other authorized contacts at the same location can use it as well.
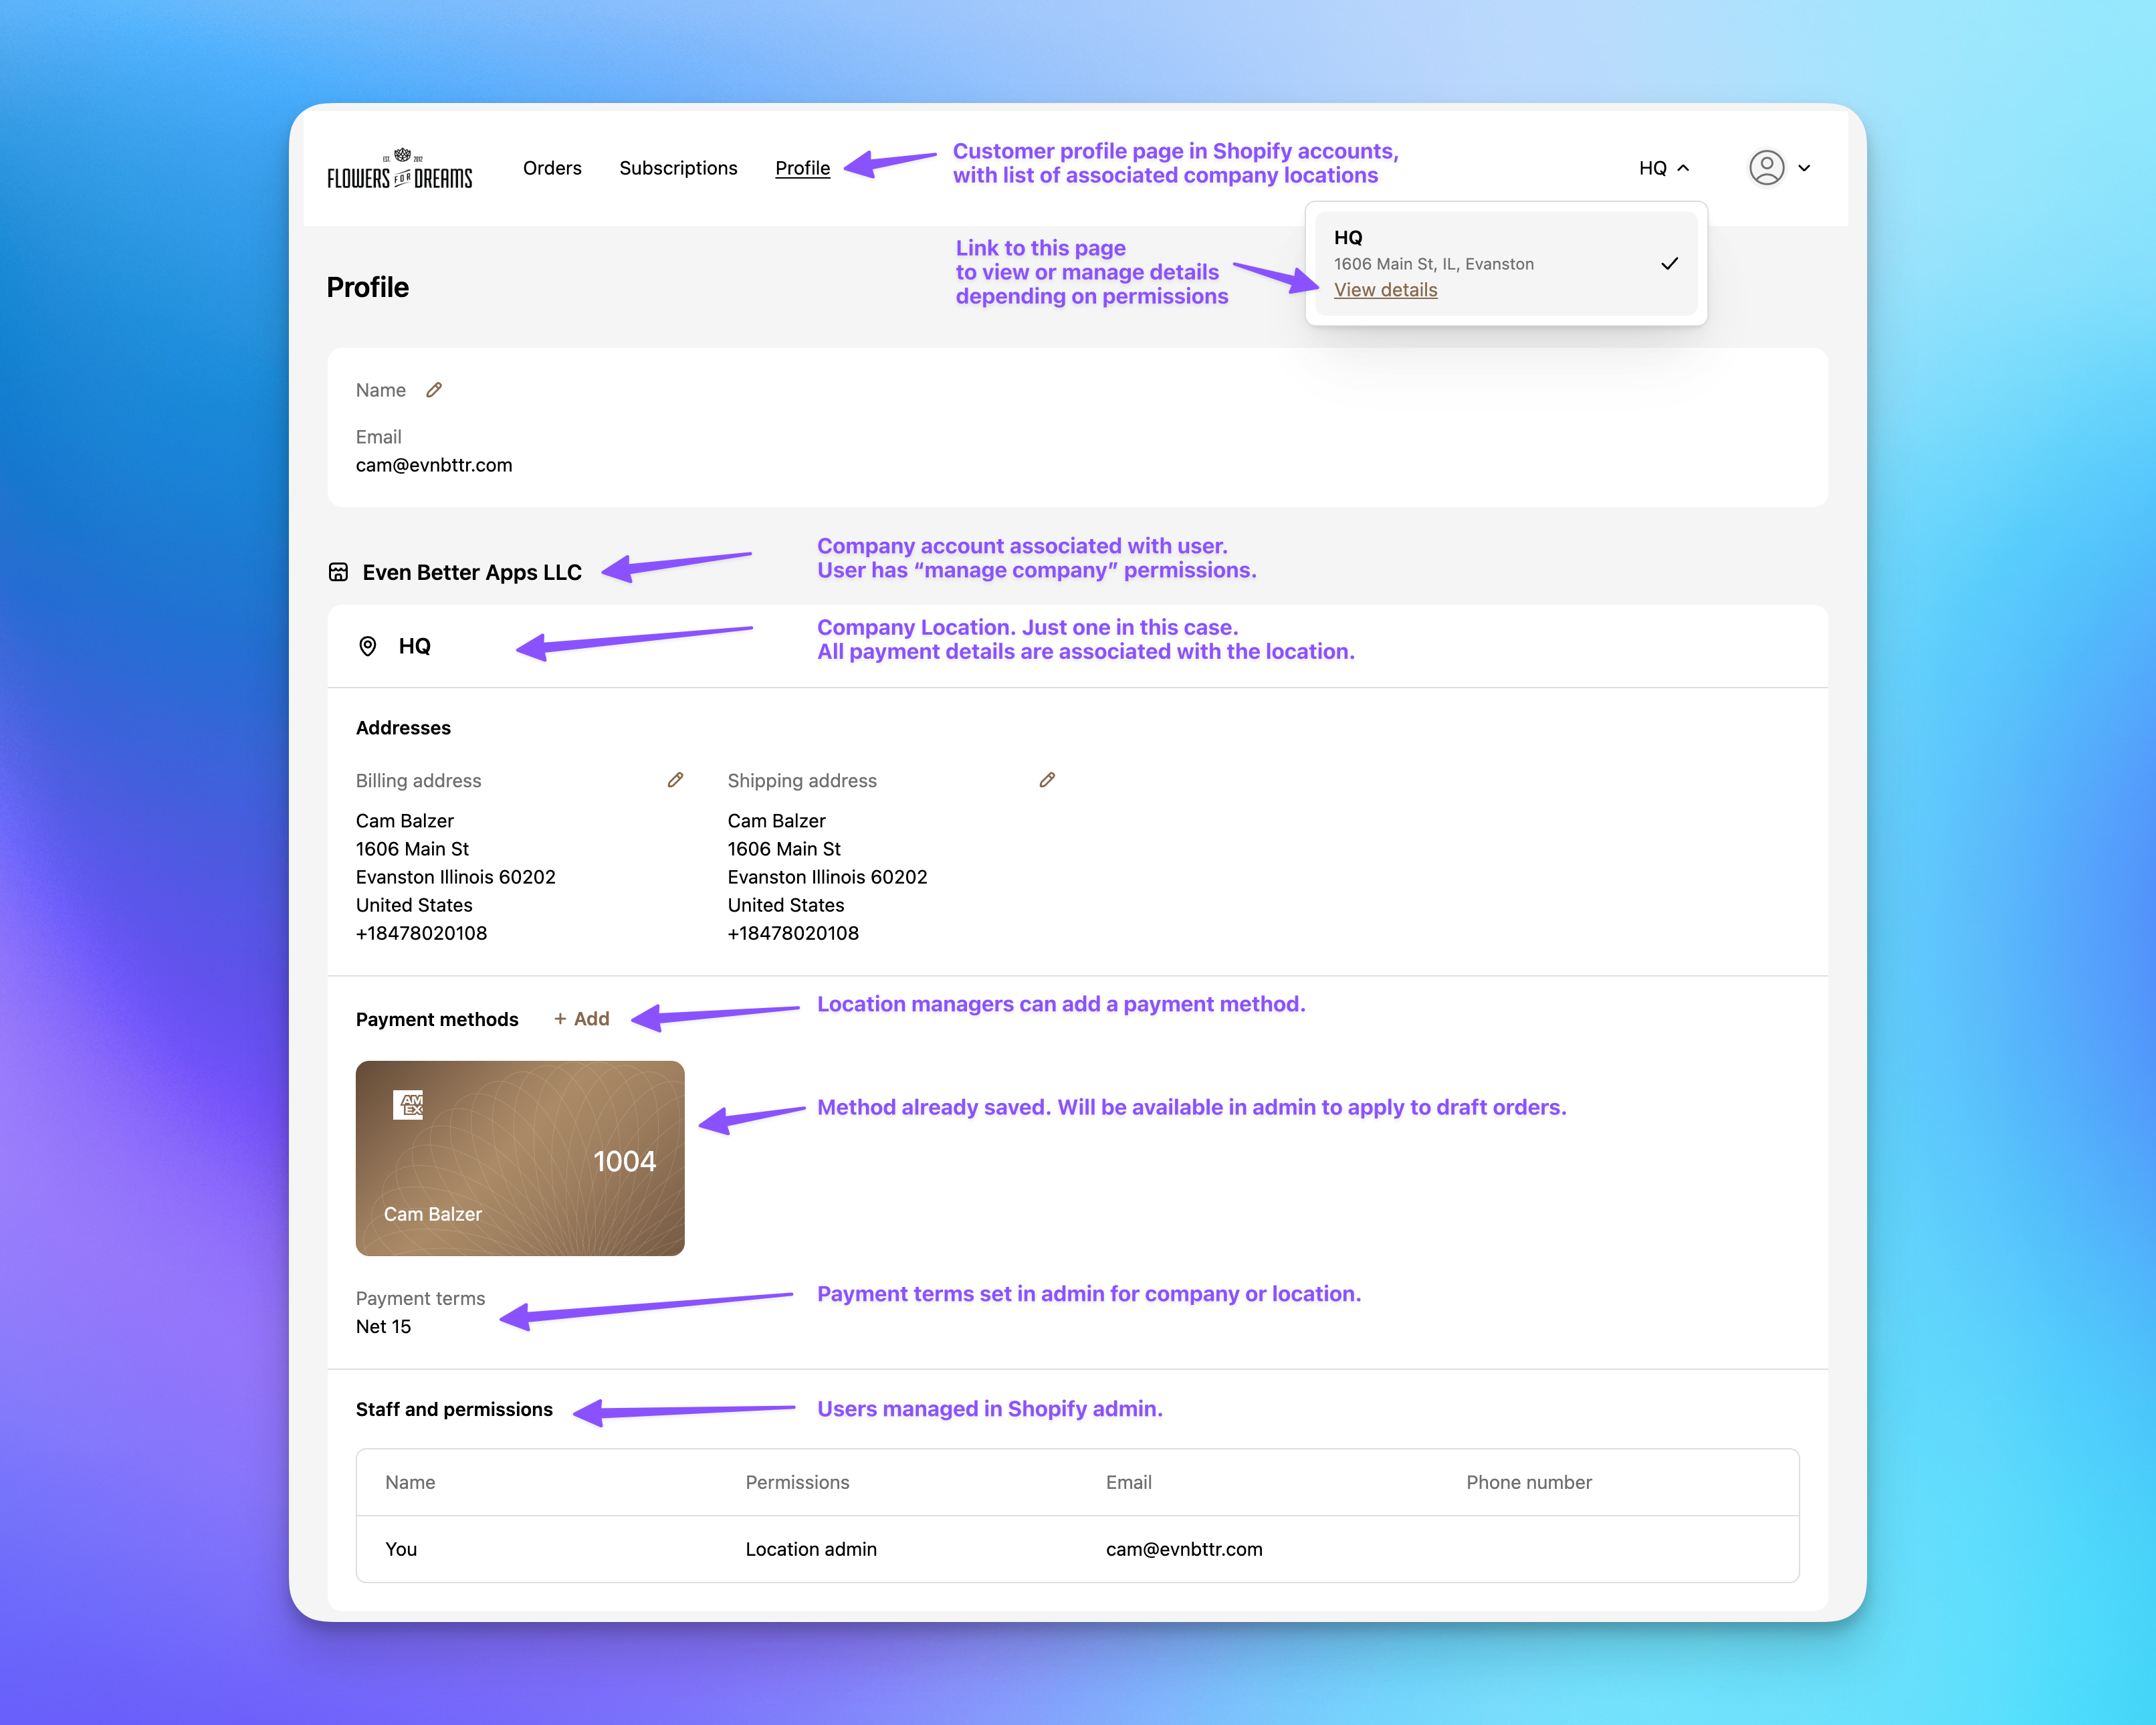
9. Adding a Payment Method from the B2B Account
A customer assigned as a location manager can also add a payment method by logging into their account on your store and navigating to their profile and location details.
Inside the B2B account, the customer can see their company and location, view saved payment methods and add new ones, review payment terms, and check staff permissions. All vaulted payment methods are tied to the location, not the individual user.
Setting Up B2B in Shopify for Vaulted Card Payments
For all of this to work properly, you need to confirm several settings in Shopify. For additional details, see Shopify's documentation on vaulted payment methods and getting started with B2B.
Confirm Company-Level Setup
In Shopify Admin, go to Customers > Companies and select the company. Confirm that the company is approved, at least one location exists, payment terms are defined (for example, Net 15), catalogs are assigned, and customers are associated with the company.
Payment terms and payment methods are applied at the location level.
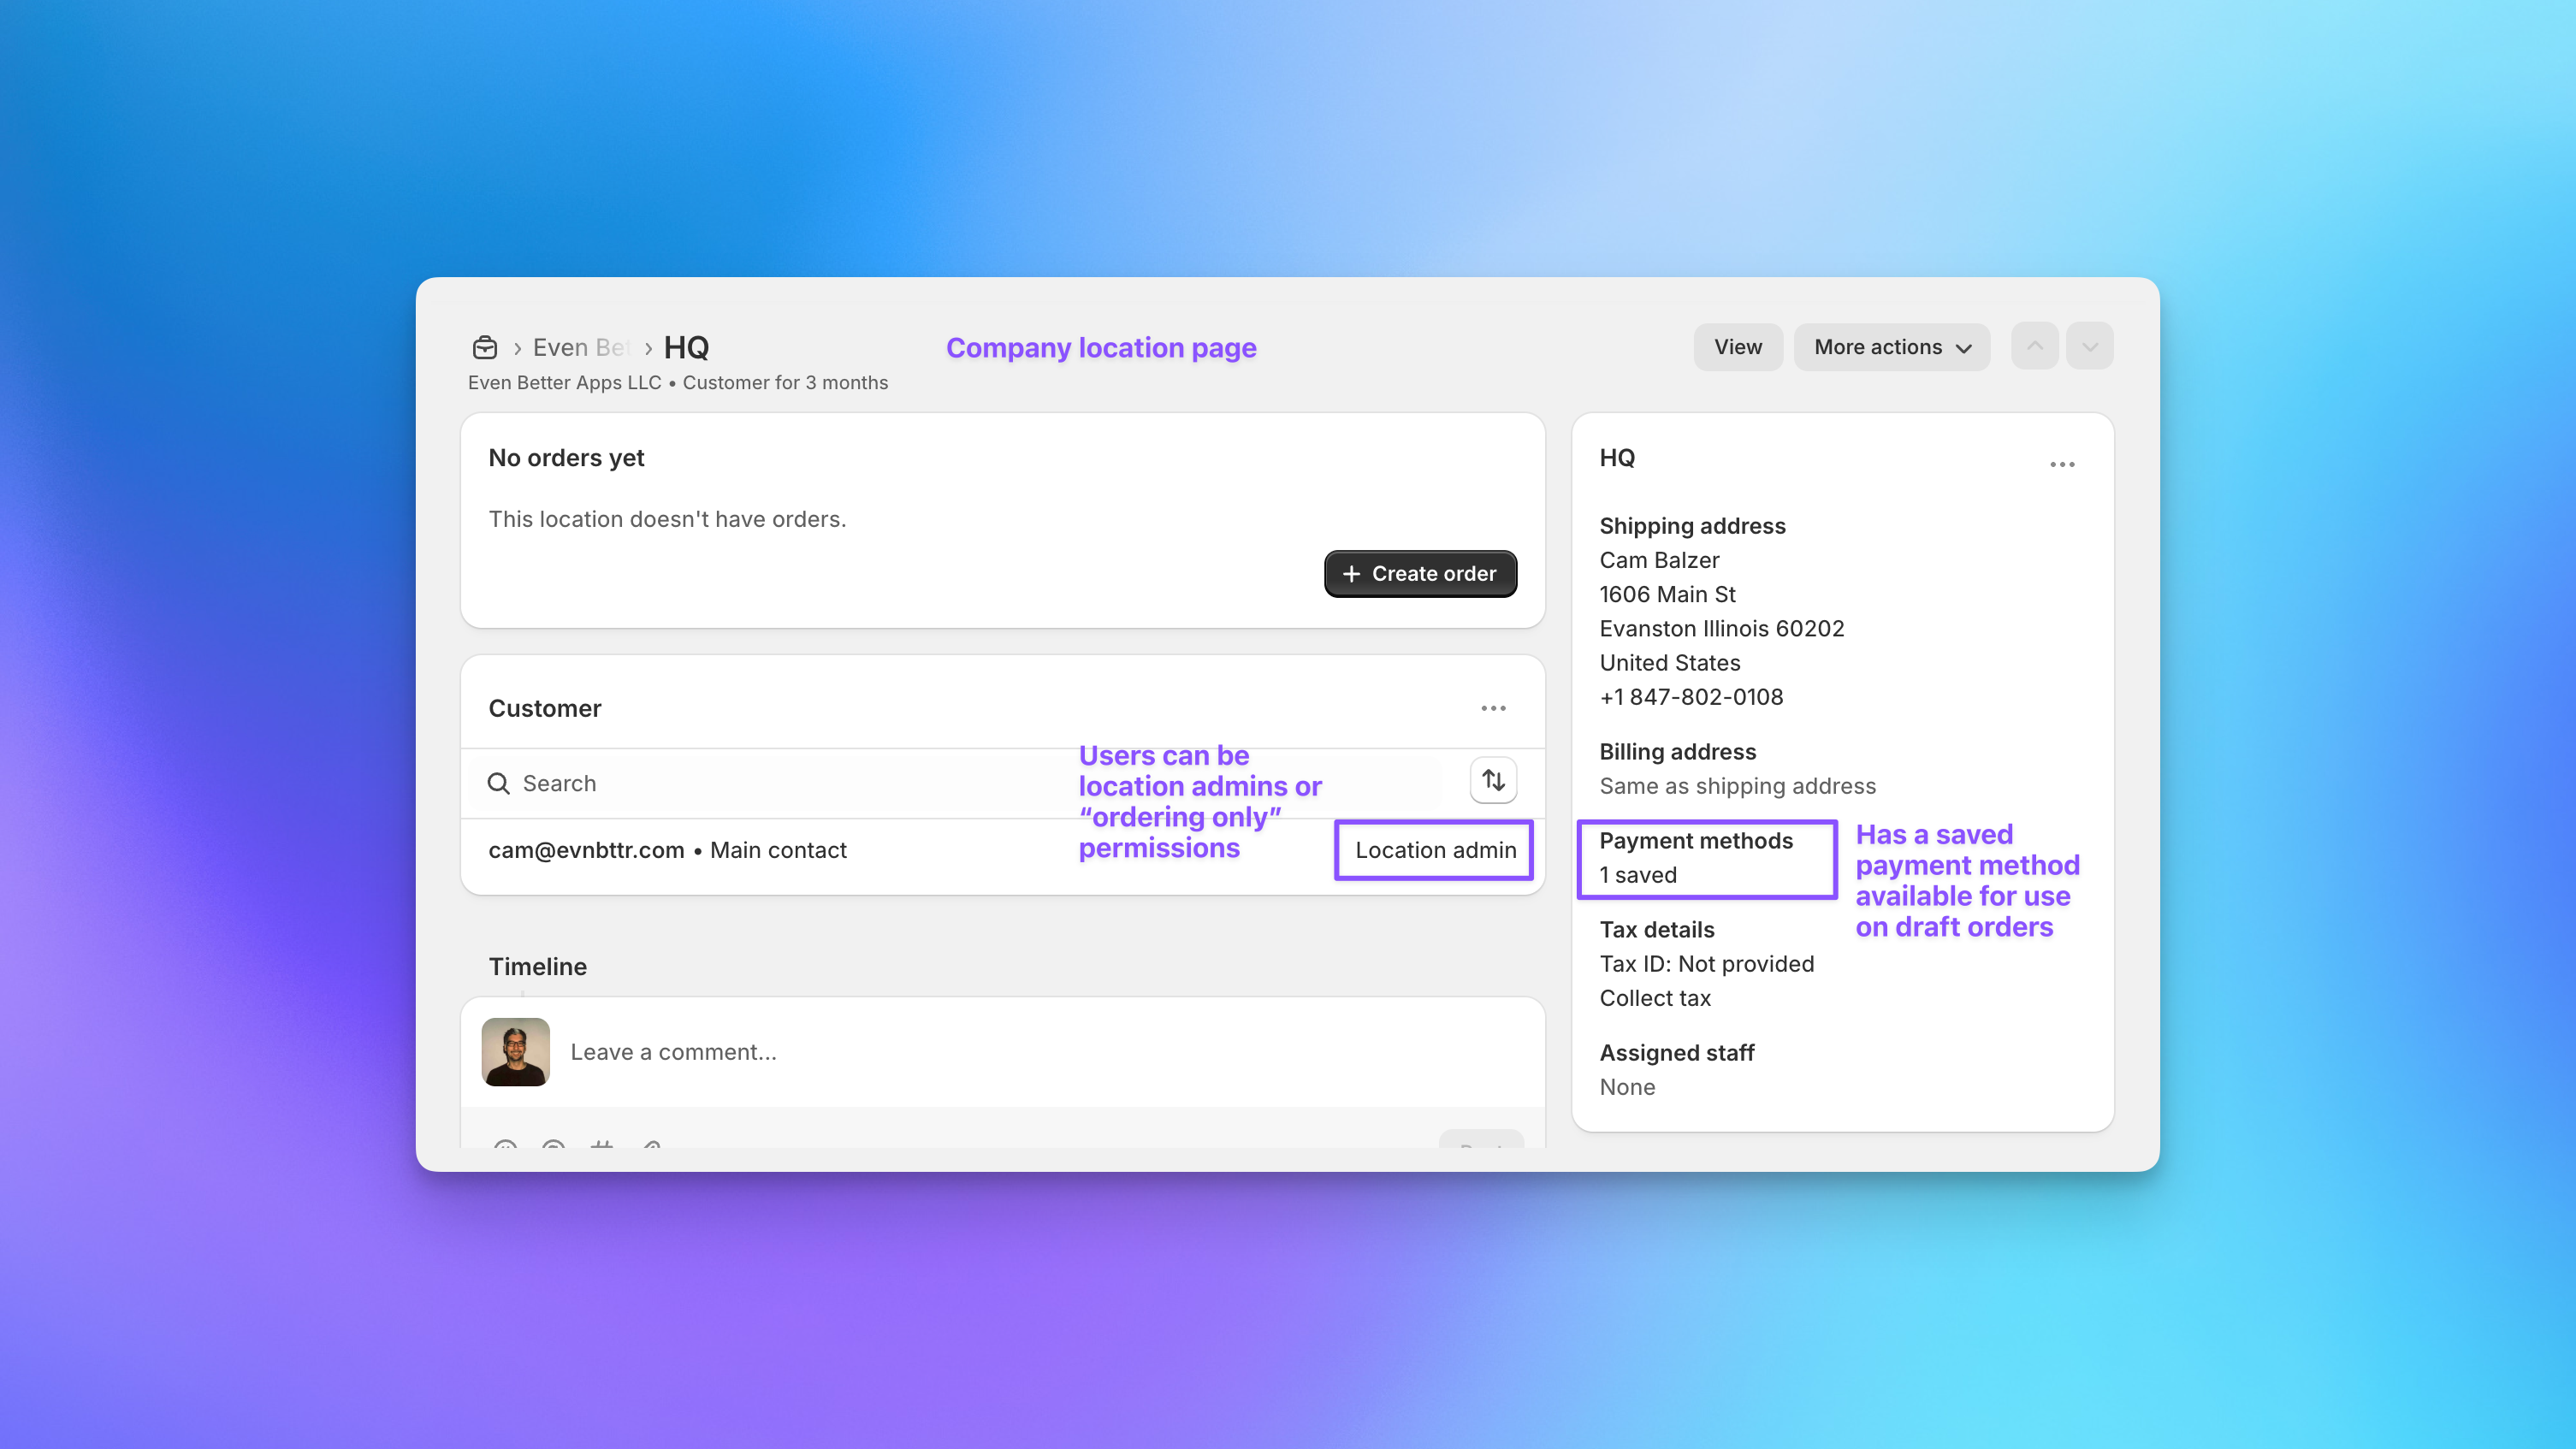
Confirm the Location Has a Saved Payment Method
Click into the location (for example, "HQ"). Verify that payment methods show at least one saved method, billing details are correct, and payment terms are set.
If no payment method is saved, the customer must save one at checkout or add one from their B2B account page.
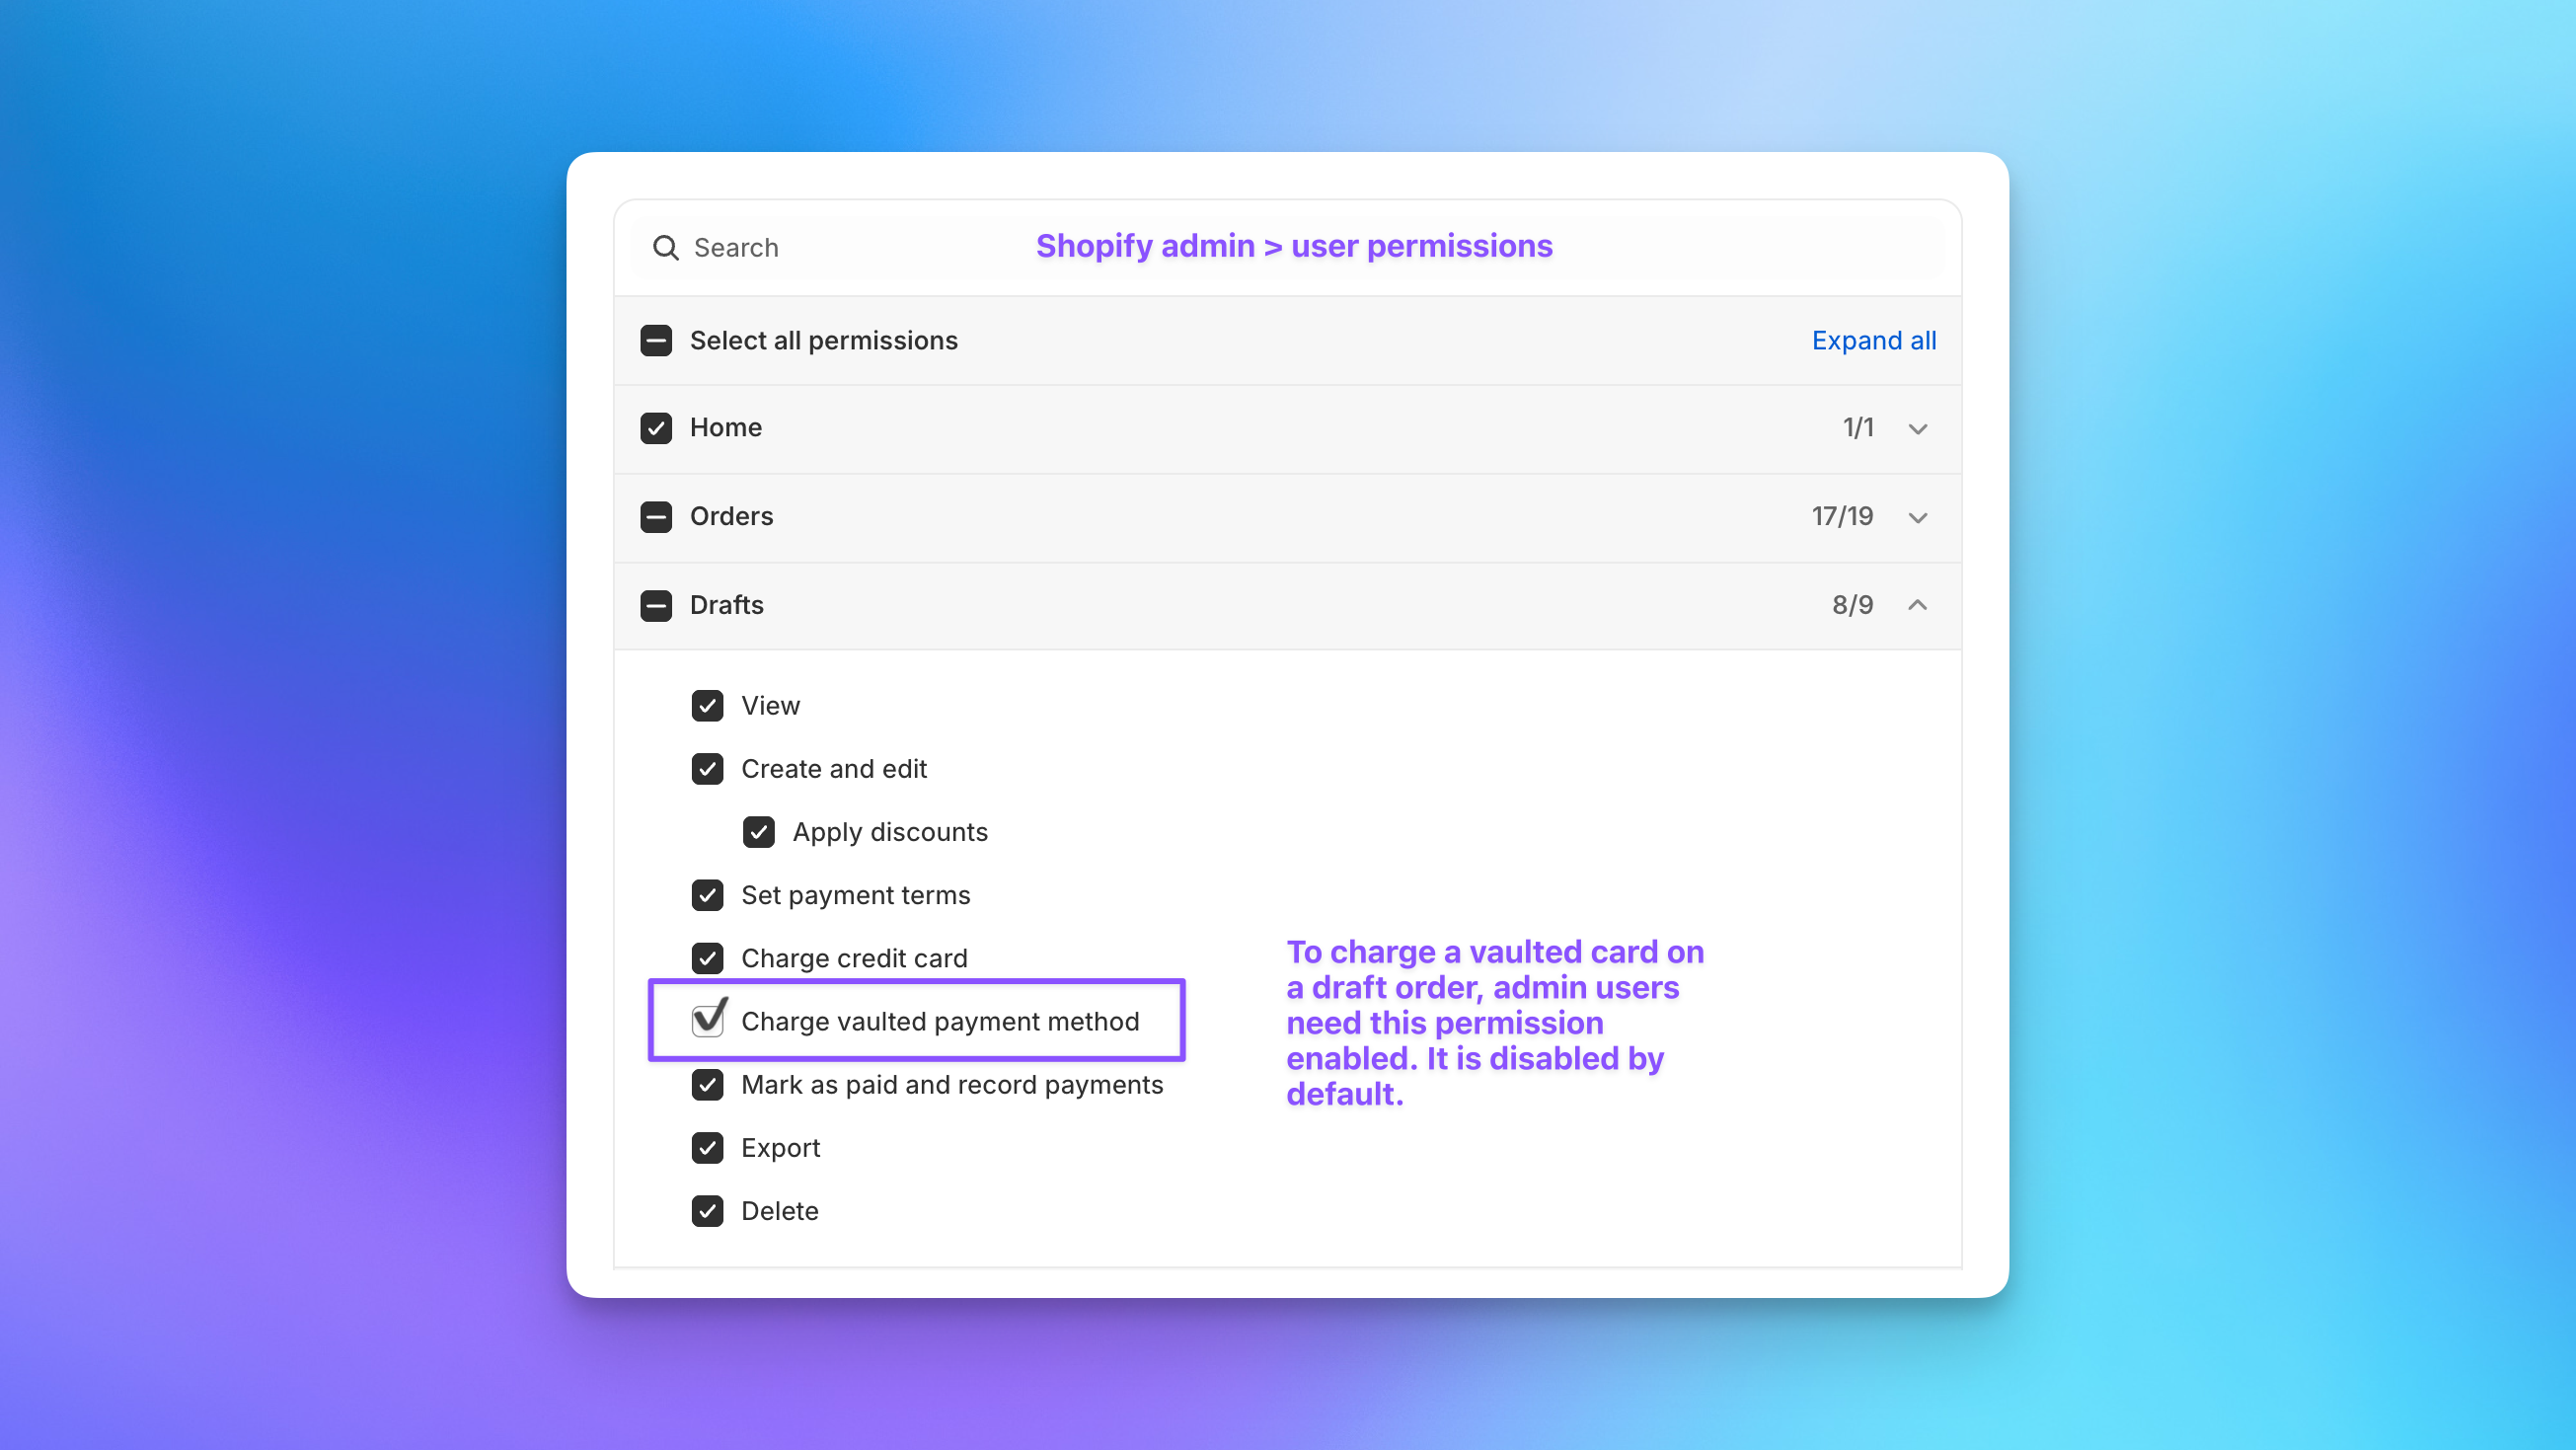
Enable Admin Permission to Charge Vaulted Cards
Even if a payment method exists, admins cannot charge it unless the permission is enabled.
In Shopify Admin, go to Settings > Users and permissions and select the user. Under Draft Orders permissions, enable Charge vaulted payment method.
This permission is disabled by default. Without it, you can see saved cards but cannot charge them on draft orders. With it enabled, you can collect deposits, charge balances later, and apply payment directly to aggregate invoices.
Confirm Customer Location Permissions
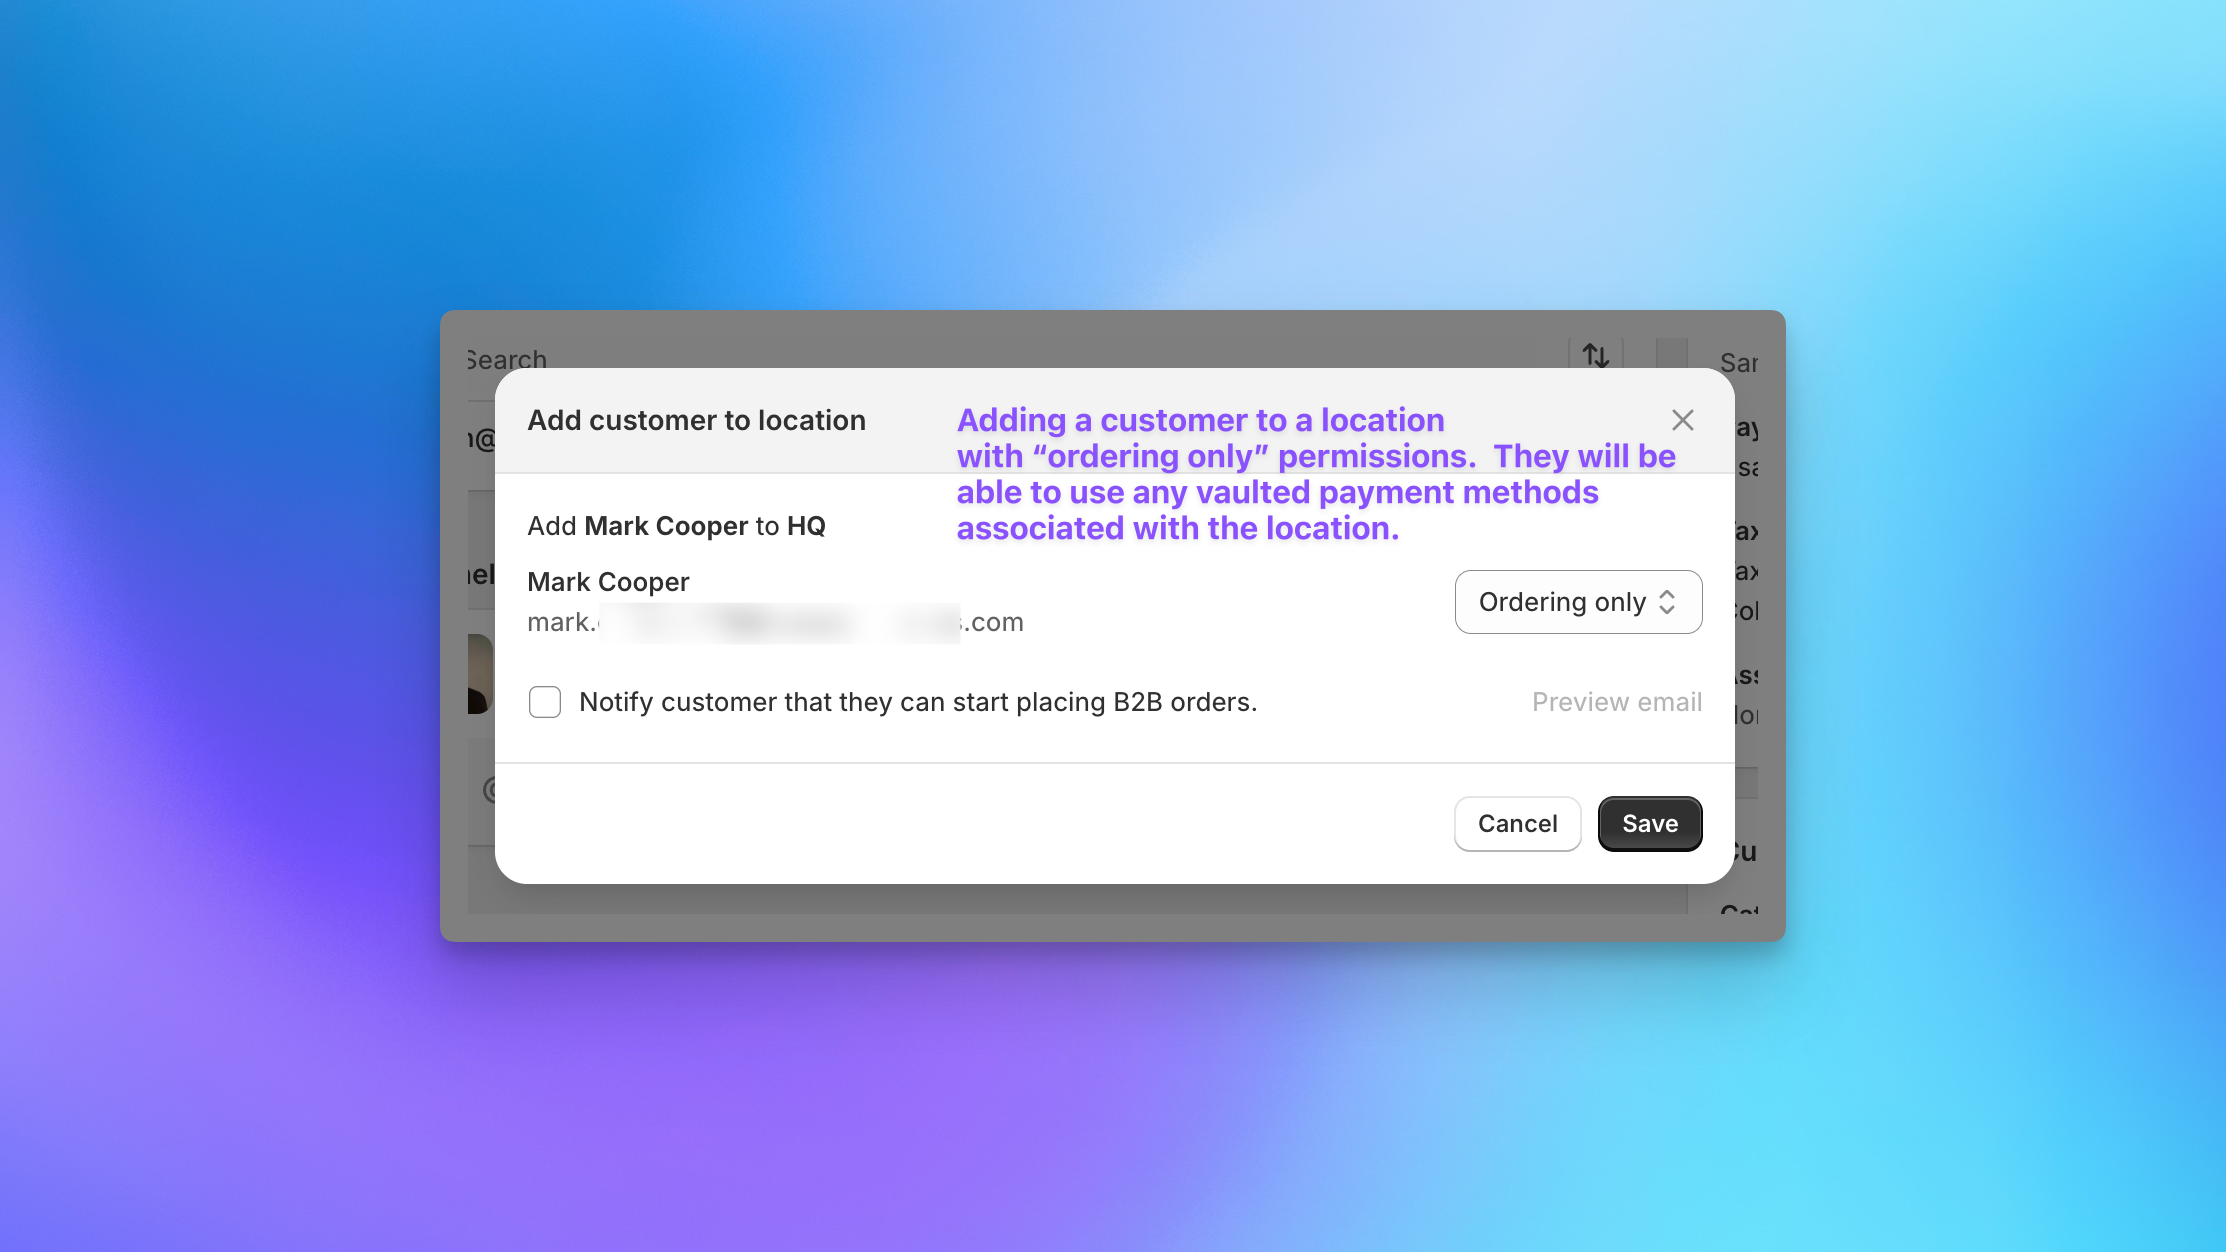
Vaulted cards are available to contacts assigned to the location. On the location page, confirm the customer contact is assigned with the appropriate role.
Location Admin contacts can manage payment methods, update addresses, manage users, and place B2B orders. Ordering Only contacts can place B2B orders and use any vaulted payment method tied to the location, but cannot manage company settings.
Any contact assigned to the location can use the saved payment methods at checkout.
B2B Invoices, Vaulted Cards, and Send To Many
For Send To Many aggregate draft invoices, the workflow is:
- A Send is associated with a company location.
- Shopify generates a draft order under that location.
- Payment terms and deposit rules apply.
- If a vaulted card exists, the admin can charge it (with permission enabled) or the customer can use it at checkout.
- Charges are processed via Shopify Payments under the company location.
Vaulted Card Requirements Checklist
Before charging a B2B draft invoice, confirm all of the following:
- Company exists in Shopify B2B.
- Location exists under the company.
- Customer is assigned to the location.
- Payment terms are configured.
- A payment method is saved at the location.
- Admin has "Charge vaulted payment method" permission enabled.
- Draft order is tied to the correct location.
If all requirements are met, you can either charge the vaulted card directly to collect payment and complete the draft order, or send the invoice to the customer and allow them to use their vaulted payment method at checkout with or without additional payment terms.
Related
For invoicing and payment basics, see Invoicing and Payment Collection.
For an overview of B2B features, see Using Shopify B2B for Corporate Gifting.
For deposits and split payment approaches, see Deposits and Split Payments.