Bulk Order Spreadsheet Format: CSV & Excel Template for Shopify
Format your CSV or Excel file for multi-recipient order imports. Column mapping for names, addresses, products, quantities, gift messages, and shipping methods.
Send To Many takes the hassle out of bulk order uploading in Shopify, starting with very flexible spreadsheet formatting. In most cases, you should be able to use your existing order spreadsheet without making changes — so go ahead and create a Send and give your file a try.
But if you have a more complex upload or are just curious, here's what you can expect from the upload experience:
- Flexible column names: No need to rename or reformat your spreadsheet columns. Name them however you like — you'll map them to the required fields directly in the app during upload.
- Automatic validation: We automatically validate recipient details and addresses, fixing or alerting you to the most common issues.
- Product selection: Products can be specified in your spreadsheet or selected later in the app. You can include multiple products, variants, and quantities per recipient.
- Additional order information: Need to attach extra details to your orders? Add them as additional columns and map them to Additional Details, the Order Note, or Tags during upload.
- Saved upload formats: After you've mapped your columns once, we save your upload format so you won't need to remap next time. Learn more about saved Import Formats.
File formats and size
Google Sheets, Excel (.xls, .xlsx), CSV, Numbers, and a few more esoteric formats will all work. If your file includes a large header block above the actual data, we'll do our best to skip it and find the order table.
When uploading from Google Sheets:
- Set sharing to "Anyone with the link can view" so the app can access it. You can re-secure the file once it's been uploaded.
- Copy the full URL of the specific tab you want to upload.
- If you run into any odd issues with Sheets, downloading the specific tab as a CSV and uploading that file instead will usually fix it.
There's no hard limit on the number of rows in your spreadsheet. However, uploads with more than 1,000 rows can be a bit slower to manage in the app — particularly during the address validation and draft order calculation steps.
Recipient information
A recipient name is required — either as a single "Name" column or separated into first and last name columns.
Recommended (but not required):
- Include the recipient's email and phone number for easy follow-up if needed.
- You can also add a company name column.
Address columns
Separate addresses into clear columns, naming them whatever is most convenient:
- Street address (Address 1)
- Apartment, suite, unit, etc. (Address 2)
- City
- Province / State
- Postal code / ZIP
- Country
Country is only required if you're sending internationally. Otherwise, we default to your store's home country.
Excel sometimes coerces phone numbers into scientific notation and strips leading zeros from ZIP codes. That can save unusable values even when they look correct in Excel, and even when you export to CSV. Use the Format as Text option on any column that contains ZIP codes or phone numbers before saving your file.
You don't need to reformat date columns. We detect Excel date serial numbers on import and convert them to Shopify's default date format (YYYY-MM-DD). If you need dates to appear on your orders in a different format, format that column as Text in Excel and type the dates exactly as you want them to appear.
Product columns
If all recipients are getting the same product, you can skip including it in your spreadsheet and select it in Step 2 of the upload wizard instead. Otherwise, add one or more product columns to your file. Product columns are the primary way to assign different products to different recipients. If an assignment needs to change after upload, you can also update an individual recipient's products on the Review and Finalize steps.
During upload, we'll match your product data to the products in your Shopify catalog and let you confirm or refine the selections as needed.
-
Product identification: You can use a SKU, product name, nickname, or even the Shopify Product or Variant ID (e.g.,
7841427193900). You can even use shortcuts like "product 1" — either way, you'll confirm and finalize the selections during upload. -
Multiple products: Include one column per product if you're sending multiple products per recipient.
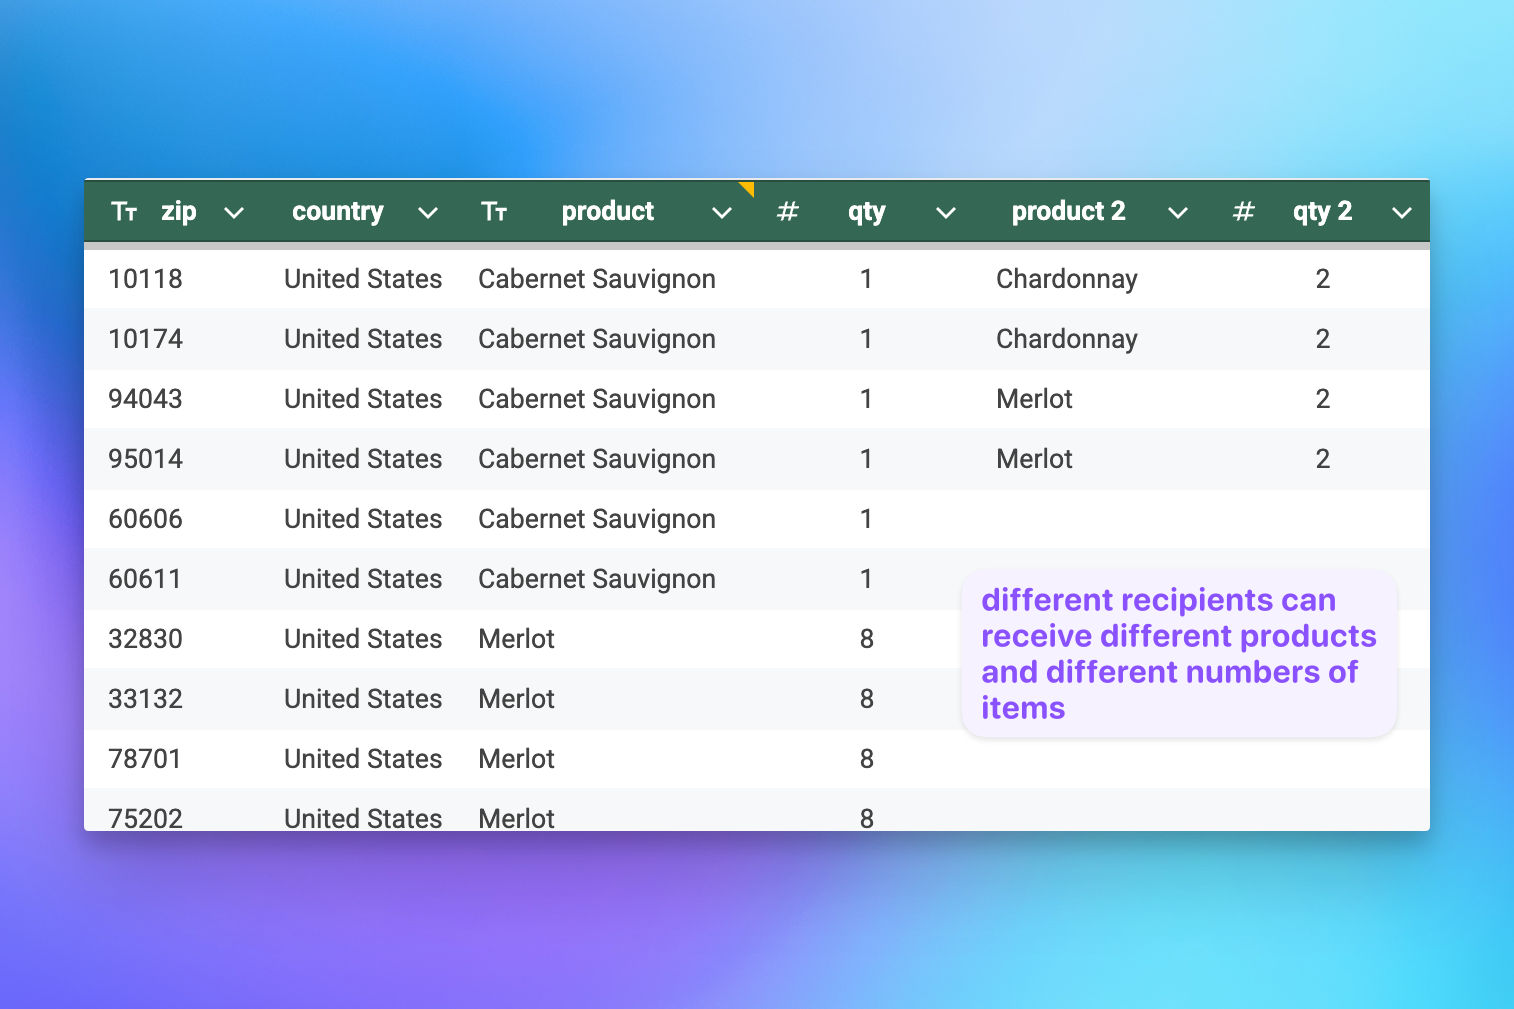
- Separate product and variant columns: Sometimes it's convenient to include both a product column and a separate variant column for size, color, etc. If some products in the upload don't have a variant, just leave the variant column blank for those rows.
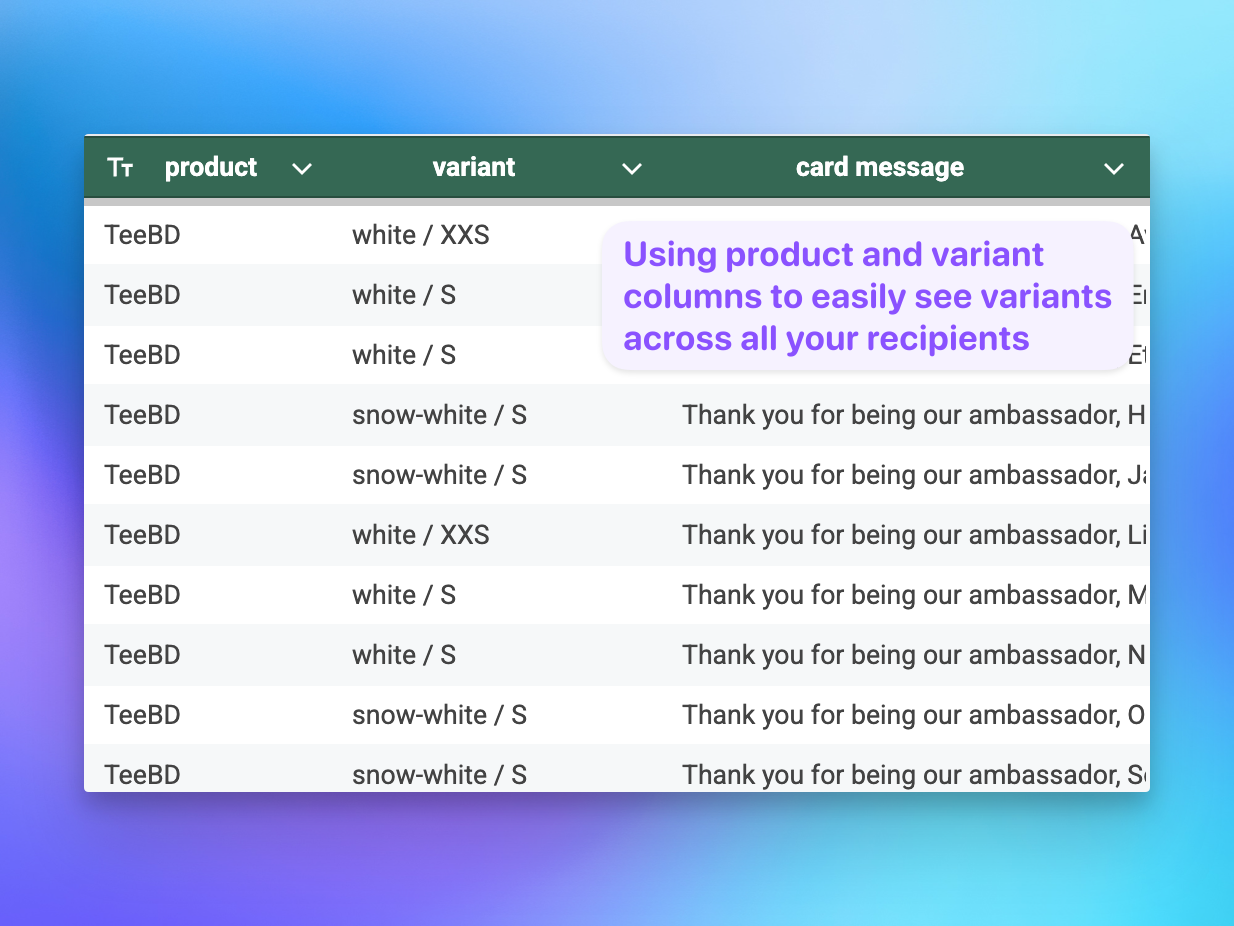
You can include multiple pairs of Product + Variant columns, but keep each pair together in the spreadsheet. If you include one Variant column, every Product column must have a corresponding Variant column — even if it's left blank for products that don't need one.
- Quantities: If you're sending more than one unit of a product to some recipients, include a quantity column next to the corresponding product column. During column mapping, map it as a Quantity field and pair it with the right product column. If no quantity column is provided, we default to 1 unit per product per recipient.
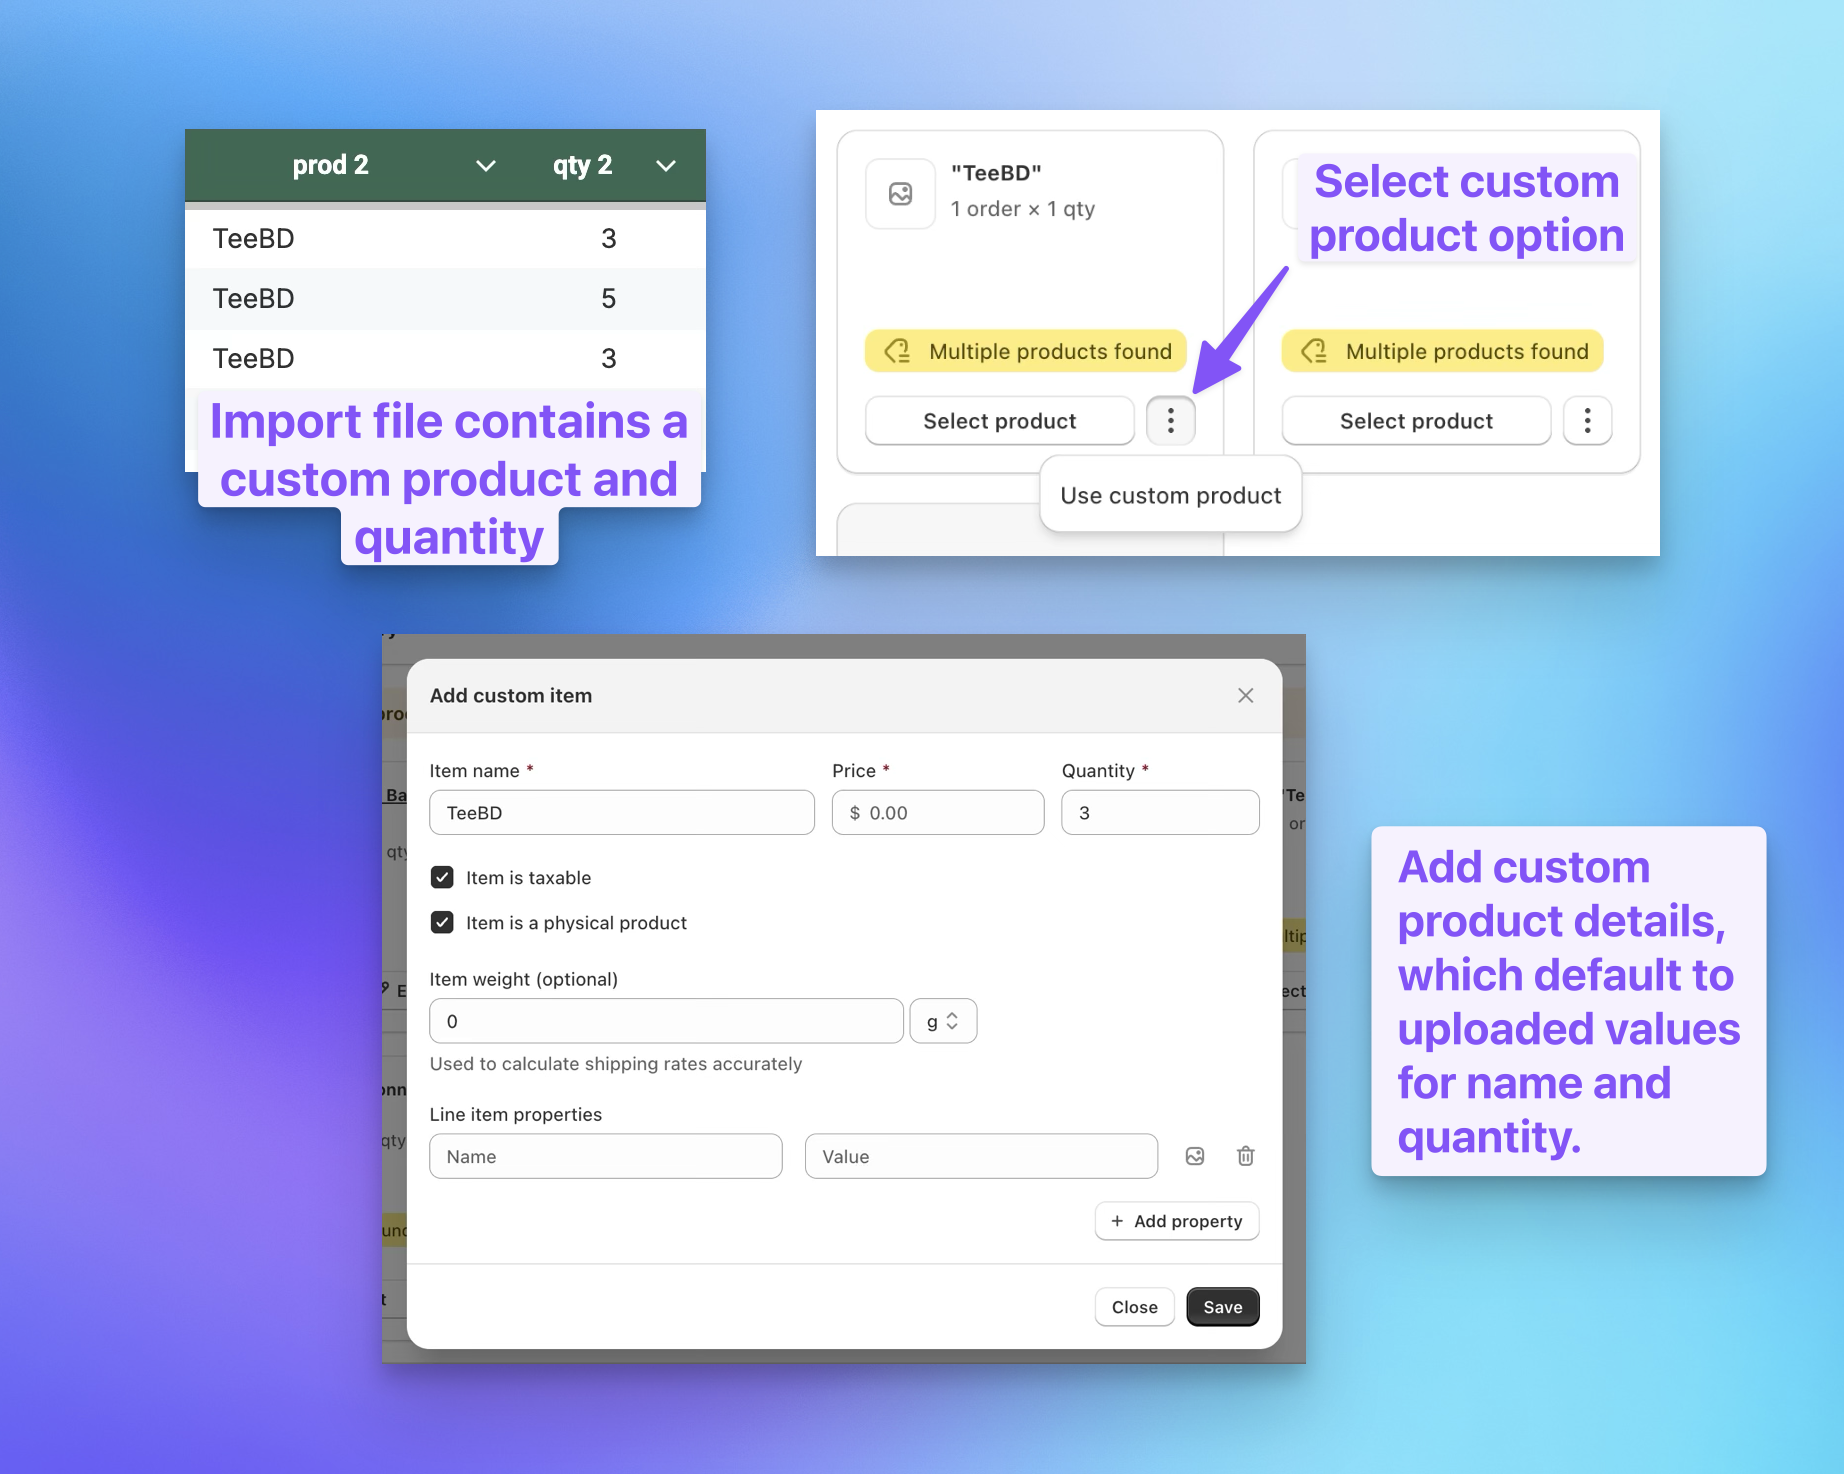
Using a custom product: If an item on your list isn't in your Shopify catalog, you don't need to create a product for it first. On the product match card in Step 2, open the menu next to Select product and choose Use custom product. We pre-fill the custom item's name and quantity from your uploaded file, and you can set the price, weight, taxability, and any line item properties before saving. You can also switch a row that's already matched to a catalog product over to a custom product when that's a better fit.
Additional columns
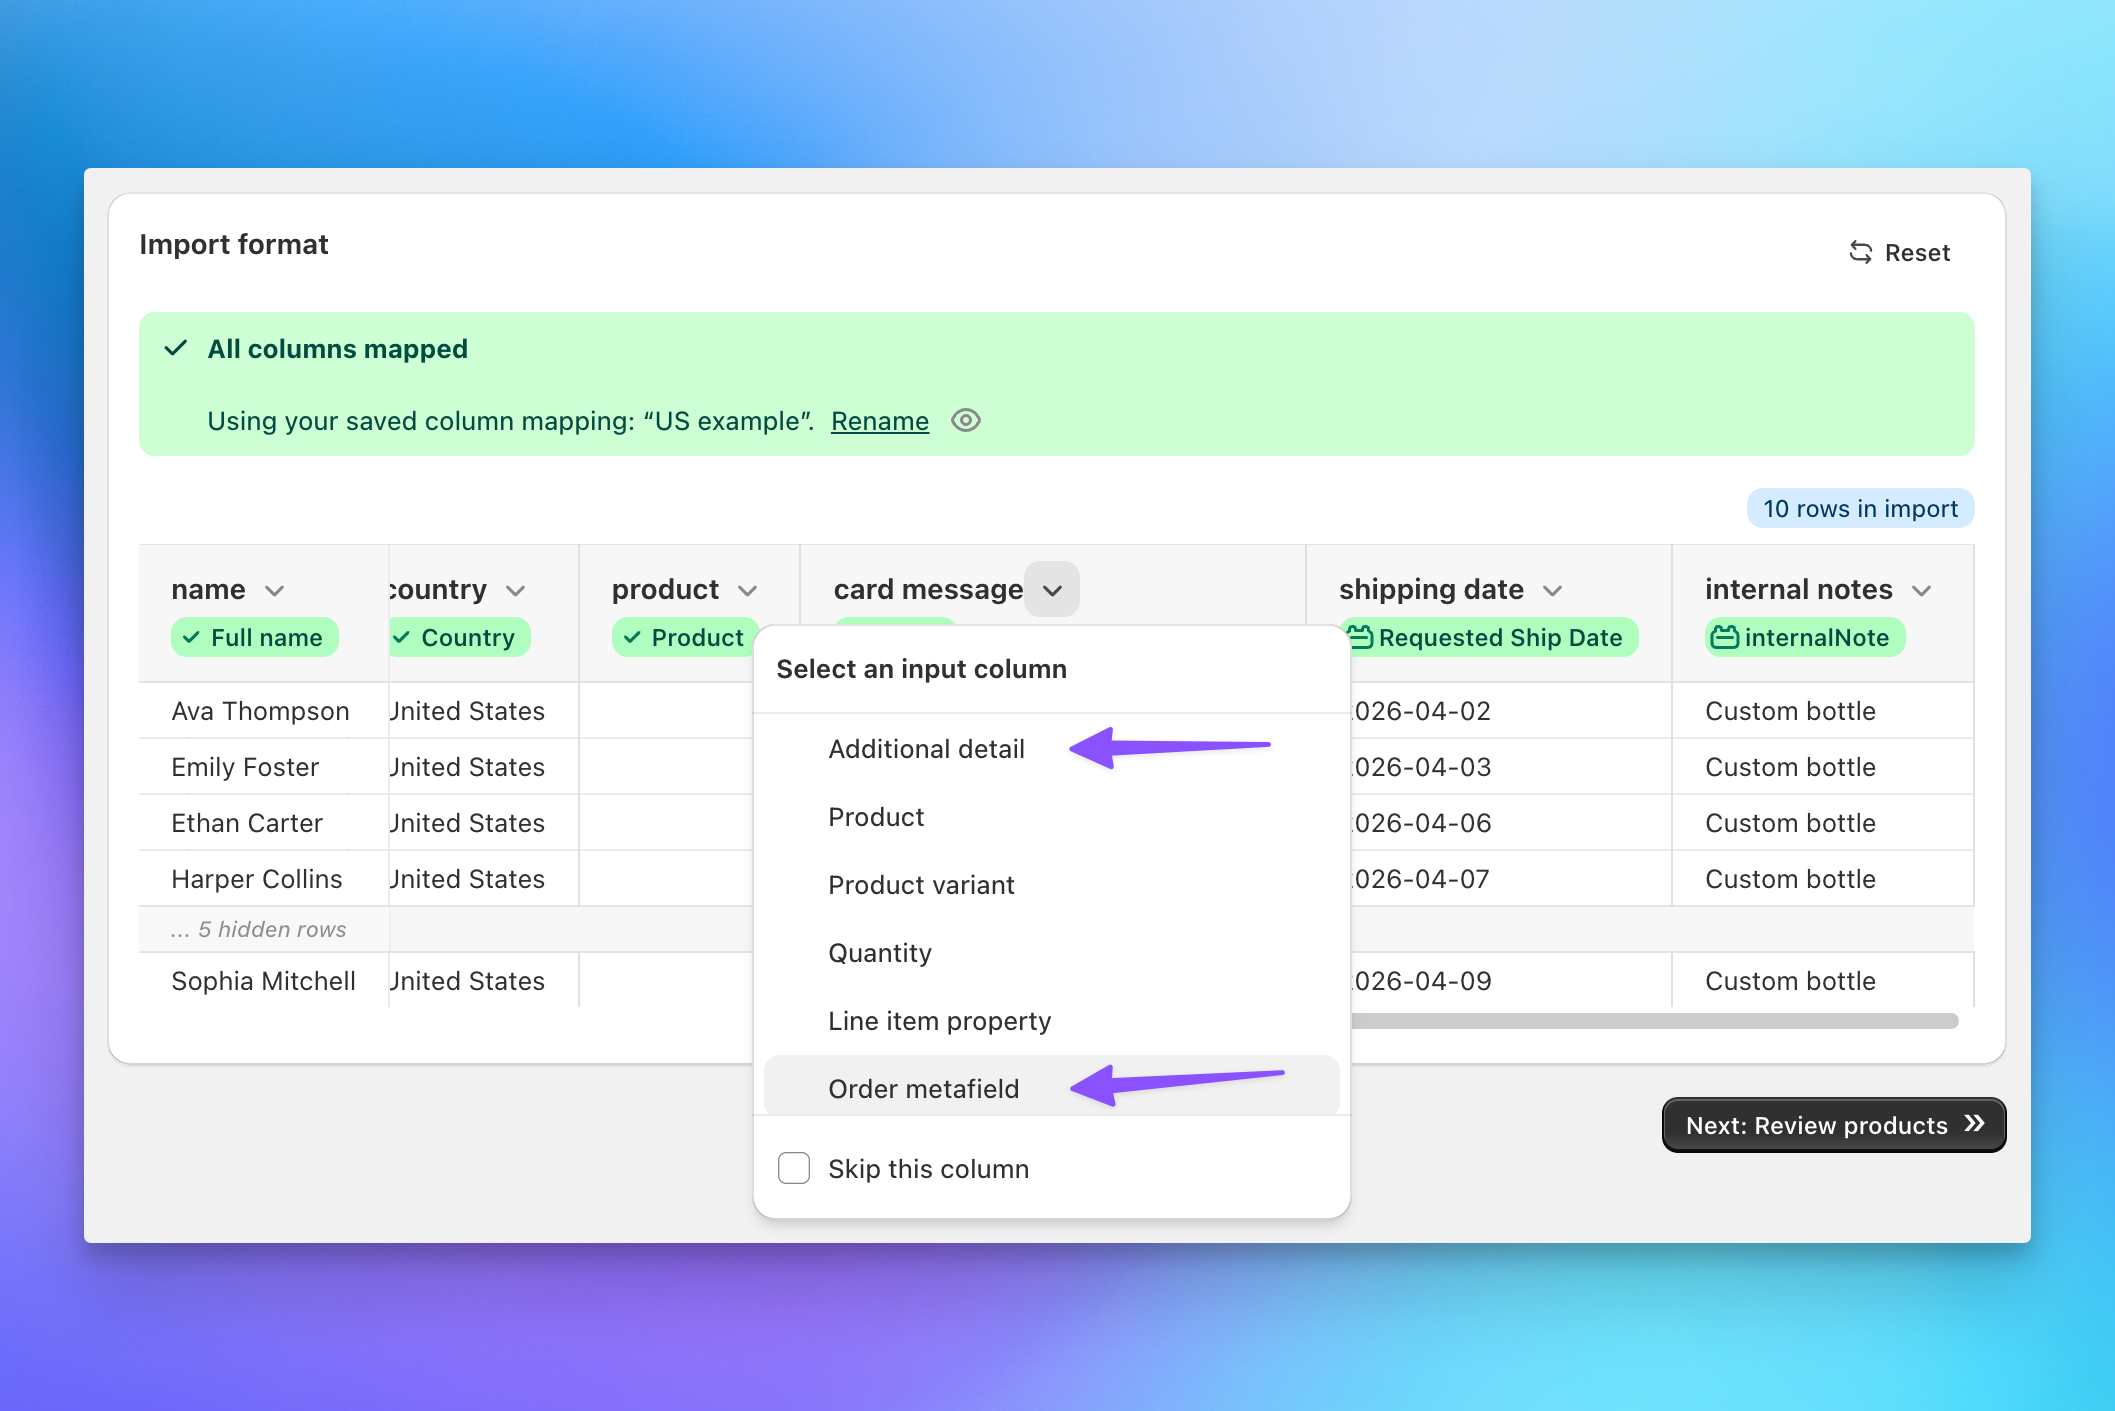
Some stores need additional information on each order — delivery dates, card messages, tags for fulfillment, inventory tracking, or accounting. Upload this data with as many extra columns as you need and map them during the column mapping step.
-
Order Note: Map a column to the Order Note field. This shows up as the note on each recipient's Shopify order.
-
Additional Details: Map columns to Additional Details (also known as
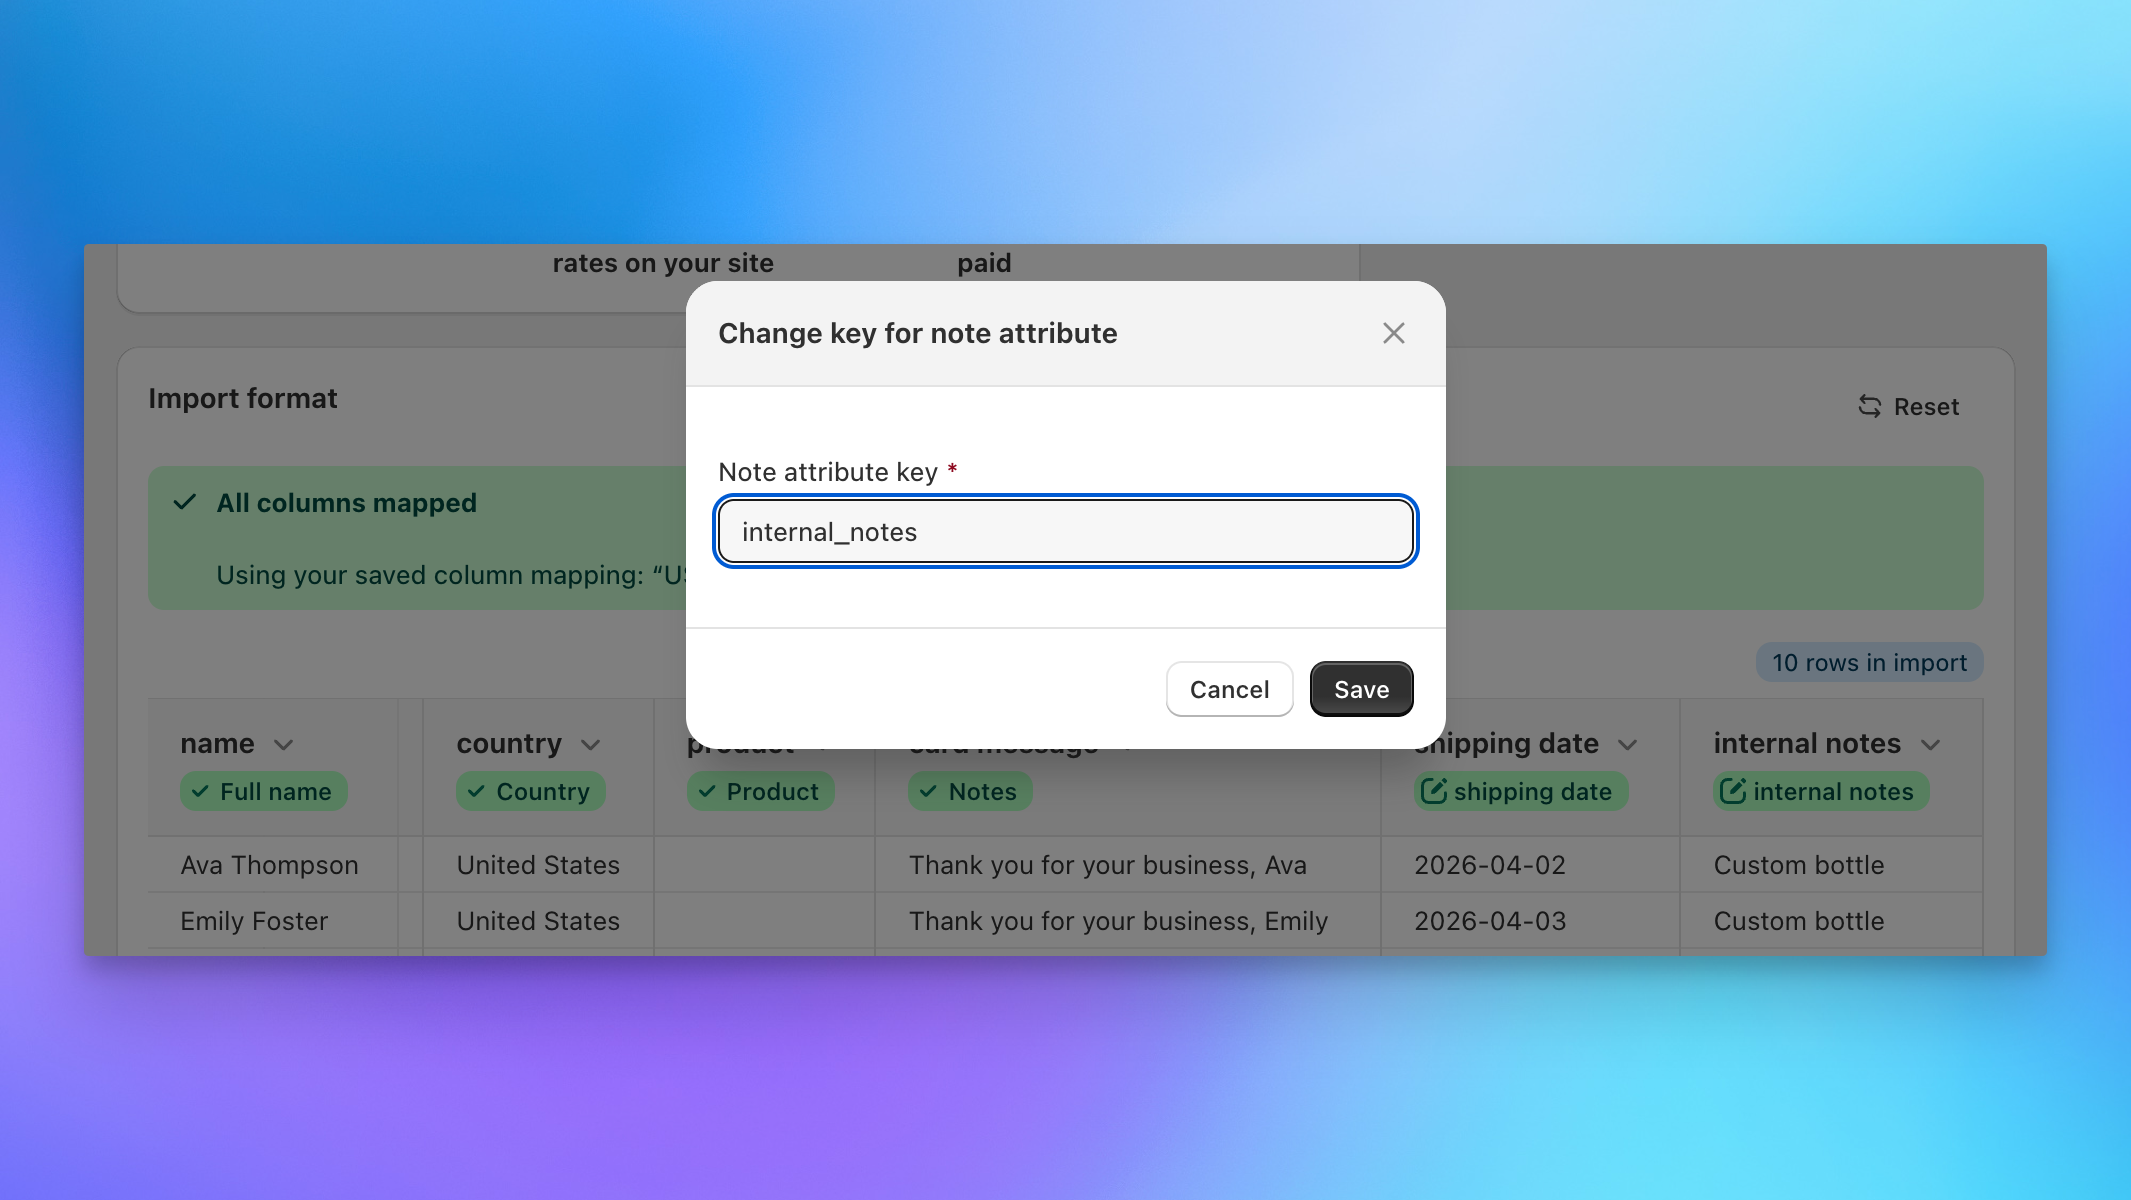
note_attributes/customAttributes). You can include as many of these as needed. If your store expects dates in a specific format, format them that way in your upload file. By default, the column header becomes the note attribute key — but you can rename the key to match what your store or a connected app expects. Just click the key name after mapping to open the rename dialog.
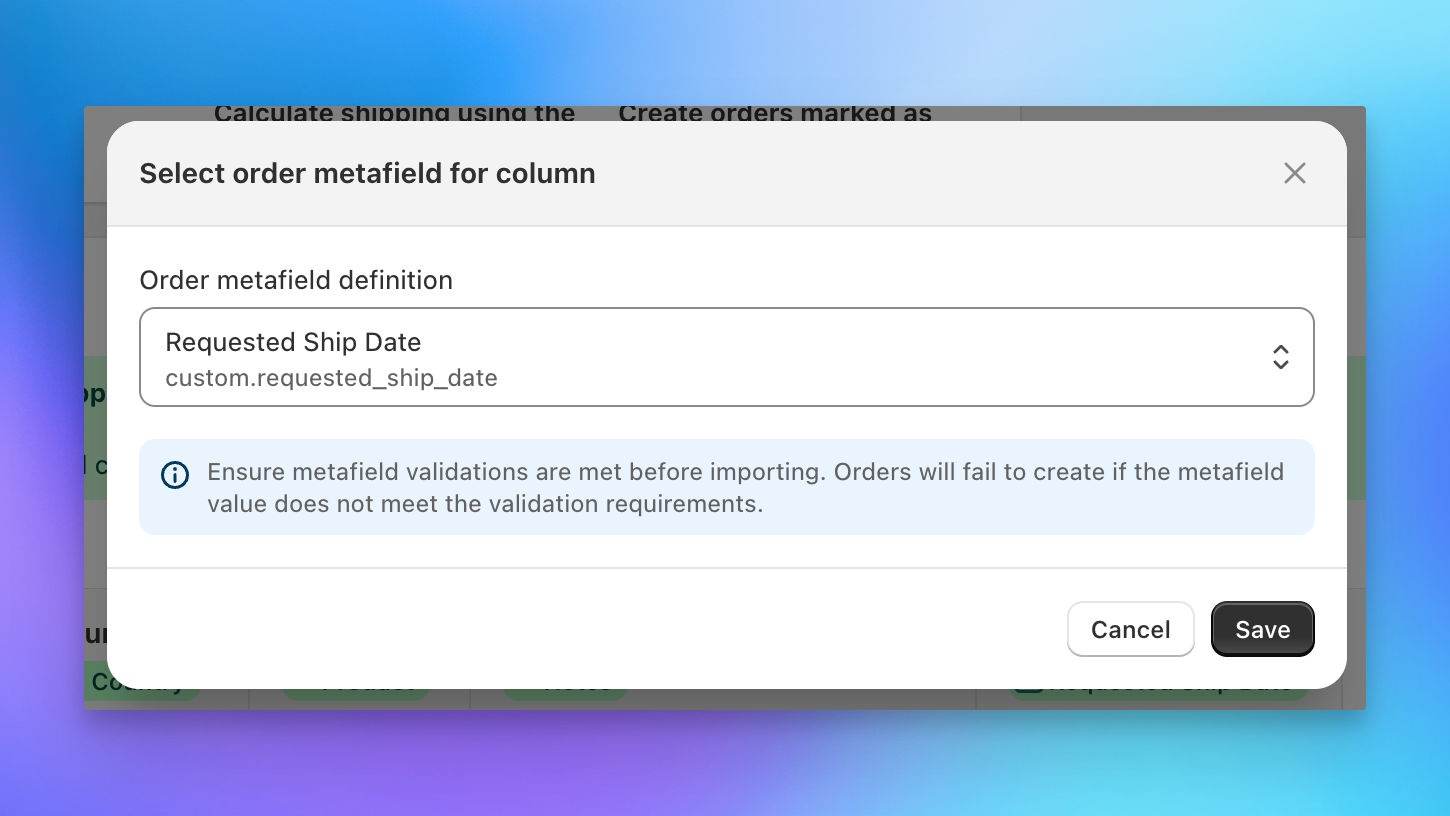
- Metafields: Map a column to an order metafield. During mapping, we'll show your store's available order metafield definitions — select the one that matches your column data. Make sure the values in your spreadsheet meet the metafield's validation requirements, as orders will fail to create if the data doesn't match what the metafield expects.
- Tags: Map a column to Tags to add custom tags to each recipient's order.
Unmapped or skipped columns
During column mapping, you can choose to skip any column you don't need — just leave it unmapped or explicitly mark it as skipped. Any data in a skipped or unmapped column is simply ignored during the import process. It won't cause errors or block your upload.
Once you've finished mapping all your columns, we save the mapping as an Import Format so you won't need to remap next time you upload a spreadsheet with the same column headers.
Updating a Send after upload
Small changes don't require a new file. On the Review and Finalize steps you can update an individual recipient's products, add a recipient, or add a discount, and totals recalculate with each change. For changes to a large number of recipients, start fresh with an updated spreadsheet: use Export to CSV on the Finalize step to download a clean spreadsheet of the current Send as your starting point.
If you upload regularly, see how saved Import Formats can speed up future uploads.