Setting Up the Corporate Gifting Inquiry Form on Shopify
Add a corporate gifting inquiry form to your Shopify store. Configure fields, place the form on a page, set up notifications, test the flow, and explore advanced options like conditional logic and file uploads.
The inquiry form lets potential corporate gifting customers submit requests directly from your Shopify storefront. When a visitor fills out the form, Send To Many creates a Shopify customer record, notifies your team, and stages the inquiry as a Send ready for your sales team to pick up.
This guide covers setup from start to finish: add the default form to a page, test it, then customize fields and notifications to match your workflow.
Before You Start
You need Send To Many installed on your Shopify store. The inquiry form is available on all paid plans.
Step 1: Add the Form to a Page
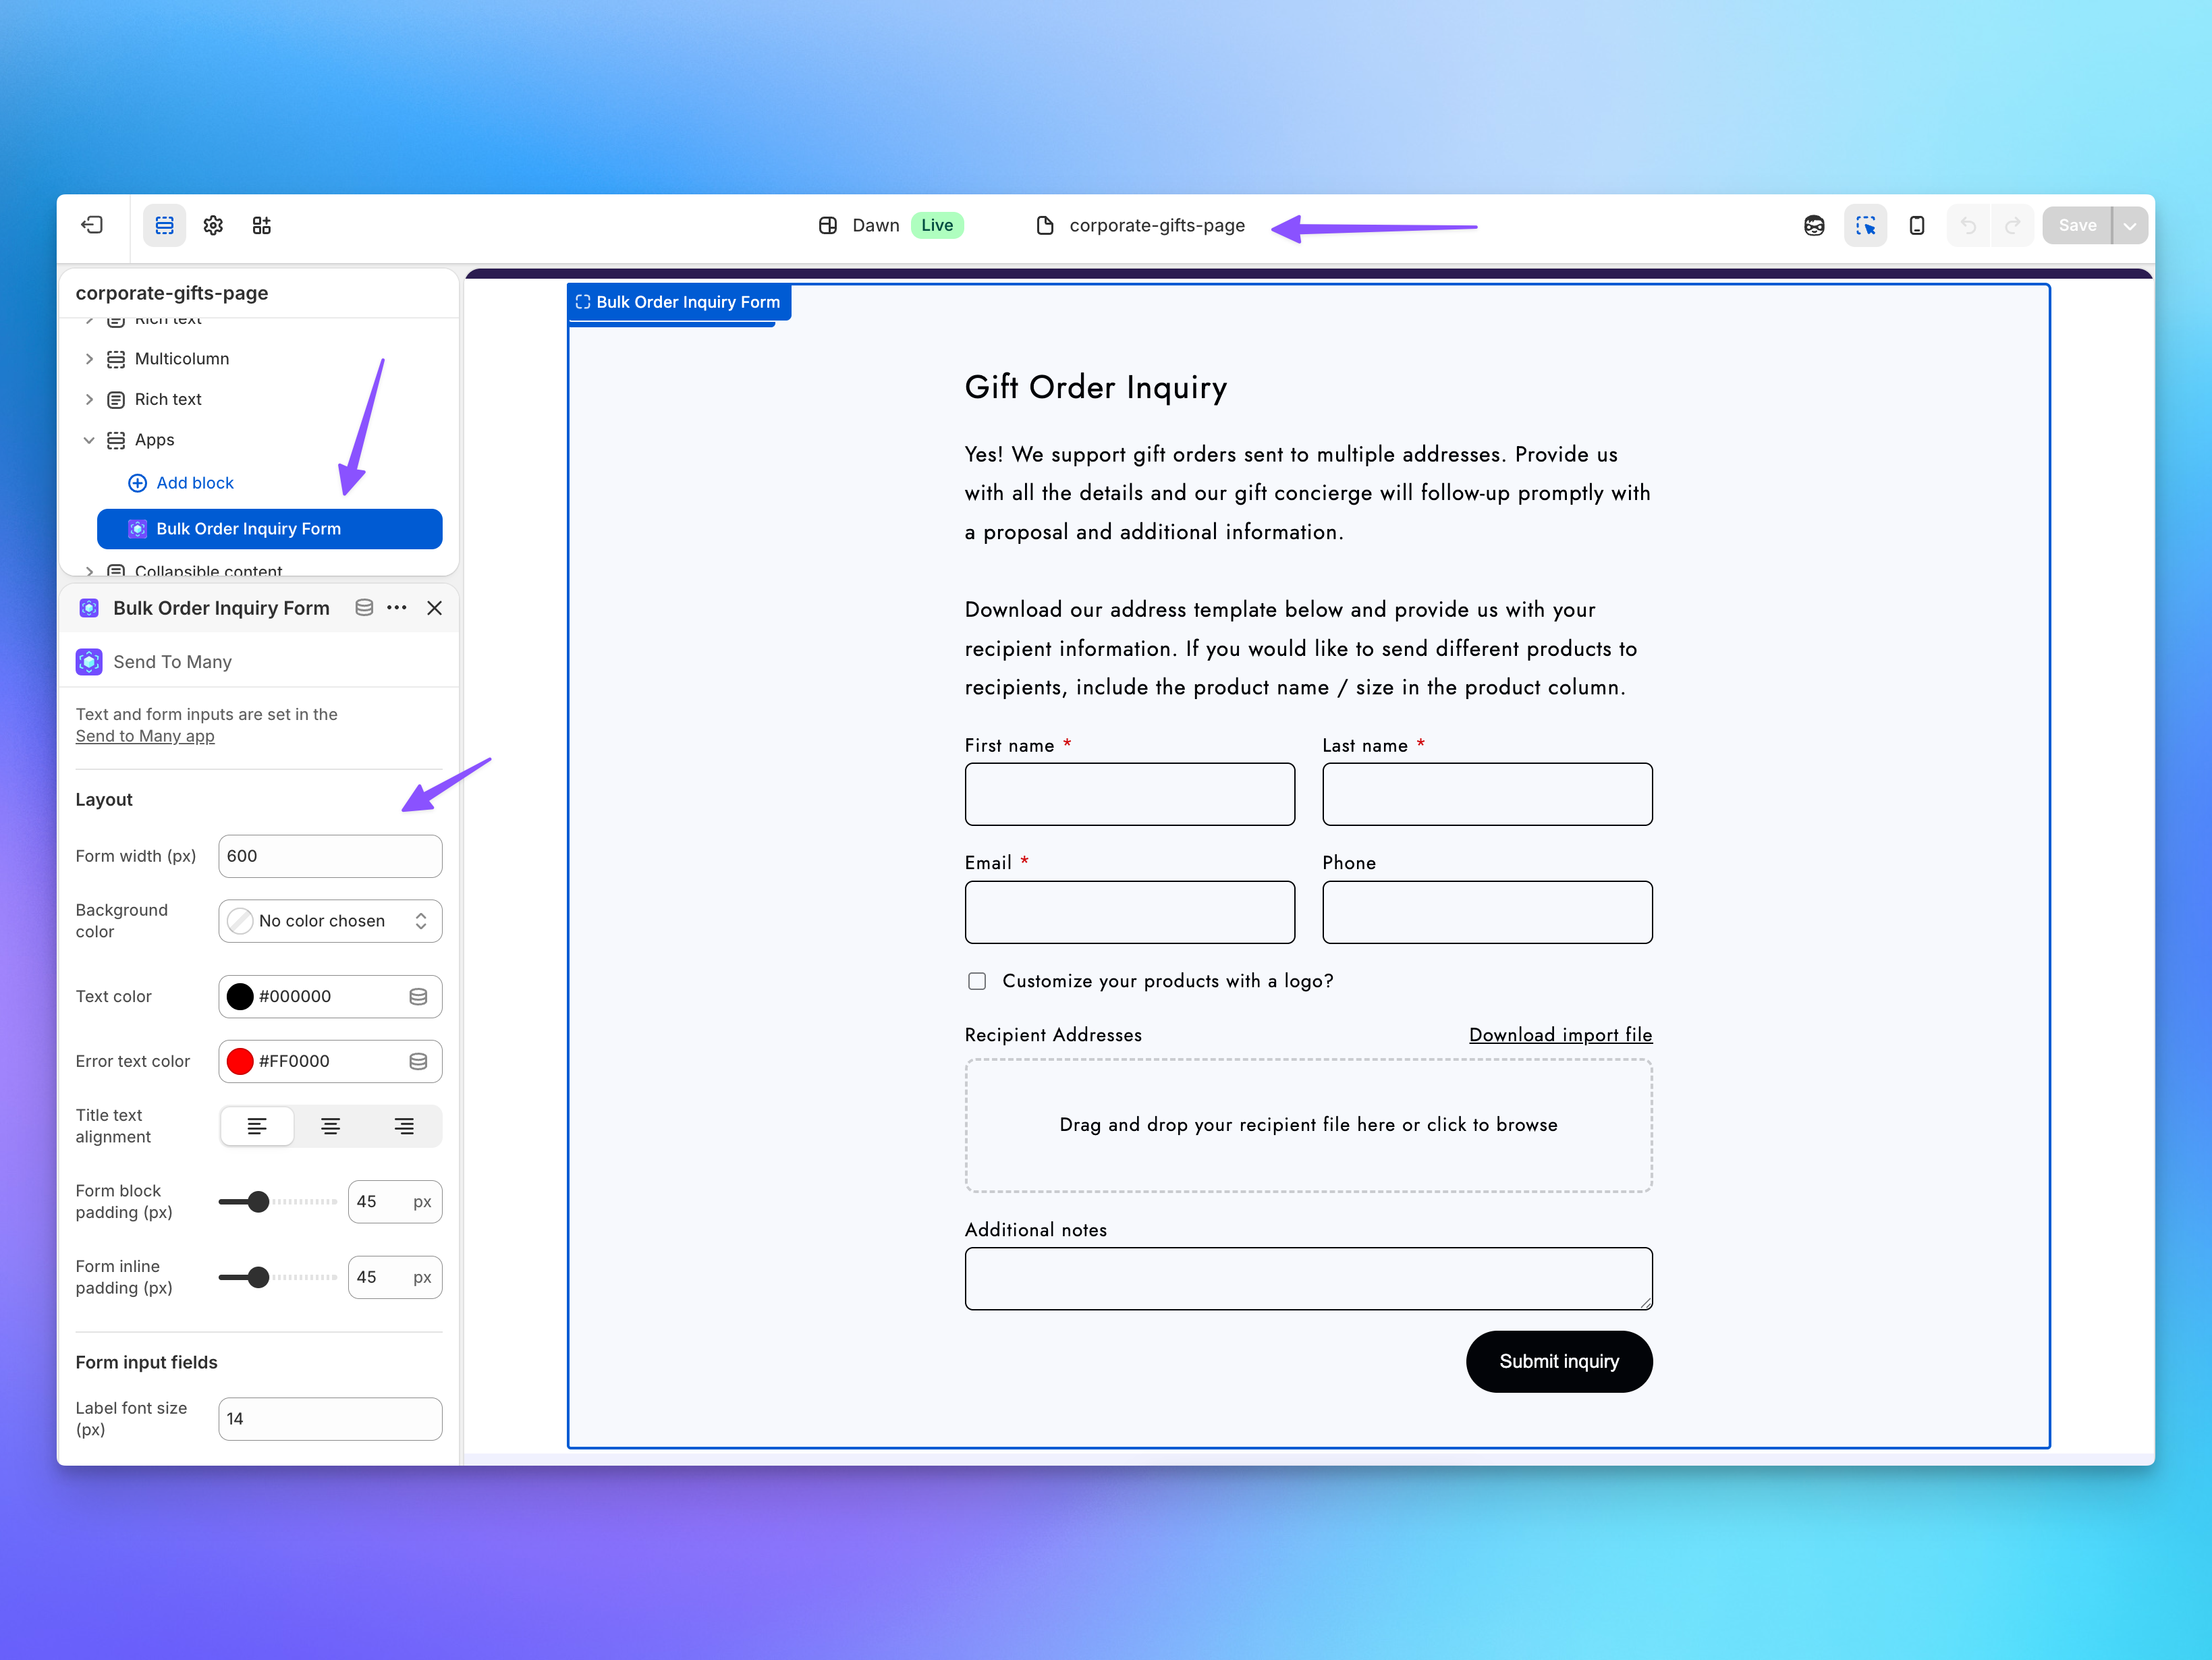
The inquiry form ships ready to use. The default form includes contact fields (first name, last name, email, phone), company, date needed, a company logo upload, a questions box, and a recipient import file field backed by a default import format. You can get it live quickly and customize later.
Create the page
- In your Shopify admin, go to Online Store → Pages.
- Click Add page. Give it a title like "Corporate Gifting," "Bulk Orders," or "Request a Quote."
- Save the page.
Add the form to the page template
- Go to Online Store → Themes → Customize.
- In the theme editor, use the page selector at the top to navigate to the page you just created.
- Click Add section and search for Send To Many or Inquiry Form.
- Select the inquiry form section. A live preview of your form fields appears on the page.
- Drag the section to position it where you want.
- Click Save.
The form inherits your theme's typography, colors, and spacing by default, so it fits naturally into your store's design without any additional styling.
Add the page to your navigation
- In your Shopify admin, go to Online Store → Navigation.
- Add your new page to your main menu, footer, or wherever customers should find it.
Step 2: Set Up Notifications
Before testing, make sure your team will receive alerts when inquiries come in.
- In Send To Many, go to the Inquiry Form settings page.
- In the Notifications section, add the email addresses of team members who should be notified.
- Click + Add after each address. Everyone configured receives the notification email.
Notification emails include the submitter's name, email, and company so your team can identify and prioritize inquiries quickly.
Step 3: Test the Form
- Visit the form page on your live storefront (or use your theme's preview URL).
- Fill out every field and submit.
- Confirm:
- Notification email arrives to all configured recipients.
- Inquiry appears in Send To Many's Manage Sends page.
- Customer was created (or matched to an existing customer) in Shopify.
The theme editor shows a visual preview of the form, but submissions only work on the live store or the theme preview URL. Don't try to submit from the theme editor.
Step 4: Customize Your Form Fields
Now that the form is live and working, customize the fields to match what you need from prospective customers. In Send To Many, go to the Inquiry Form settings page.
Form title and description
Set a Title and Description that appear above your form on the storefront. The description supports basic rich text formatting. For example: "Request a Quote for Corporate Gifts" with a description like "Tell us about your gifting needs and we'll put together a custom proposal."
Adding and configuring fields
The Fields section lists every field on your form. First Name and Last Name are locked and always present, and Email is required by default. Send To Many uses these to create or match a Shopify customer on submission.
Click Add new field to add more. Available field types:
- Customer address: A structured address field that saves to the customer's default address in Shopify (Pro and Enterprise plans).
- Email and Phone: Validated contact fields.
- Single line text: For company name, job title, or short answers.
- Multi-line text: For special instructions or notes.
- Number: For recipient counts or budgets.
- Date: For requested delivery dates.
- Dropdown, Multiple choice, and Radio buttons: Structured choices like product interest or budget range.
- Image: For logos or brand assets.
- Checkbox: A yes/no toggle for opt-ins.
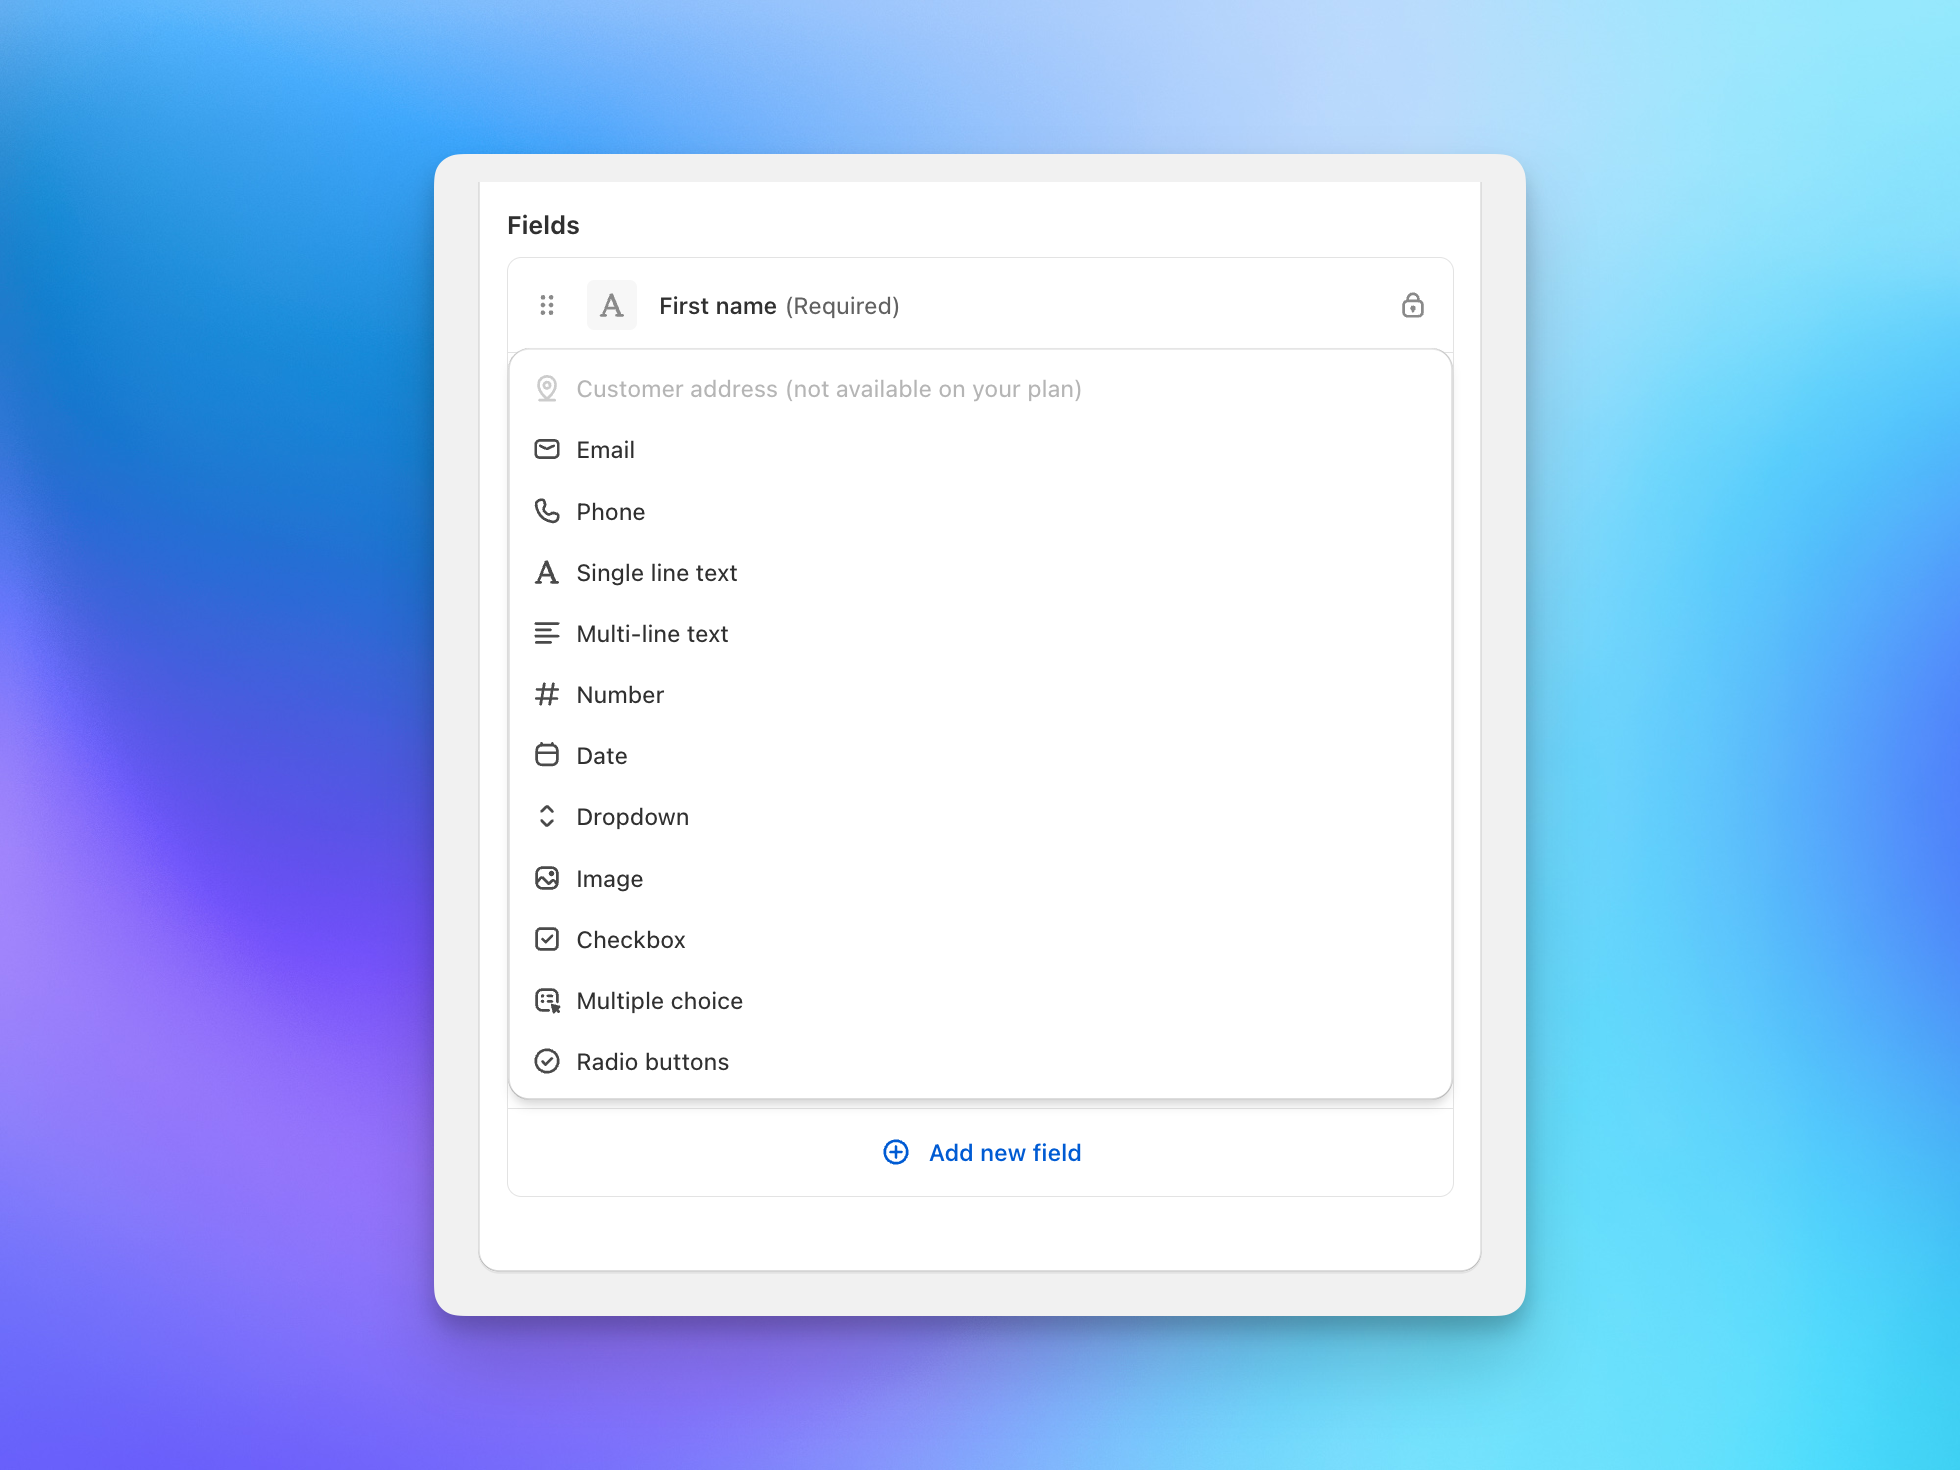
For each field, you can set the label, edit the placeholder text, mark it as required, and toggle half width to display two fields side by side. Drag fields to reorder them.
Common fields for corporate gifting inquiries: estimated number of recipients, desired delivery date, product interest, budget range, and special instructions.
For a full reference on every field option, see Configuring inquiry form fields, logic, and notifications.
Step 5: What's Next?
At this point you have a working inquiry form collecting submissions and notifying your team. Here are the additional capabilities you can explore.
Conditional Logic
Show or hide fields based on another field's value. For example, add a checkbox labeled "Customize your gift with a logo?" and an image upload field for "Company logo." Set the image field to appear only when the checkbox is checked. This keeps the form short for simple inquiries while capturing detail when needed.
![]()
Conditional fields must reference a checkbox that appears before them in the form. If you don't see a field in the conditional logic dropdown, move the controlling checkbox higher in the field order.
File Uploads and Import Templates
The import file field type lets customers attach recipient address spreadsheets (CSV, XLSX, XLS, Numbers) directly on the form. When you open the inquiry in Send To Many, the file is already queued for import with no download and re-upload needed.
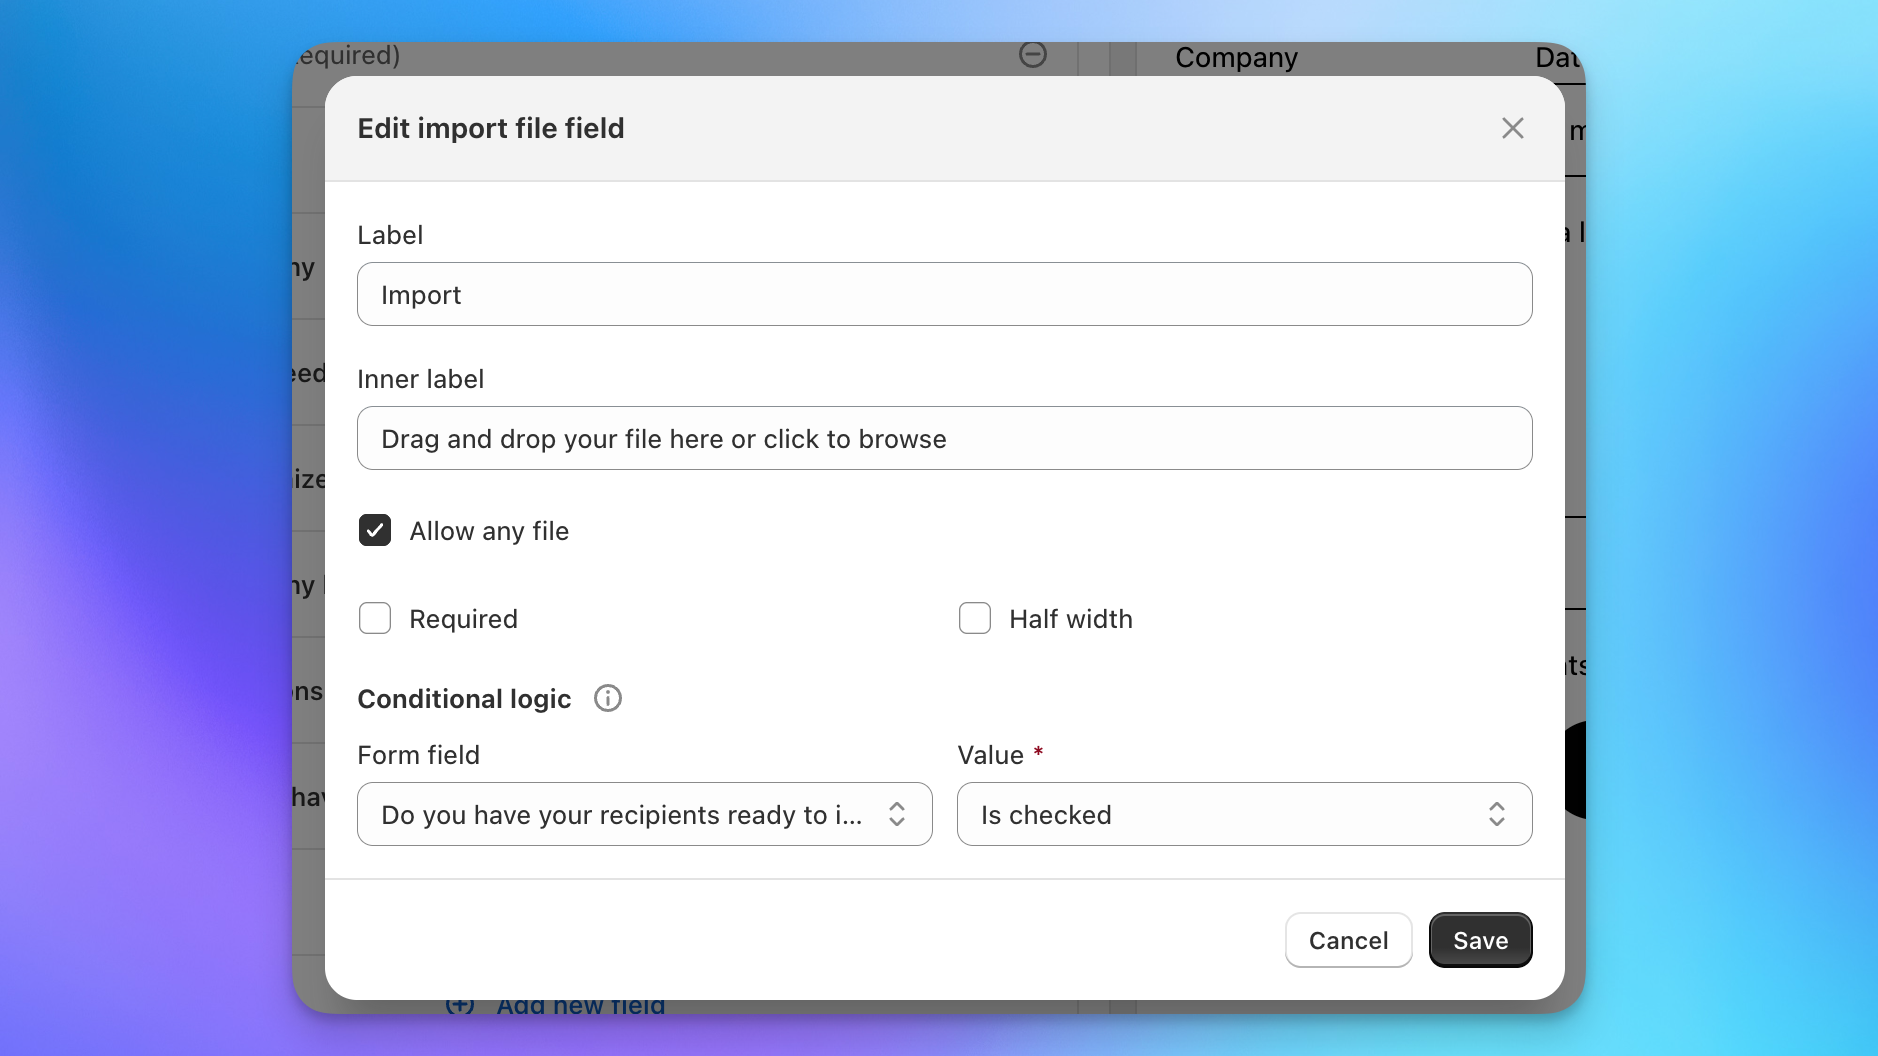
The field is optional to fill, so customers without a spreadsheet ready can still submit their inquiry.
The form includes a default import format with standard recipient columns (name, email, phone, address, product, quantity, gift message), so the import file field and the downloadable template work out of the box with no setup.
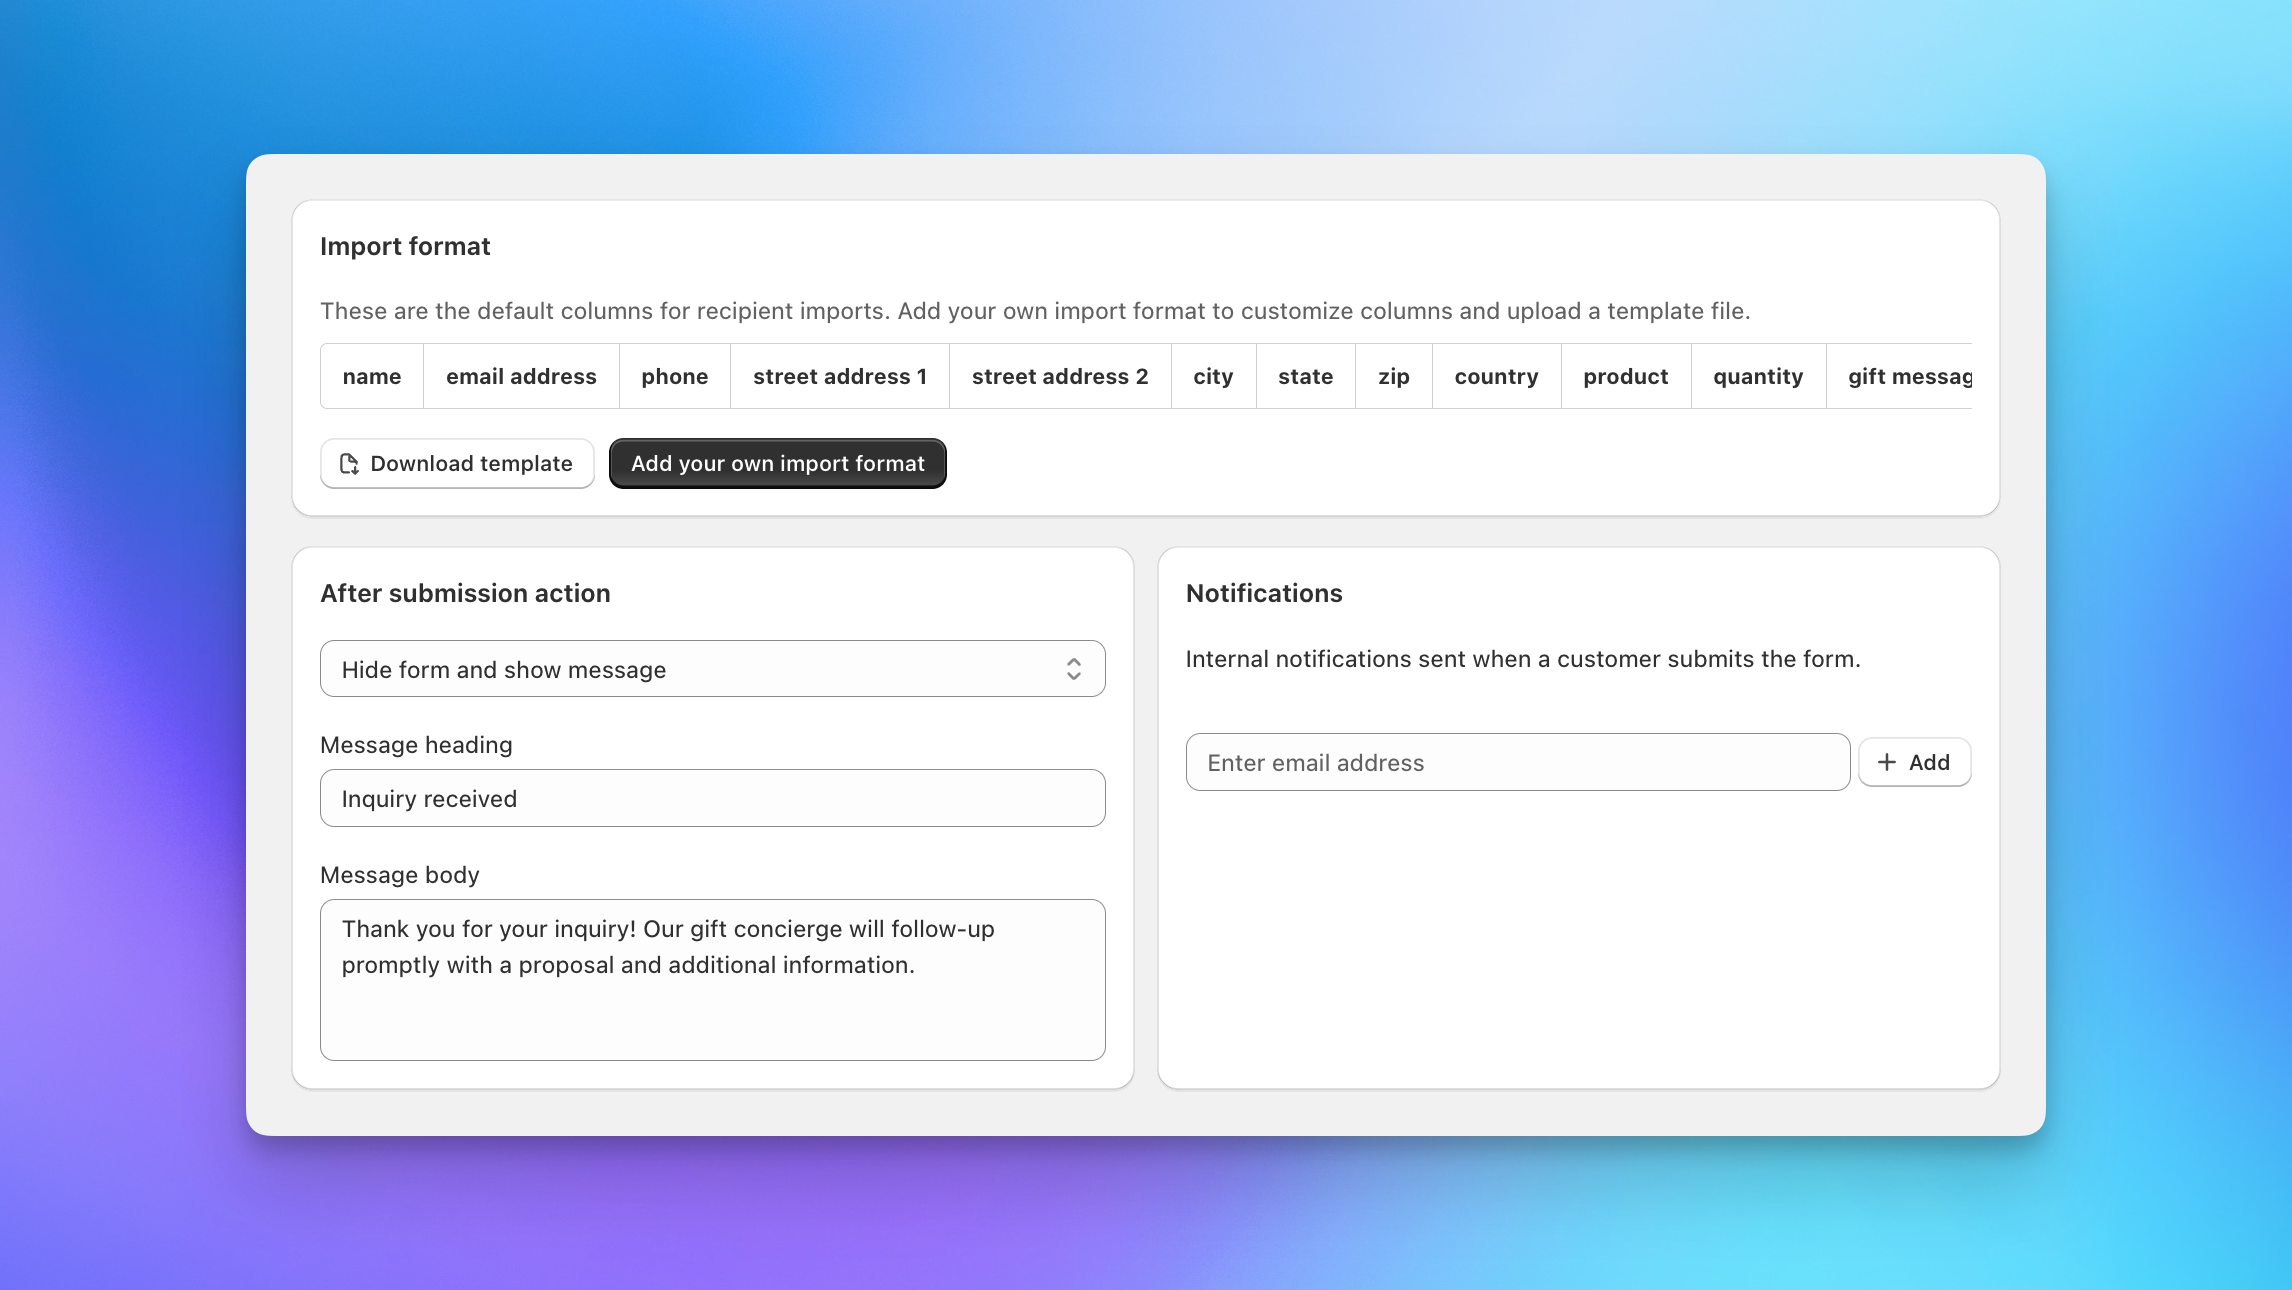
Want different columns? Add your own import format and upload a template spreadsheet that customers can download from the form before filling in their own data. This standardizes the data you receive by giving customers a pre-formatted file with the exact columns you need. If your saved Import Format matches an uploaded file's column headers, it applies automatically.
Do not include real customer information in your template. Any rows in the uploaded file will be visible to everyone who downloads it from your storefront.
Customer Address Field (Pro and Enterprise)
Add a customer address field to capture a complete address with the inquiry. For new customers, the submitted address is saved as the Shopify customer's default address; for existing customers, it's set as the billing address on the Send created from the inquiry. Either way, it's a great way to collect a billing address from the start. Optional address autocomplete gives customers suggestions as they type, and every label in the address entry experience is editable and translatable. See the customer address field for details.
Multiple Configurations and Translations
On Pro and Enterprise plans, you can create multiple form configurations and choose one per placement in the theme editor: for example, a corporate gifting form on one page and a B2B form on another. All plans can translate form text using the language picker at the top of the form settings.
Customize Appearance
The form inherits your theme's styling by default. For finer control, click the inquiry form section in the theme editor to adjust padding, margins, and background color. For advanced styling, add custom CSS through your theme's code editor.
After Submission Settings
Configure what happens after a customer submits: show a confirmation message or redirect to a URL. Most merchants use the confirmation message with a heading like "Inquiry received" and body text letting the customer know your team will follow up.
What Happens When Inquiries Come In
When a customer submits the form, your team receives an email notification. Open Send To Many, go to Manage Sends, and click the inquiry. From there, review the customer's responses and any uploaded files, then walk through the standard Send workflow: configure the send preset, import recipients, match products, validate addresses, and generate an invoice.
See Managing and converting corporate gifting inquiries for the full submission-to-invoice walkthrough.
Next Steps
- How the corporate gifting inquiry form works: Conceptual overview of the feature
- Configuring inquiry form fields, logic, and notifications: Full reference for every field type and setting
- Managing and converting corporate gifting inquiries: The inquiry-to-Send workflow