Setting Up Multi-Recipient Checkout on Shopify
A step-by-step guide to configuring and launching multi-recipient checkout on your Shopify store. Set up recipient fields, test the experience, configure order processing, and go live.
This guide walks you through setting up multi-recipient checkout from scratch. We'll start with the settings your shoppers interact with directly, add the checkout to a test page so you can try it yourself, then configure how orders are processed behind the scenes. By the end, you'll have a working checkout ready to go live on your storefront.
The recommended setup order:
- Configure the shopper experience (recipient fields, gift messages, shipping)
- Add the checkout to a test page
- Test the full flow with a real order
- Configure order processing settings
- Explore additional options
- Go live on your storefront
Before You Start
Make sure you have an active Send To Many plan. Multi-recipient checkout is available on all monthly or annual plans. Some advanced features like multiple checkout configurations and product customization fields require a Pro plan or higher.
Step 1: Configure the Shopper Experience
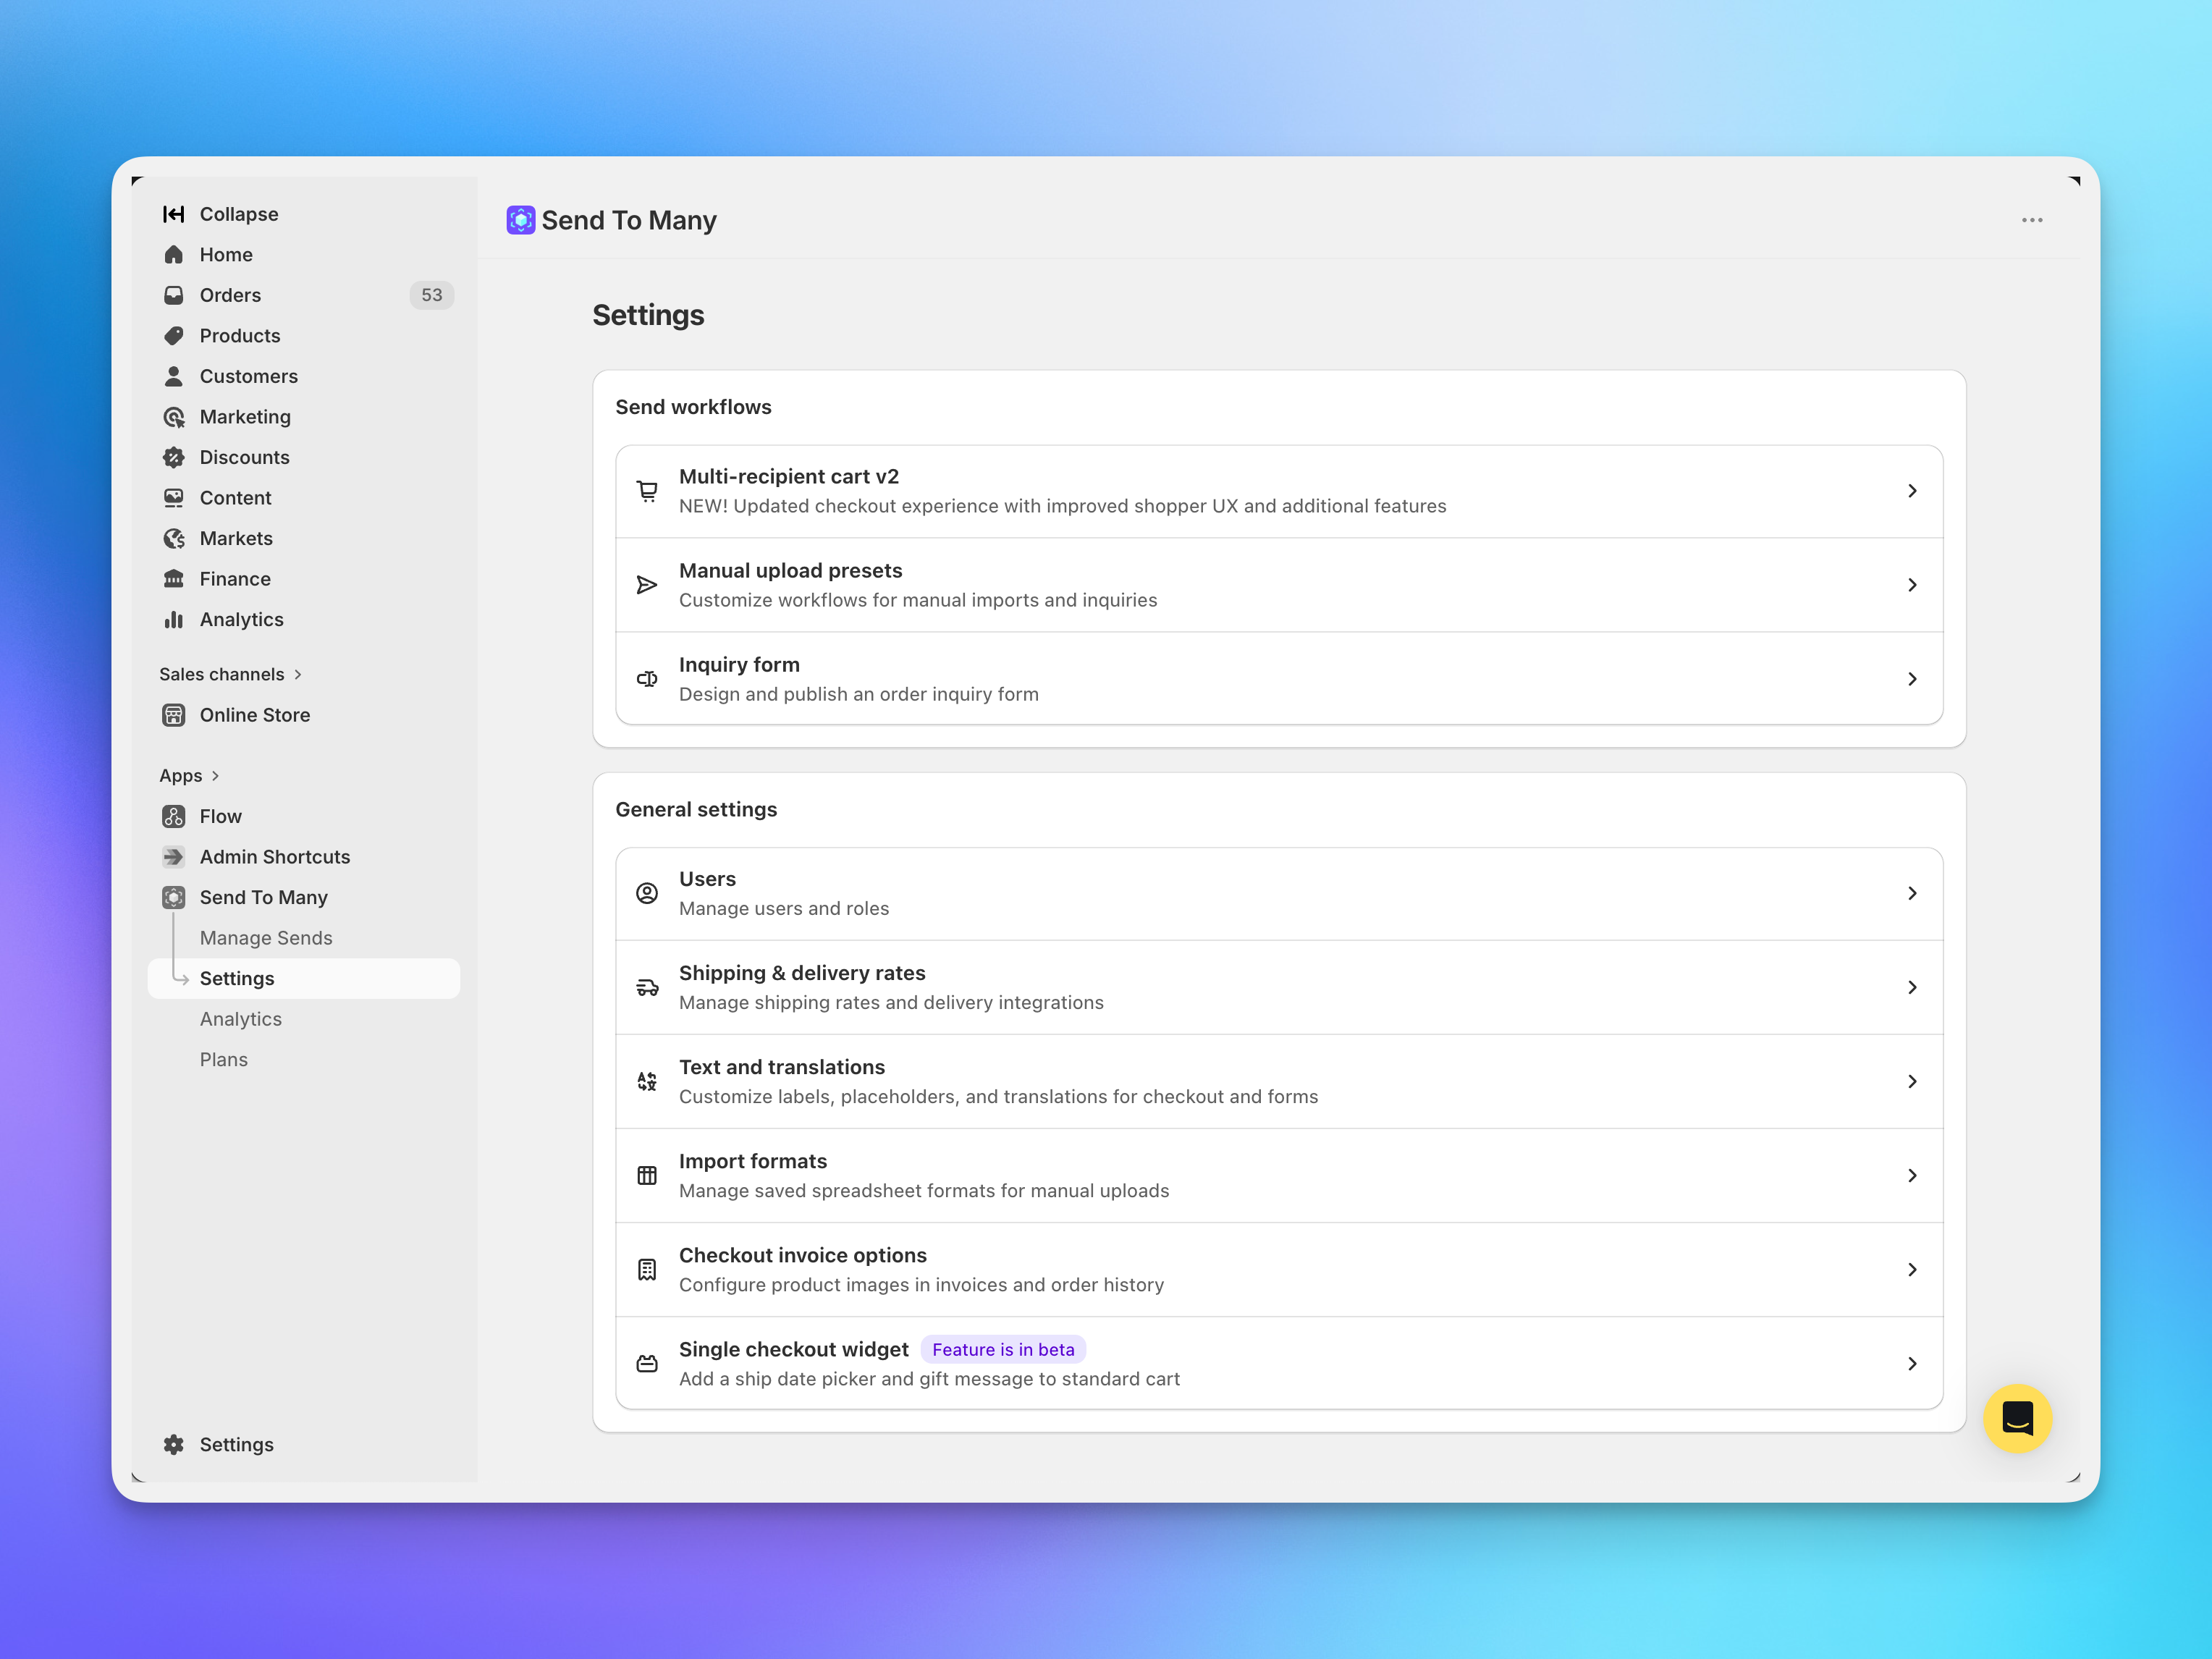
Start with the settings your shoppers will see and interact with. In your Shopify admin, go to Apps → Send To Many → Settings and click Multi-recipient cart v2.
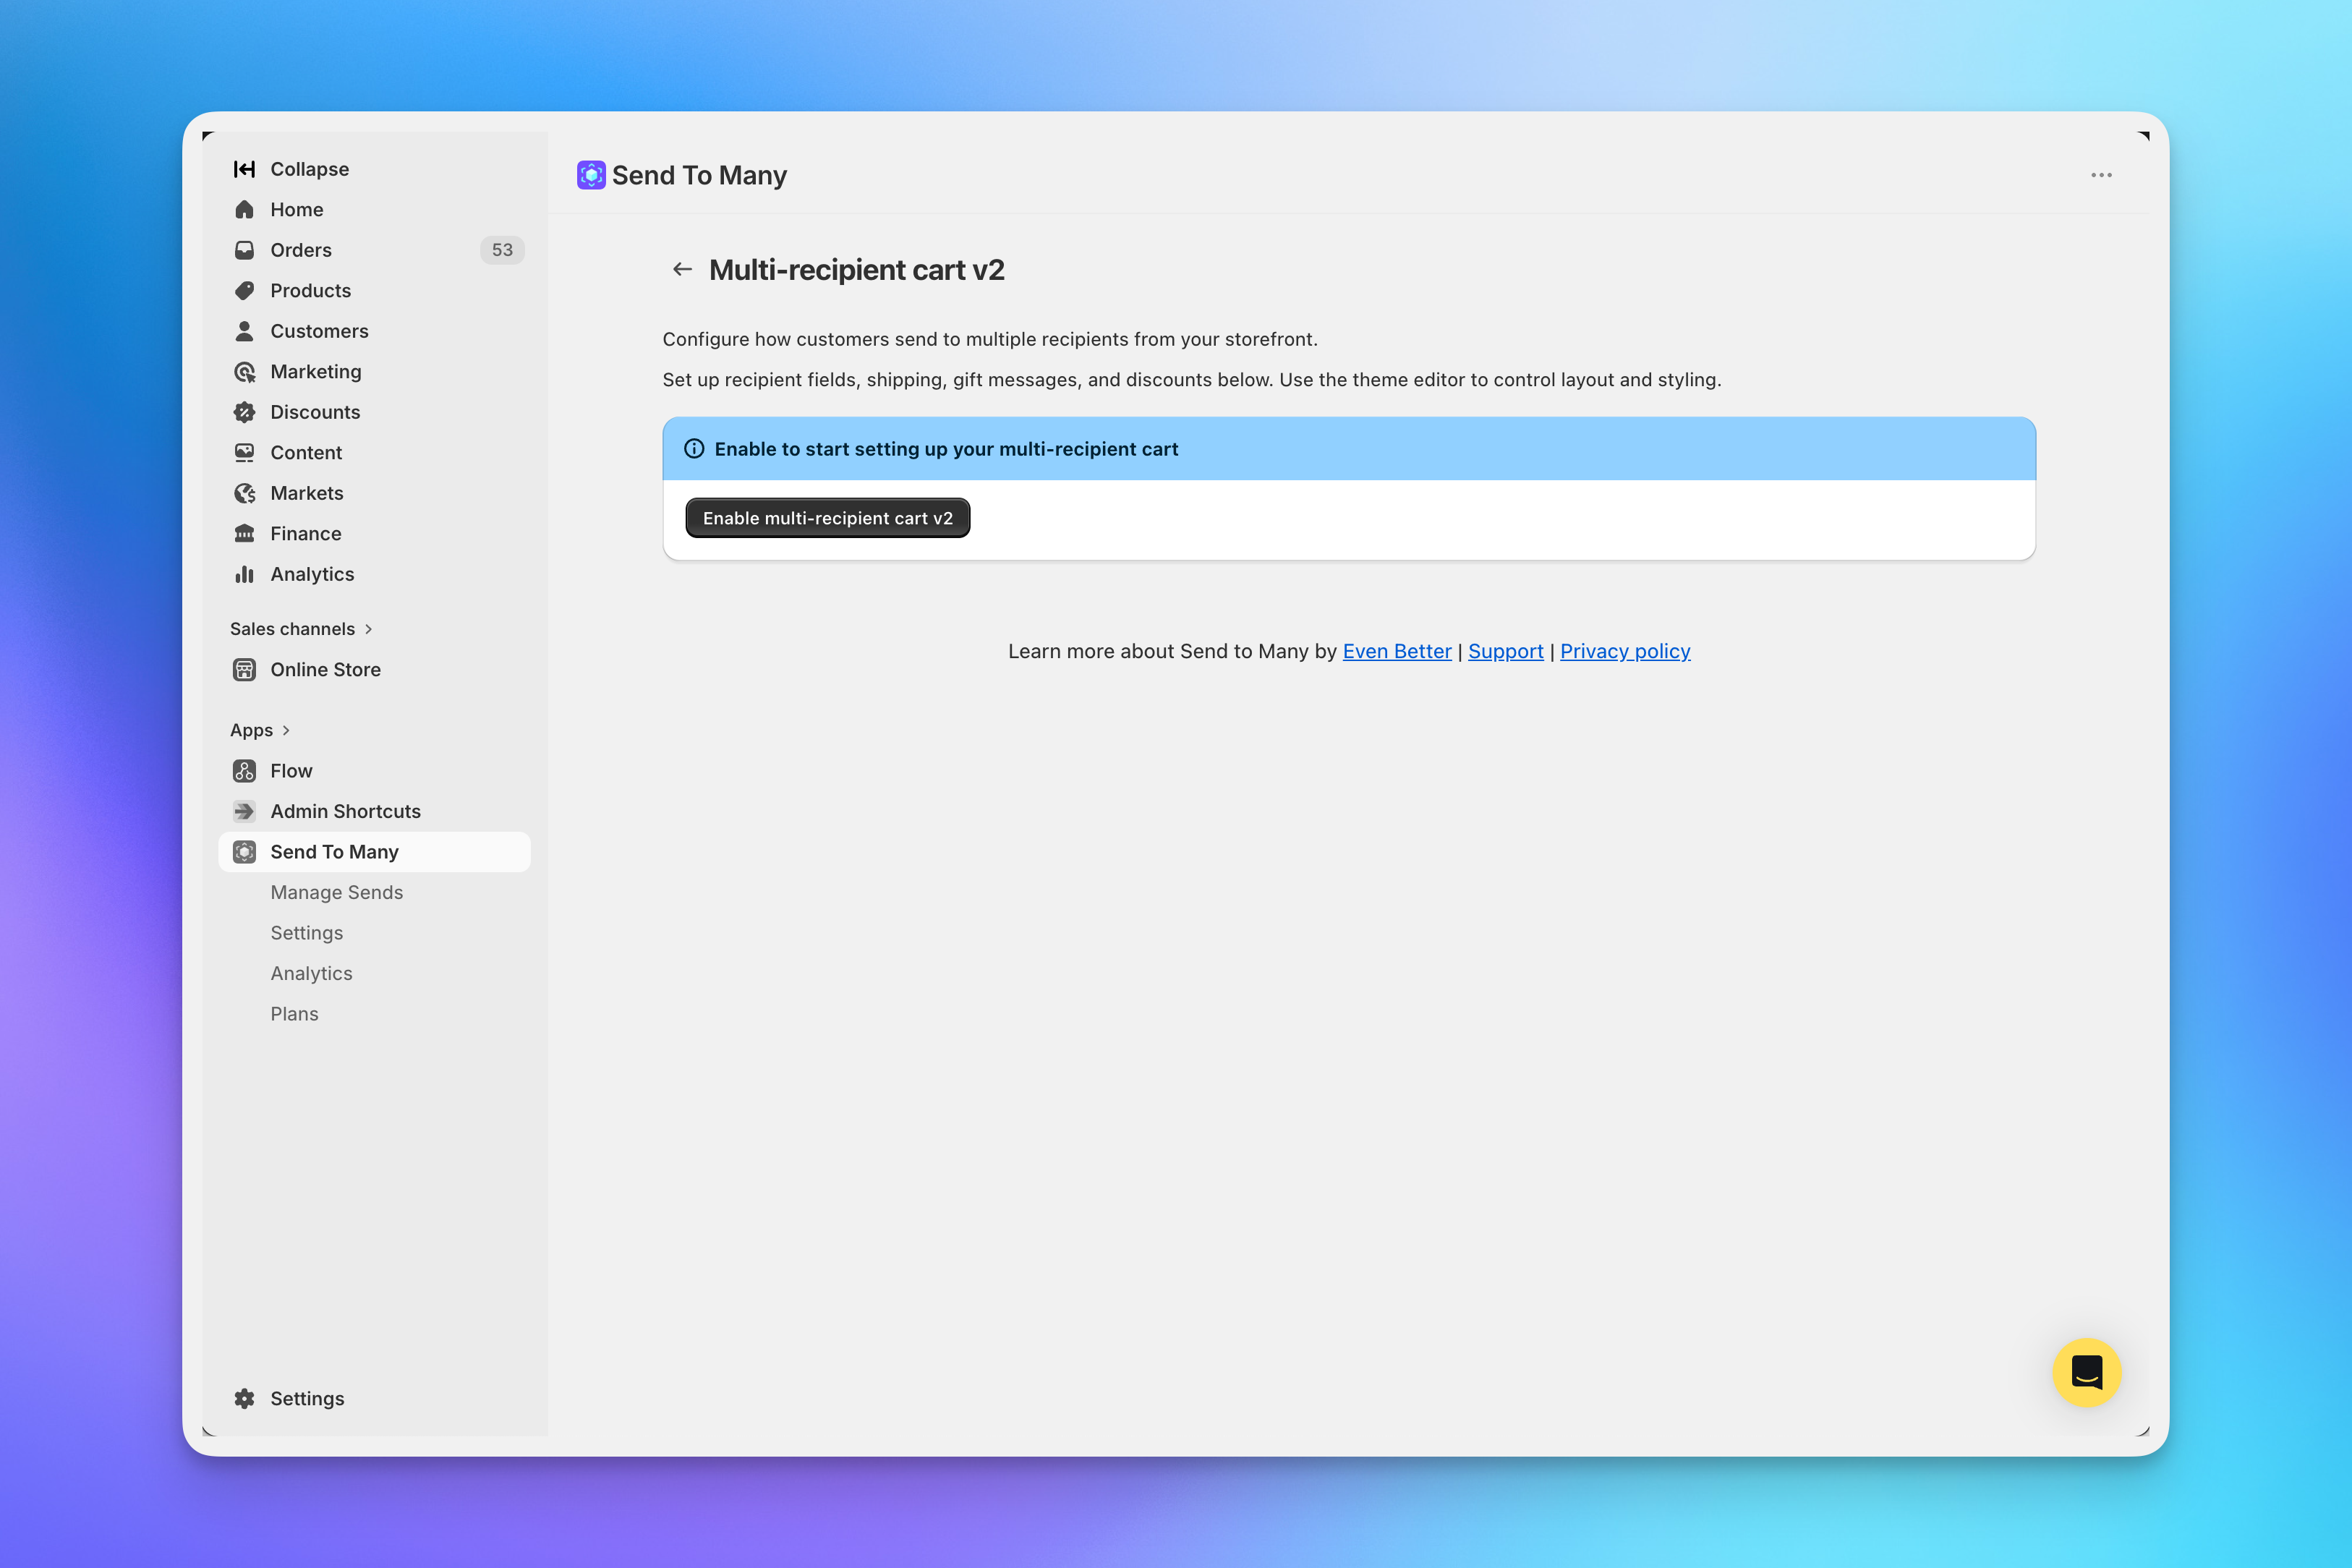
If this is your first time opening checkout settings, you'll see an enable prompt. Click Enable multi-recipient cart v2 to activate the checkout and access the settings.
Once enabled, you'll see the settings page with a navigation menu on the left. We'll focus on three sections first: Recipient fields, Gift message, and Shipping and/or delivery.
Recipient Fields
The recipient fields tab controls what information your shoppers provide for each recipient. The defaults work well for most stores, but you can customize them to match your workflow.
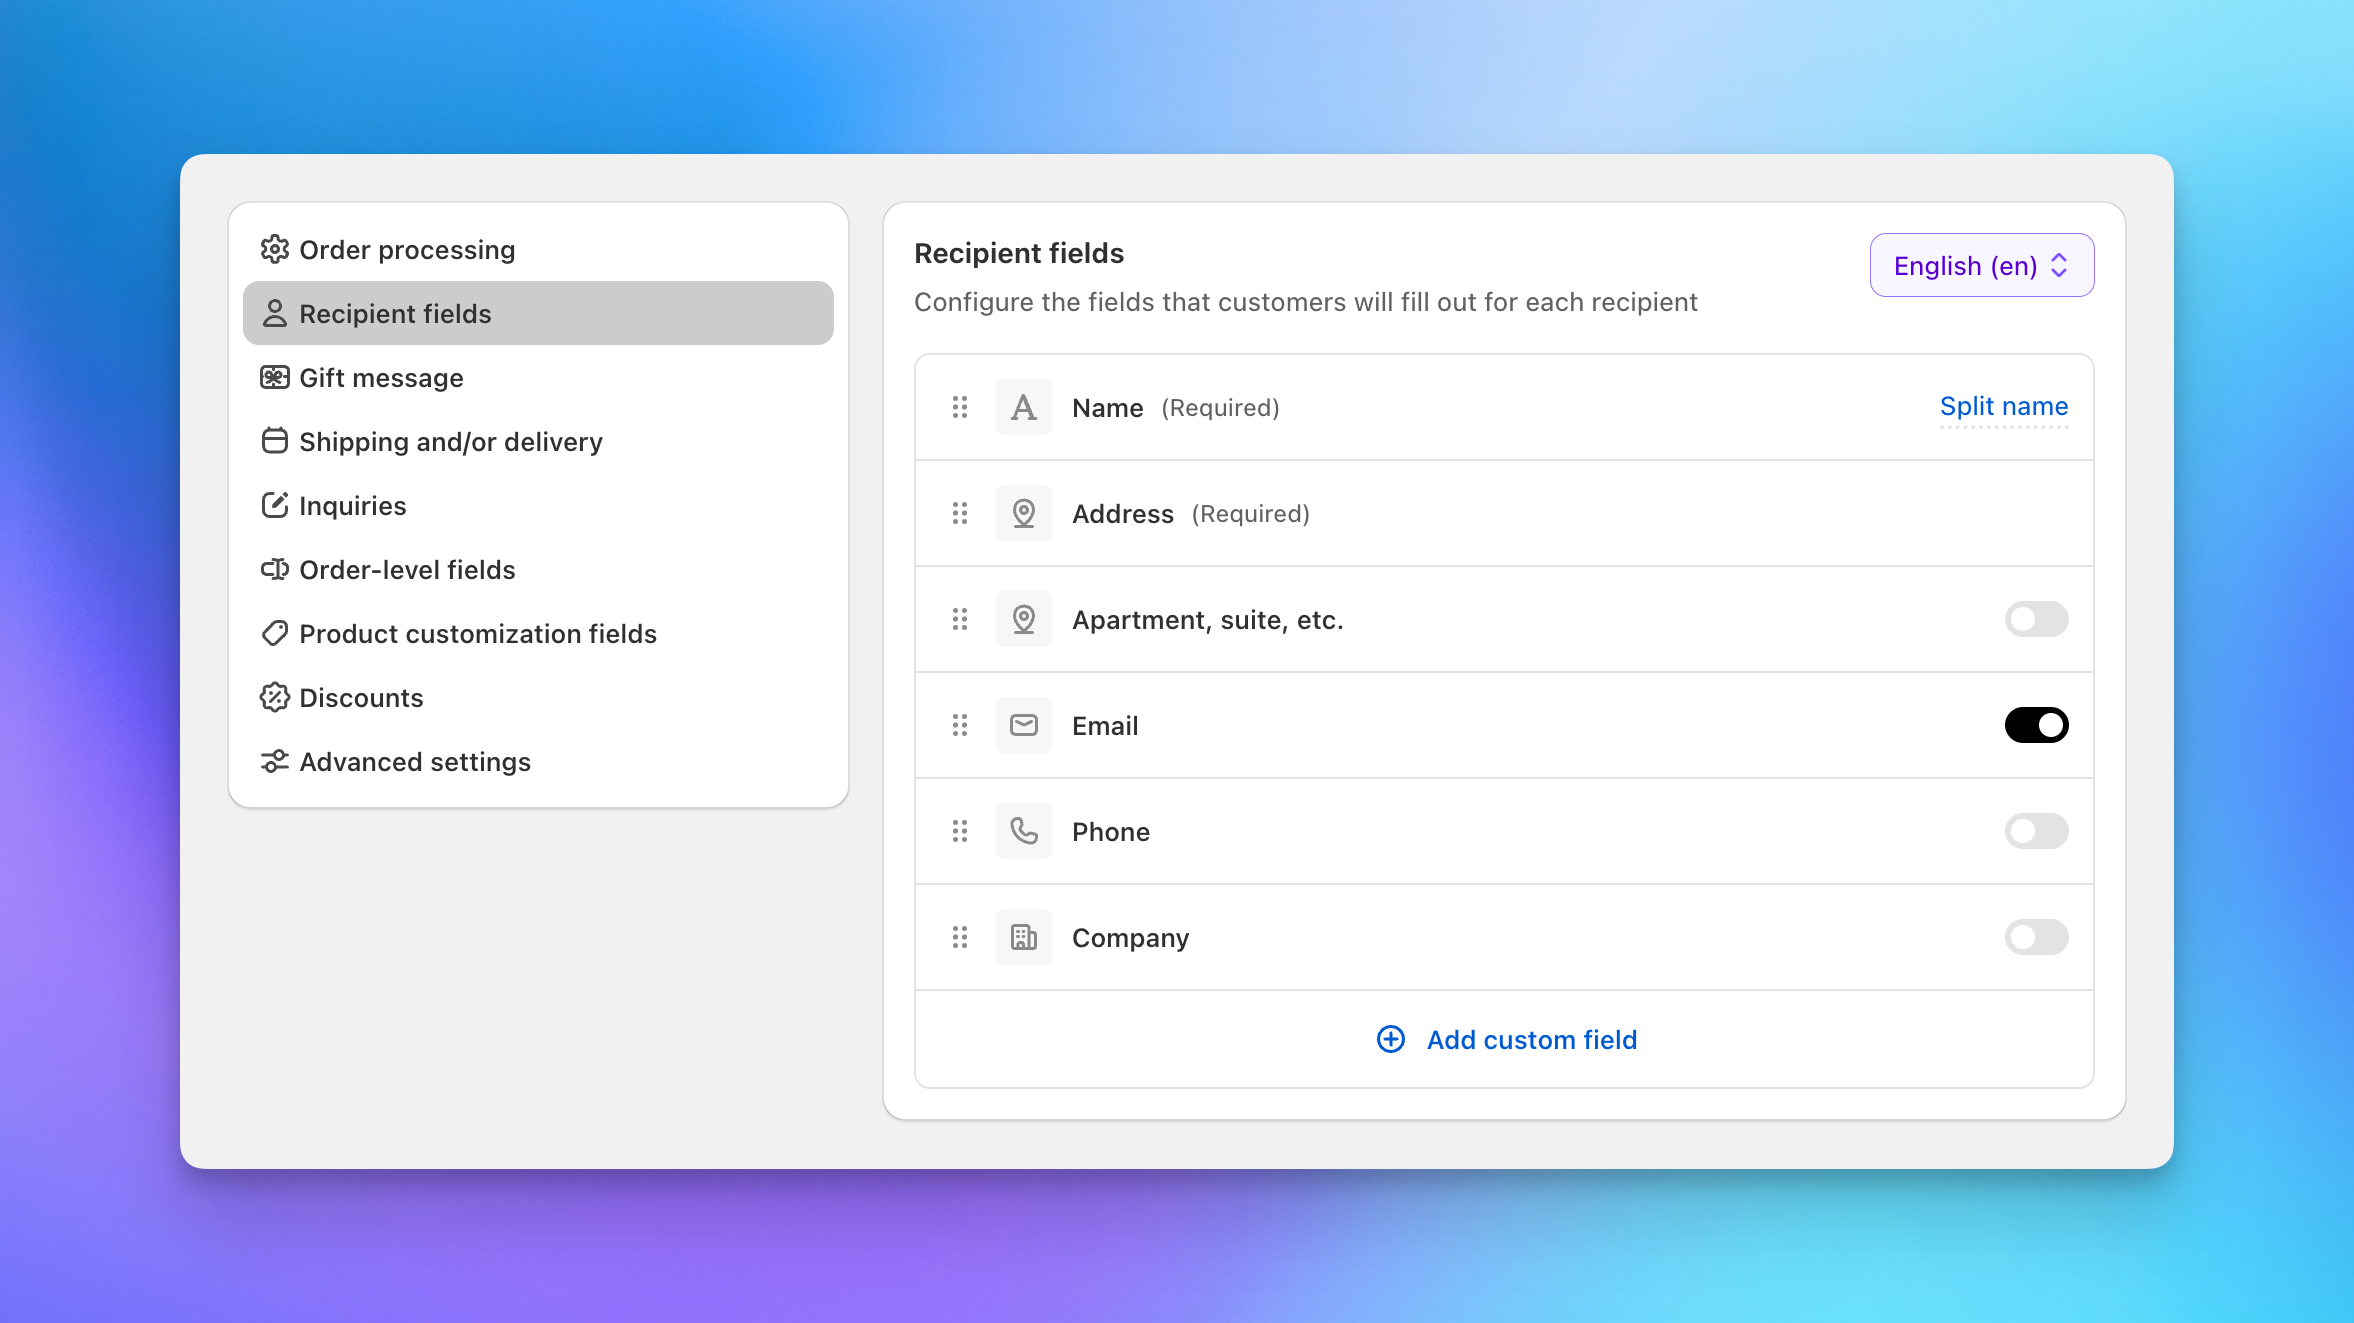
Name and Address are always required. Address uses Google autocomplete for fast, accurate entry. You can click on any field to edit its label, placeholder text, and options. For example, clicking the address field lets you toggle address autocomplete and PO Box restrictions.

Toggle on Email or Phone if you need to collect those for each recipient. You can also use Split name (top right) to separate the name field into first and last name.
For most gifting use cases, the defaults (Name, Address, and optionally Email) are all you need. You can always add more fields later.
Gift Message
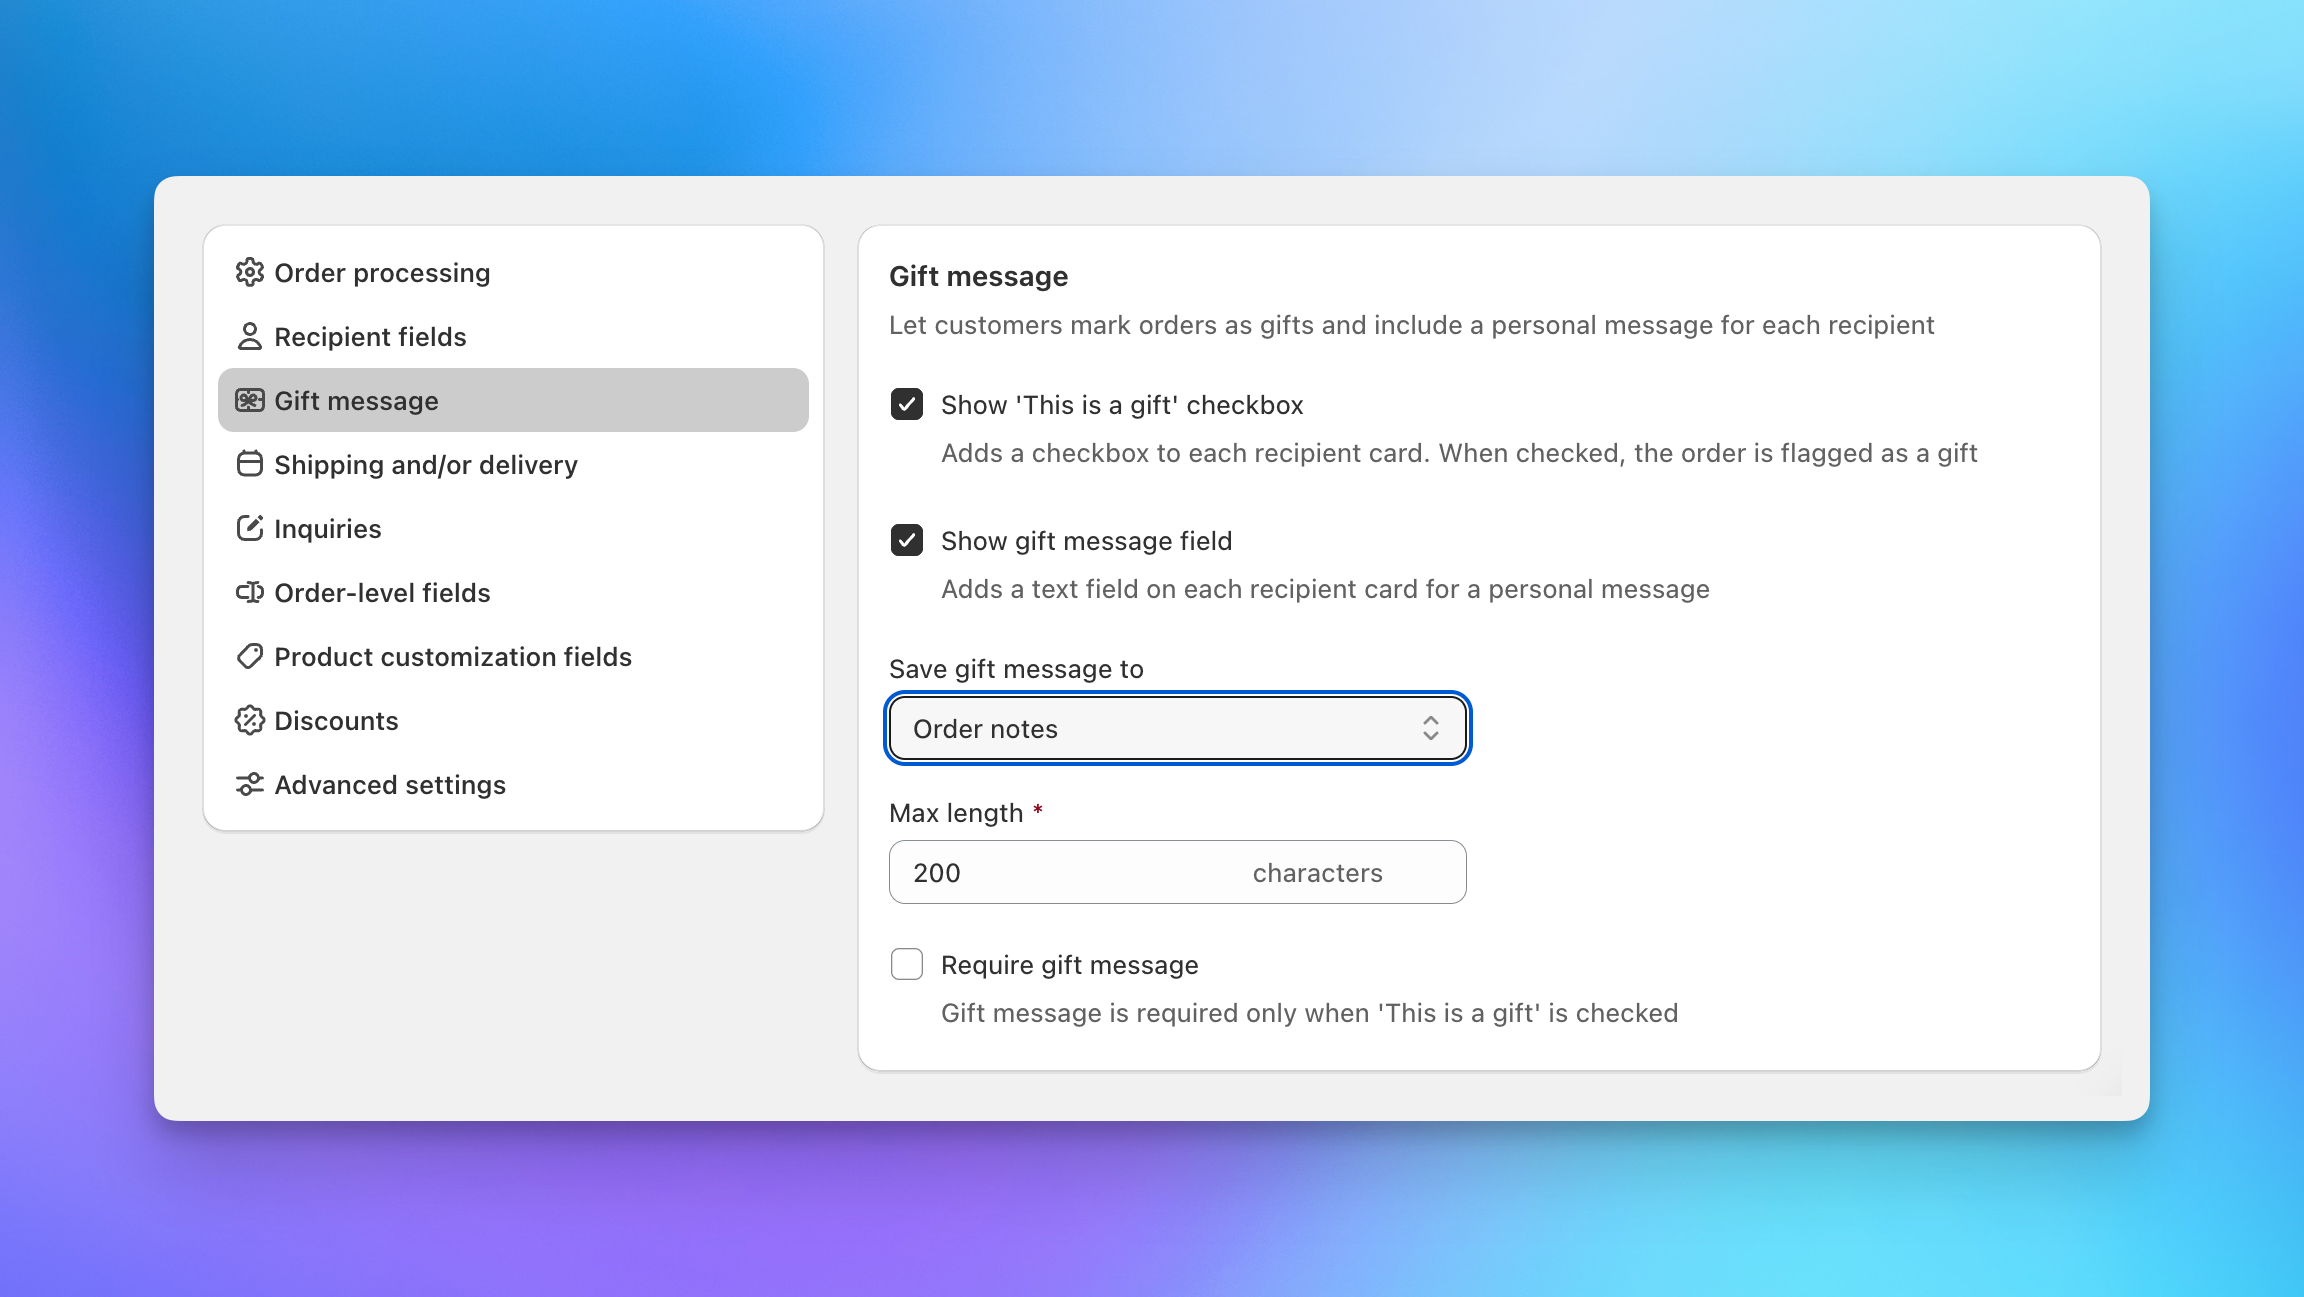
Click Gift message in the left navigation. This controls whether shoppers can mark orders as gifts and include a personal message for each recipient.
Two options here:
- Show "This is a gift" checkbox: Adds a checkbox to each recipient card. When checked, the order is flagged as a gift in Shopify.
- Show gift message field: Adds a text field on each recipient card for a personal message.
You can enable either or both. If you enable the gift message field, you can also adjust:
- Save gift message to: Where the message is stored on the order. Options include Order notes, Order additional details, Line item attributes, and Order metafields.
- Max length: Character limit for the message.
- Require gift message: When enabled, shoppers must enter a message before proceeding. This only applies when "This is a gift" is checked.
For most stores, saving to Order notes is the simplest option. Your fulfillment team can see the message directly on the order page in Shopify.
Shipping and/or Delivery
Click Shipping and/or delivery in the left navigation. This is where you configure shipping date selection for your shoppers.
If you want shoppers to pick a shipping or delivery date, check Show shipping date picker. You'll then choose between two modes:
- One date for all recipients: A single date picker appears once, and the selected date applies to every recipient.
- Date per recipient: Each recipient card gets its own date picker, so shoppers can schedule different delivery dates.
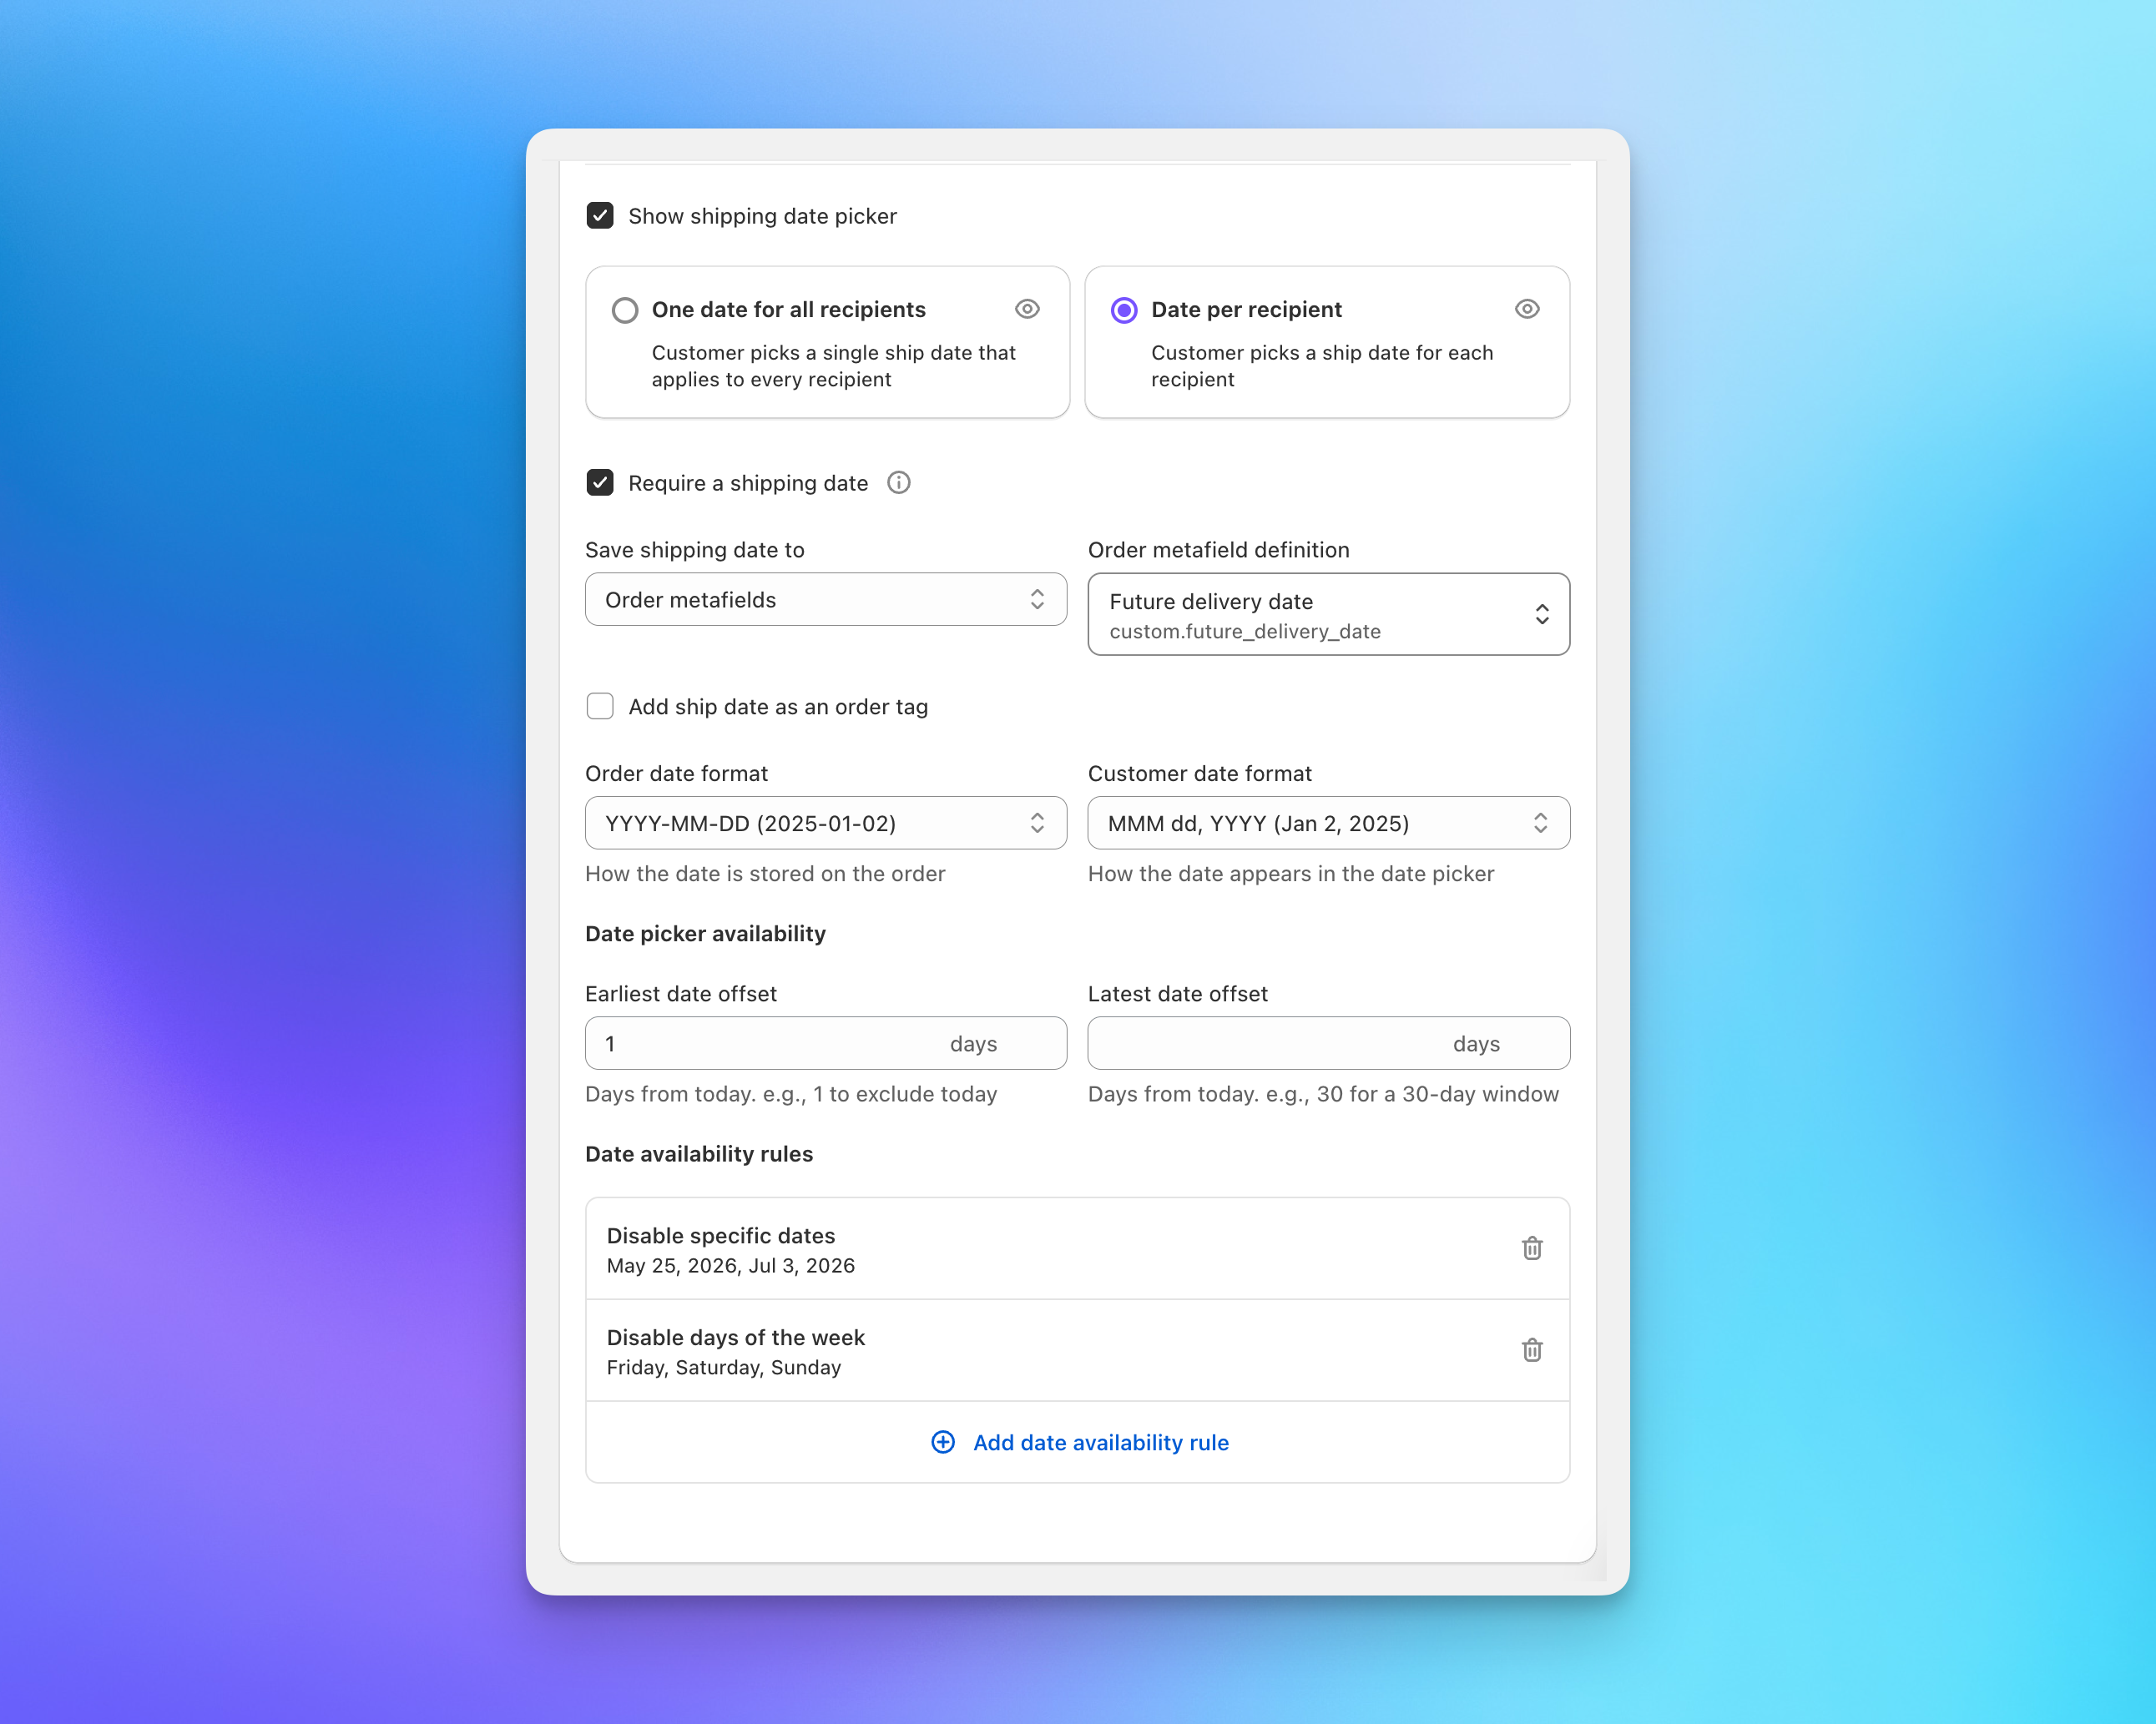
Below the date picker mode, you'll configure where the date is stored and how it's formatted:
- Save shipping date to: Choose Order additional details, Line item attributes, or Order metafields. If you use metafields, you'll also select the metafield definition.
- Order date format: The machine-readable format stored on the order (e.g., YYYY-MM-DD).
- Customer date format: The human-readable format shown in the date picker (e.g., MMM dd, YYYY).
Date availability rules let you control which dates shoppers can select. Set a minimum offset (e.g., 1 day from today) and maximum offset (e.g., 30 days out), and add rules to block specific dates or days of the week.
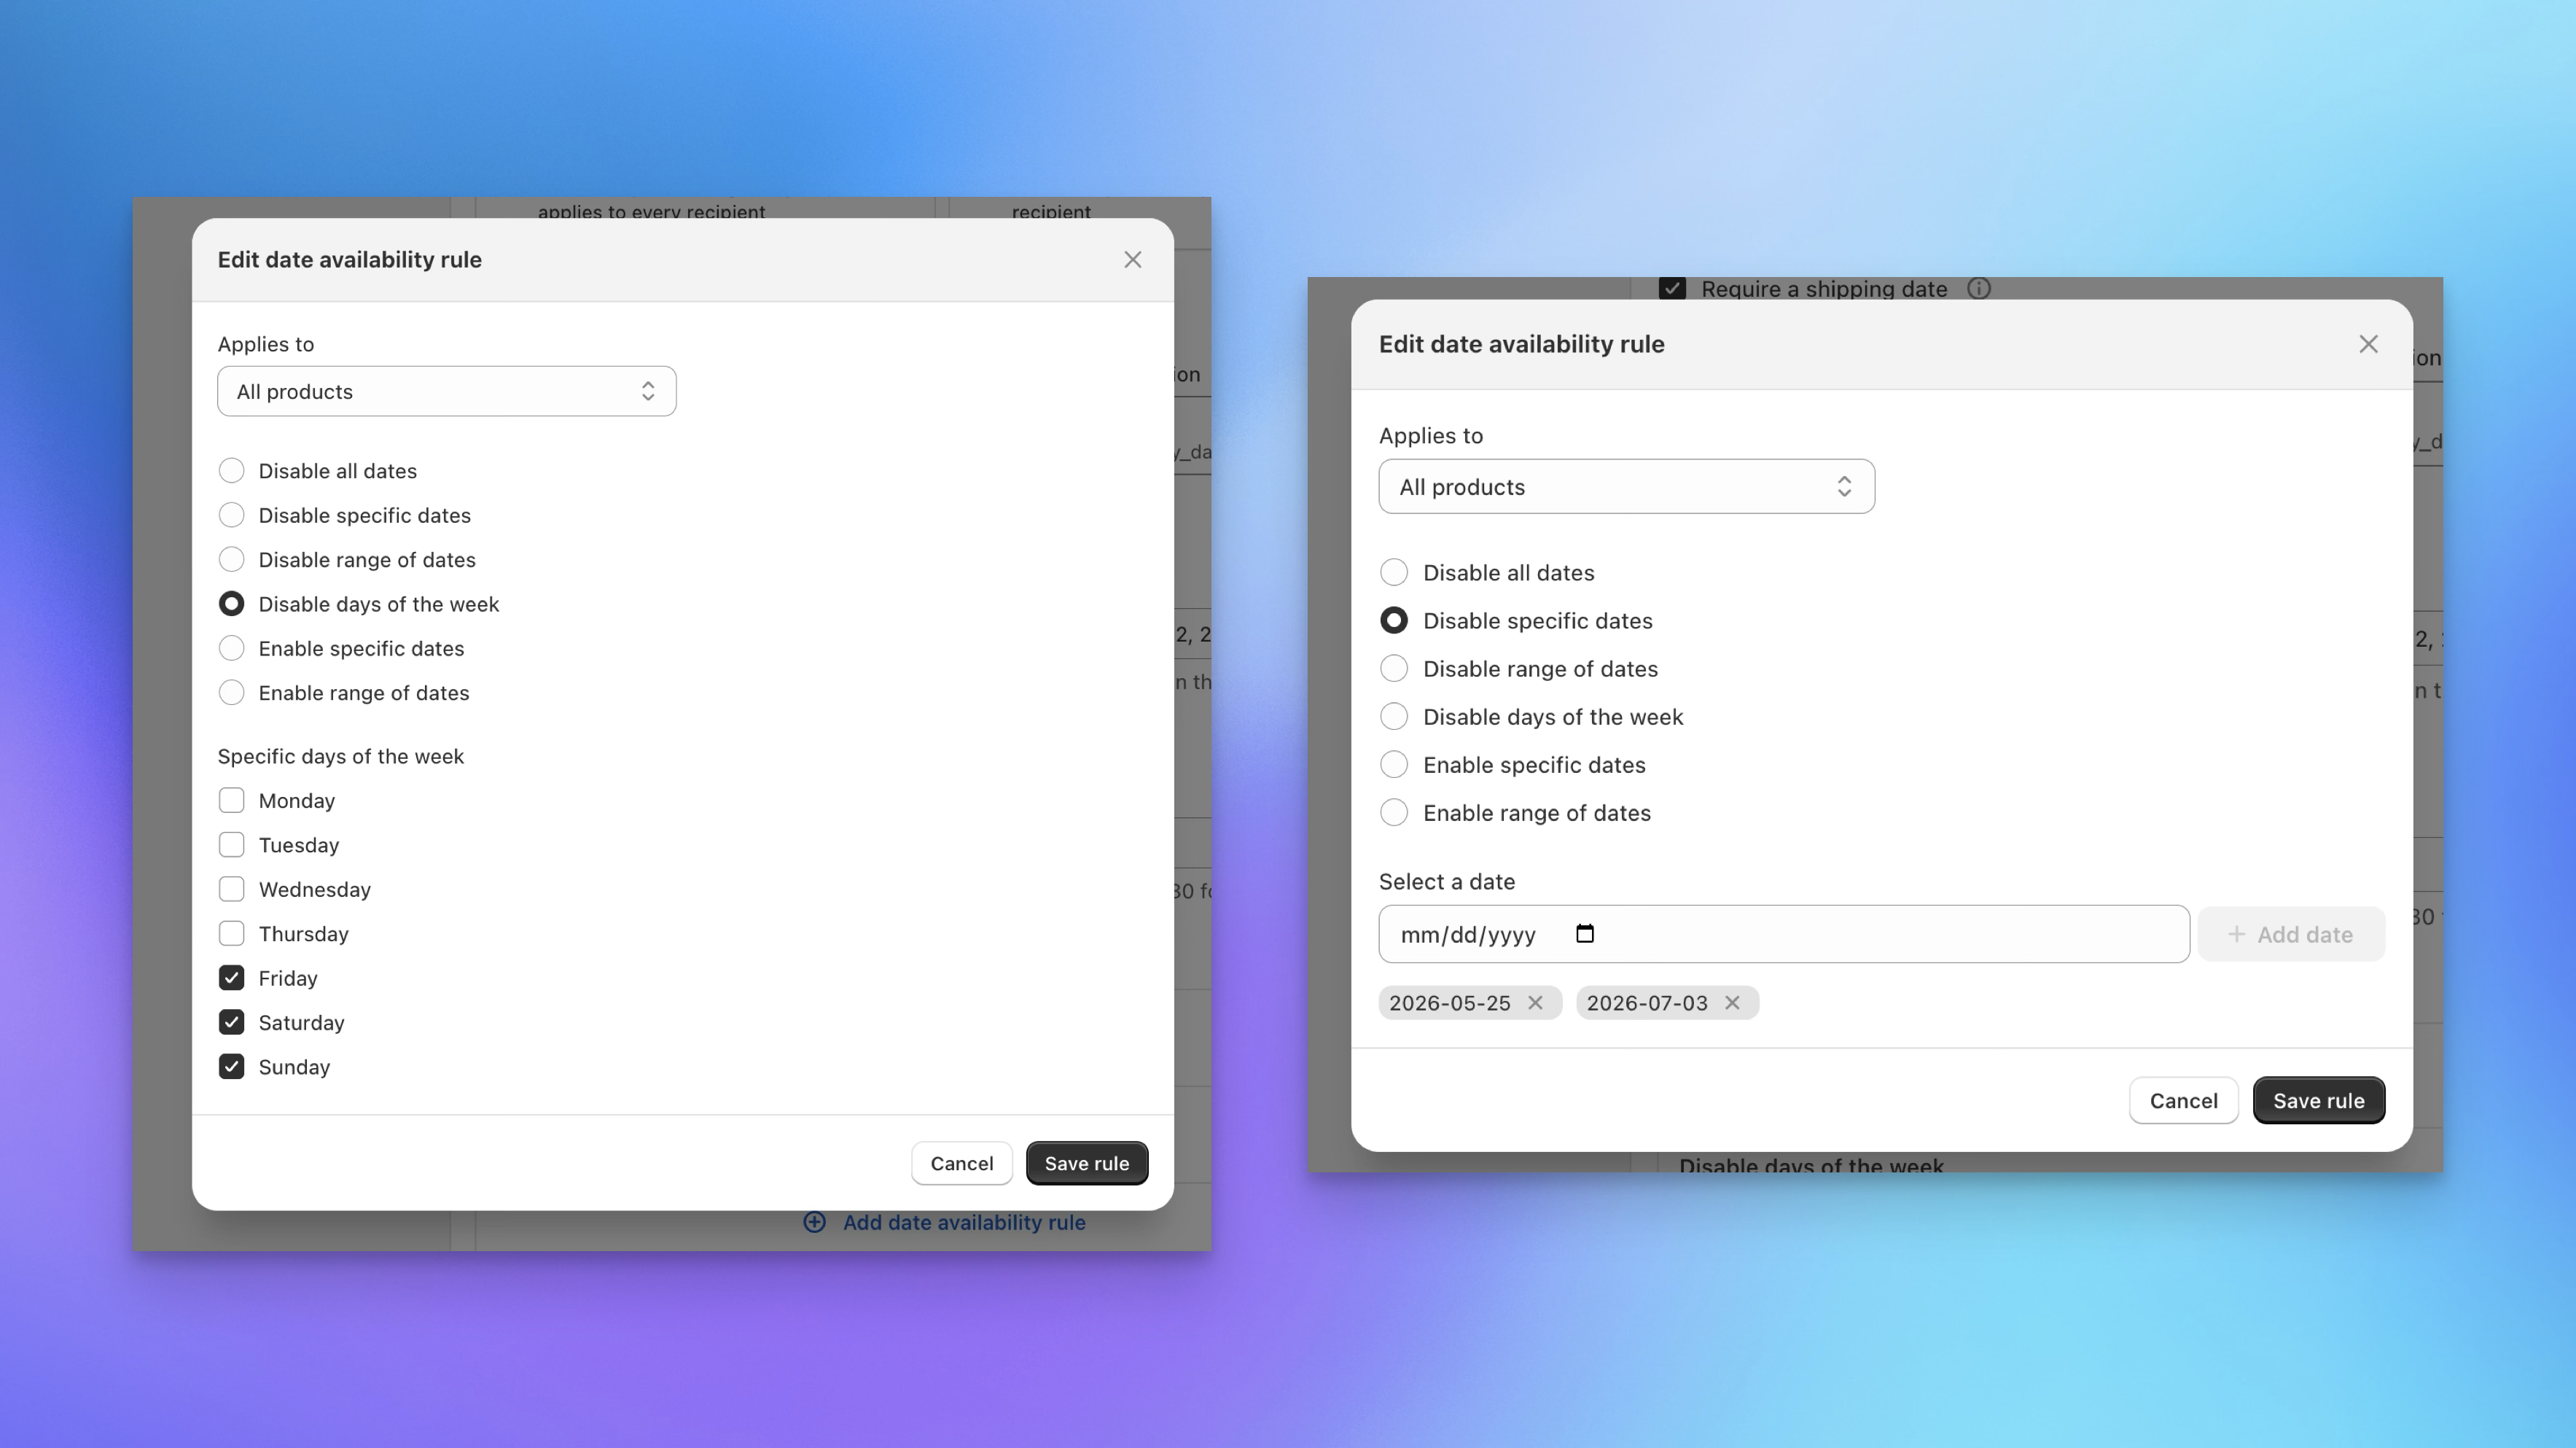
For example, you might disable weekends and specific holidays so shoppers can only select business days within your shipping window.
If you don't need date selection, leave the shipping date picker unchecked. You can always enable it later.
Step 2: Add the Checkout to a Test Page
Before going live, add the checkout to a test page so you can see exactly what your shoppers will experience. This takes about two minutes in the Shopify theme editor.
Open the Theme Editor
From the checkout settings page, click the external link icon next to Placement to jump directly to the theme editor. Alternatively, go to Online Store → Themes → Customize in your Shopify admin.
Create a Test Template
- In the theme editor, use the page template dropdown at the top to create a new template. Name it something like "multi-recipient-test".
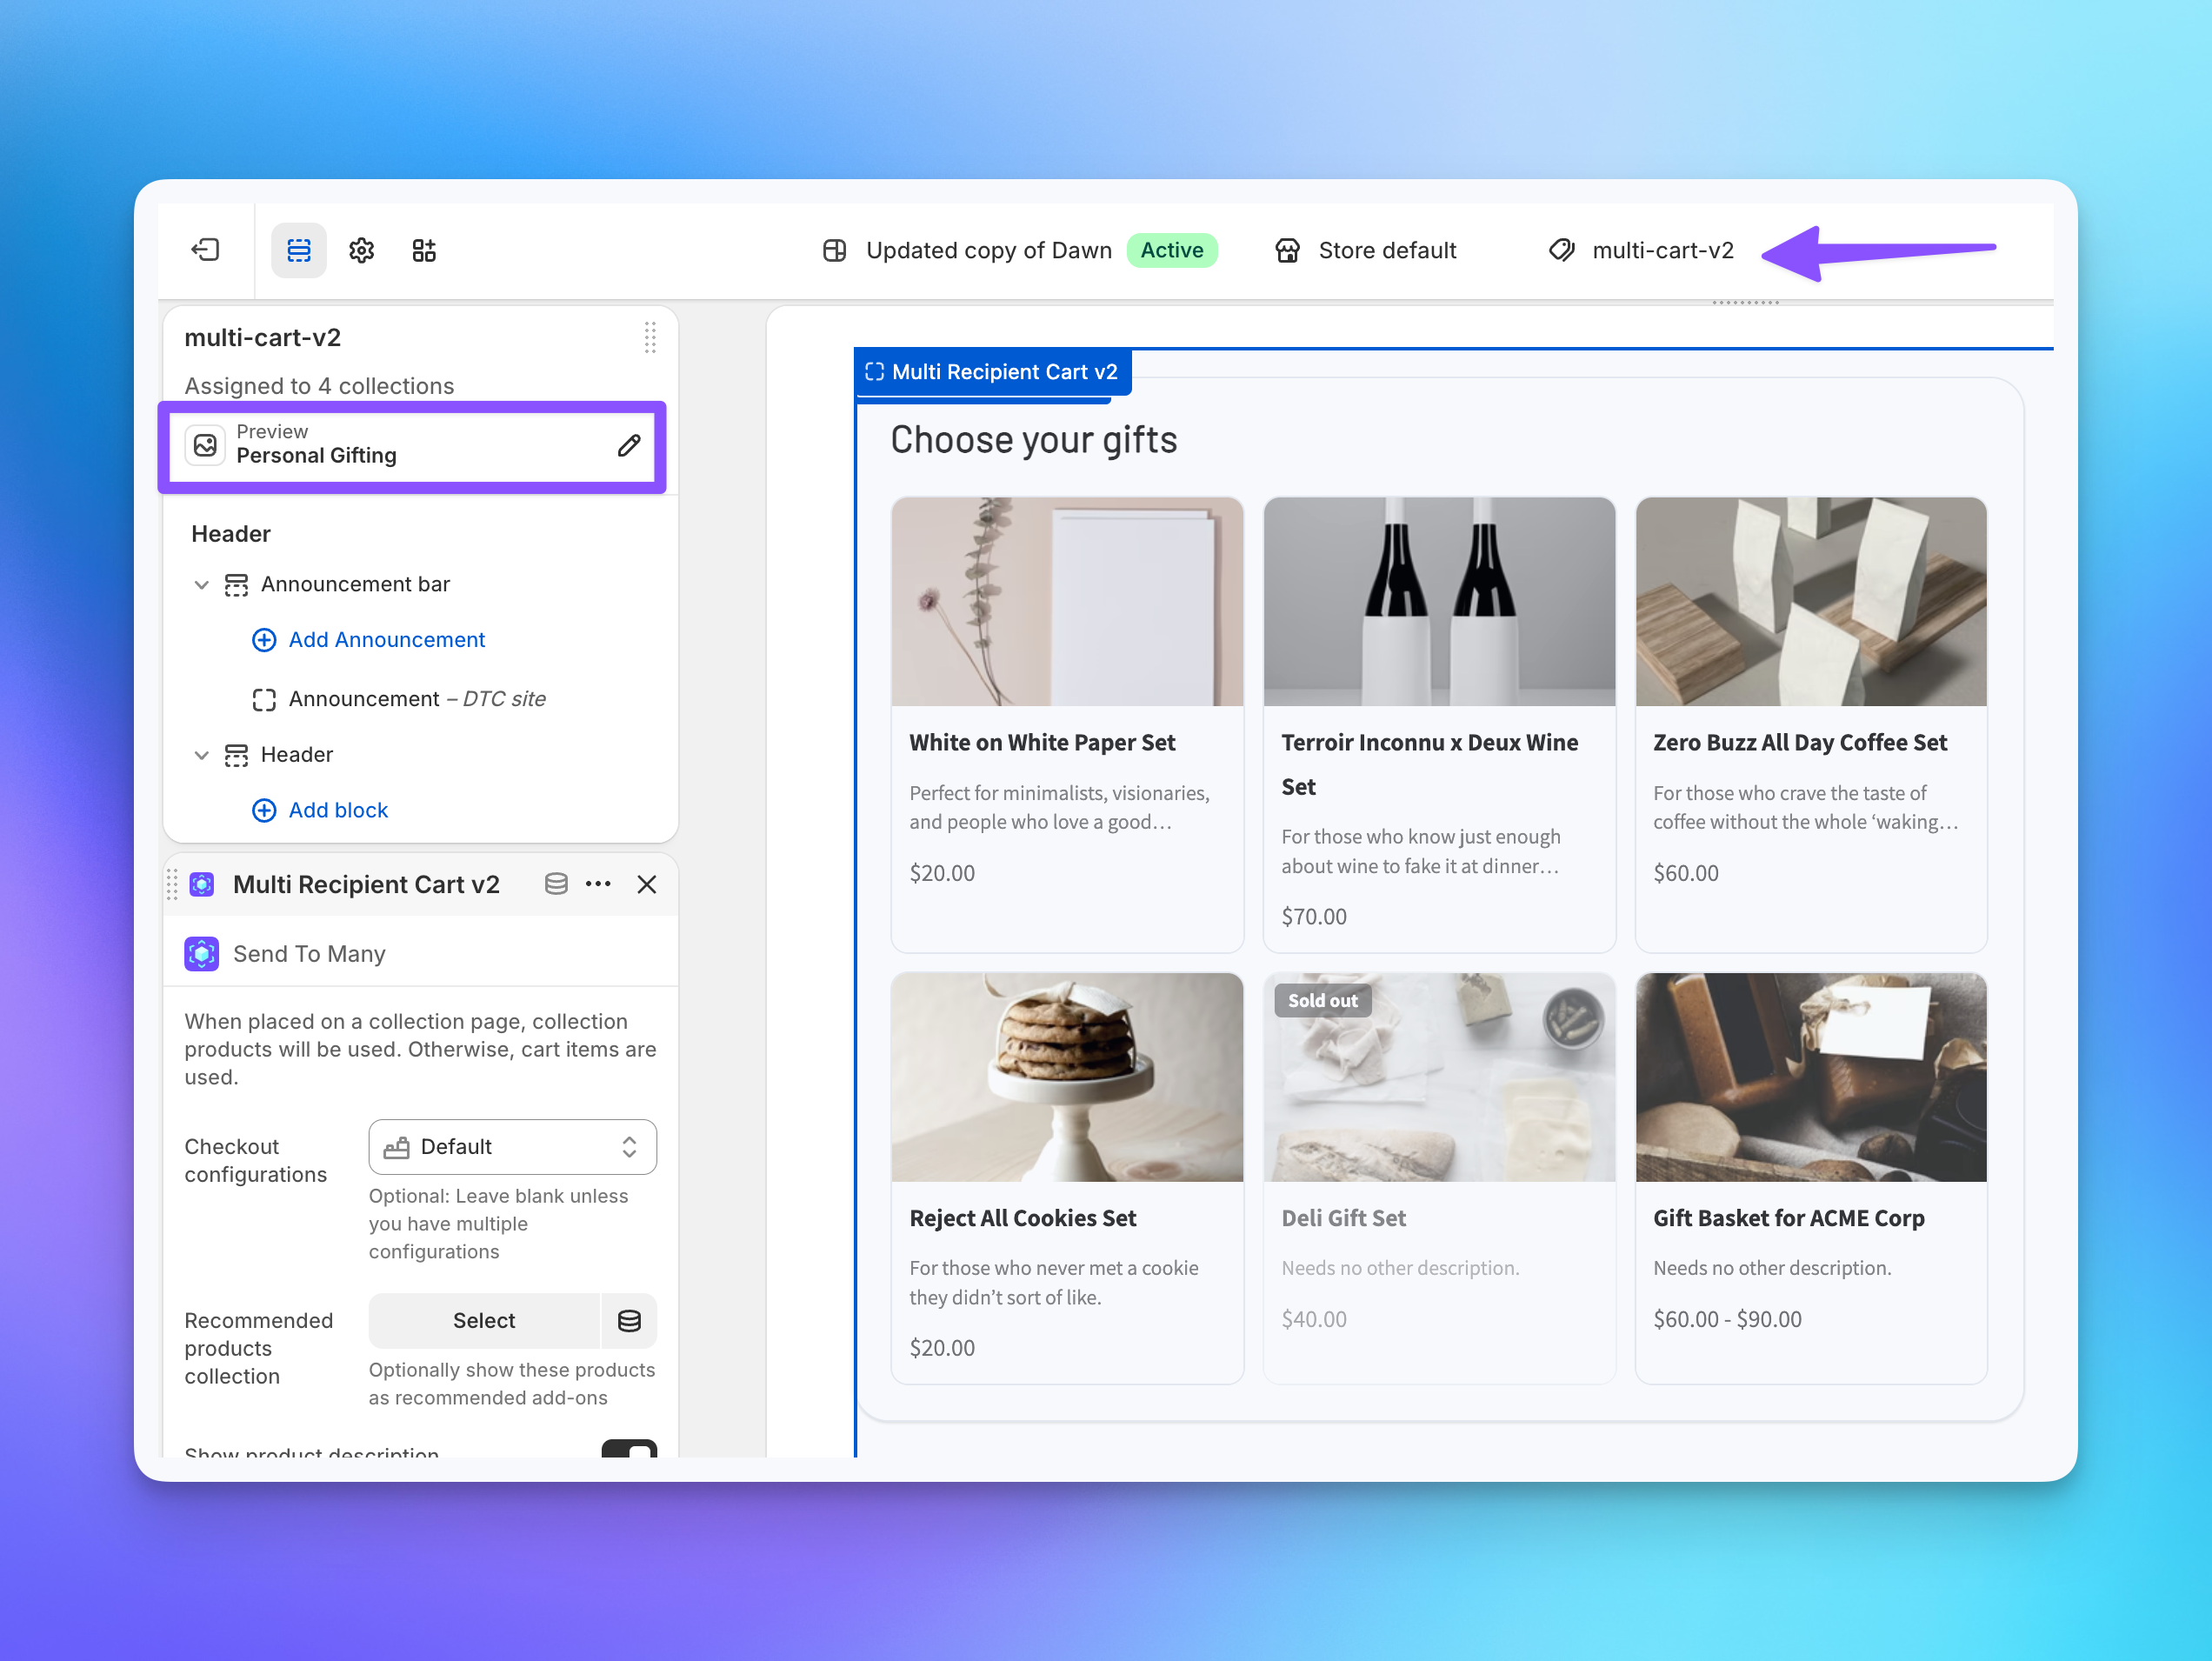
- In the template, click Add section or Add block and select Multi Recipient Cart v2 from the app blocks.
- The checkout block will appear in the template with its default settings.
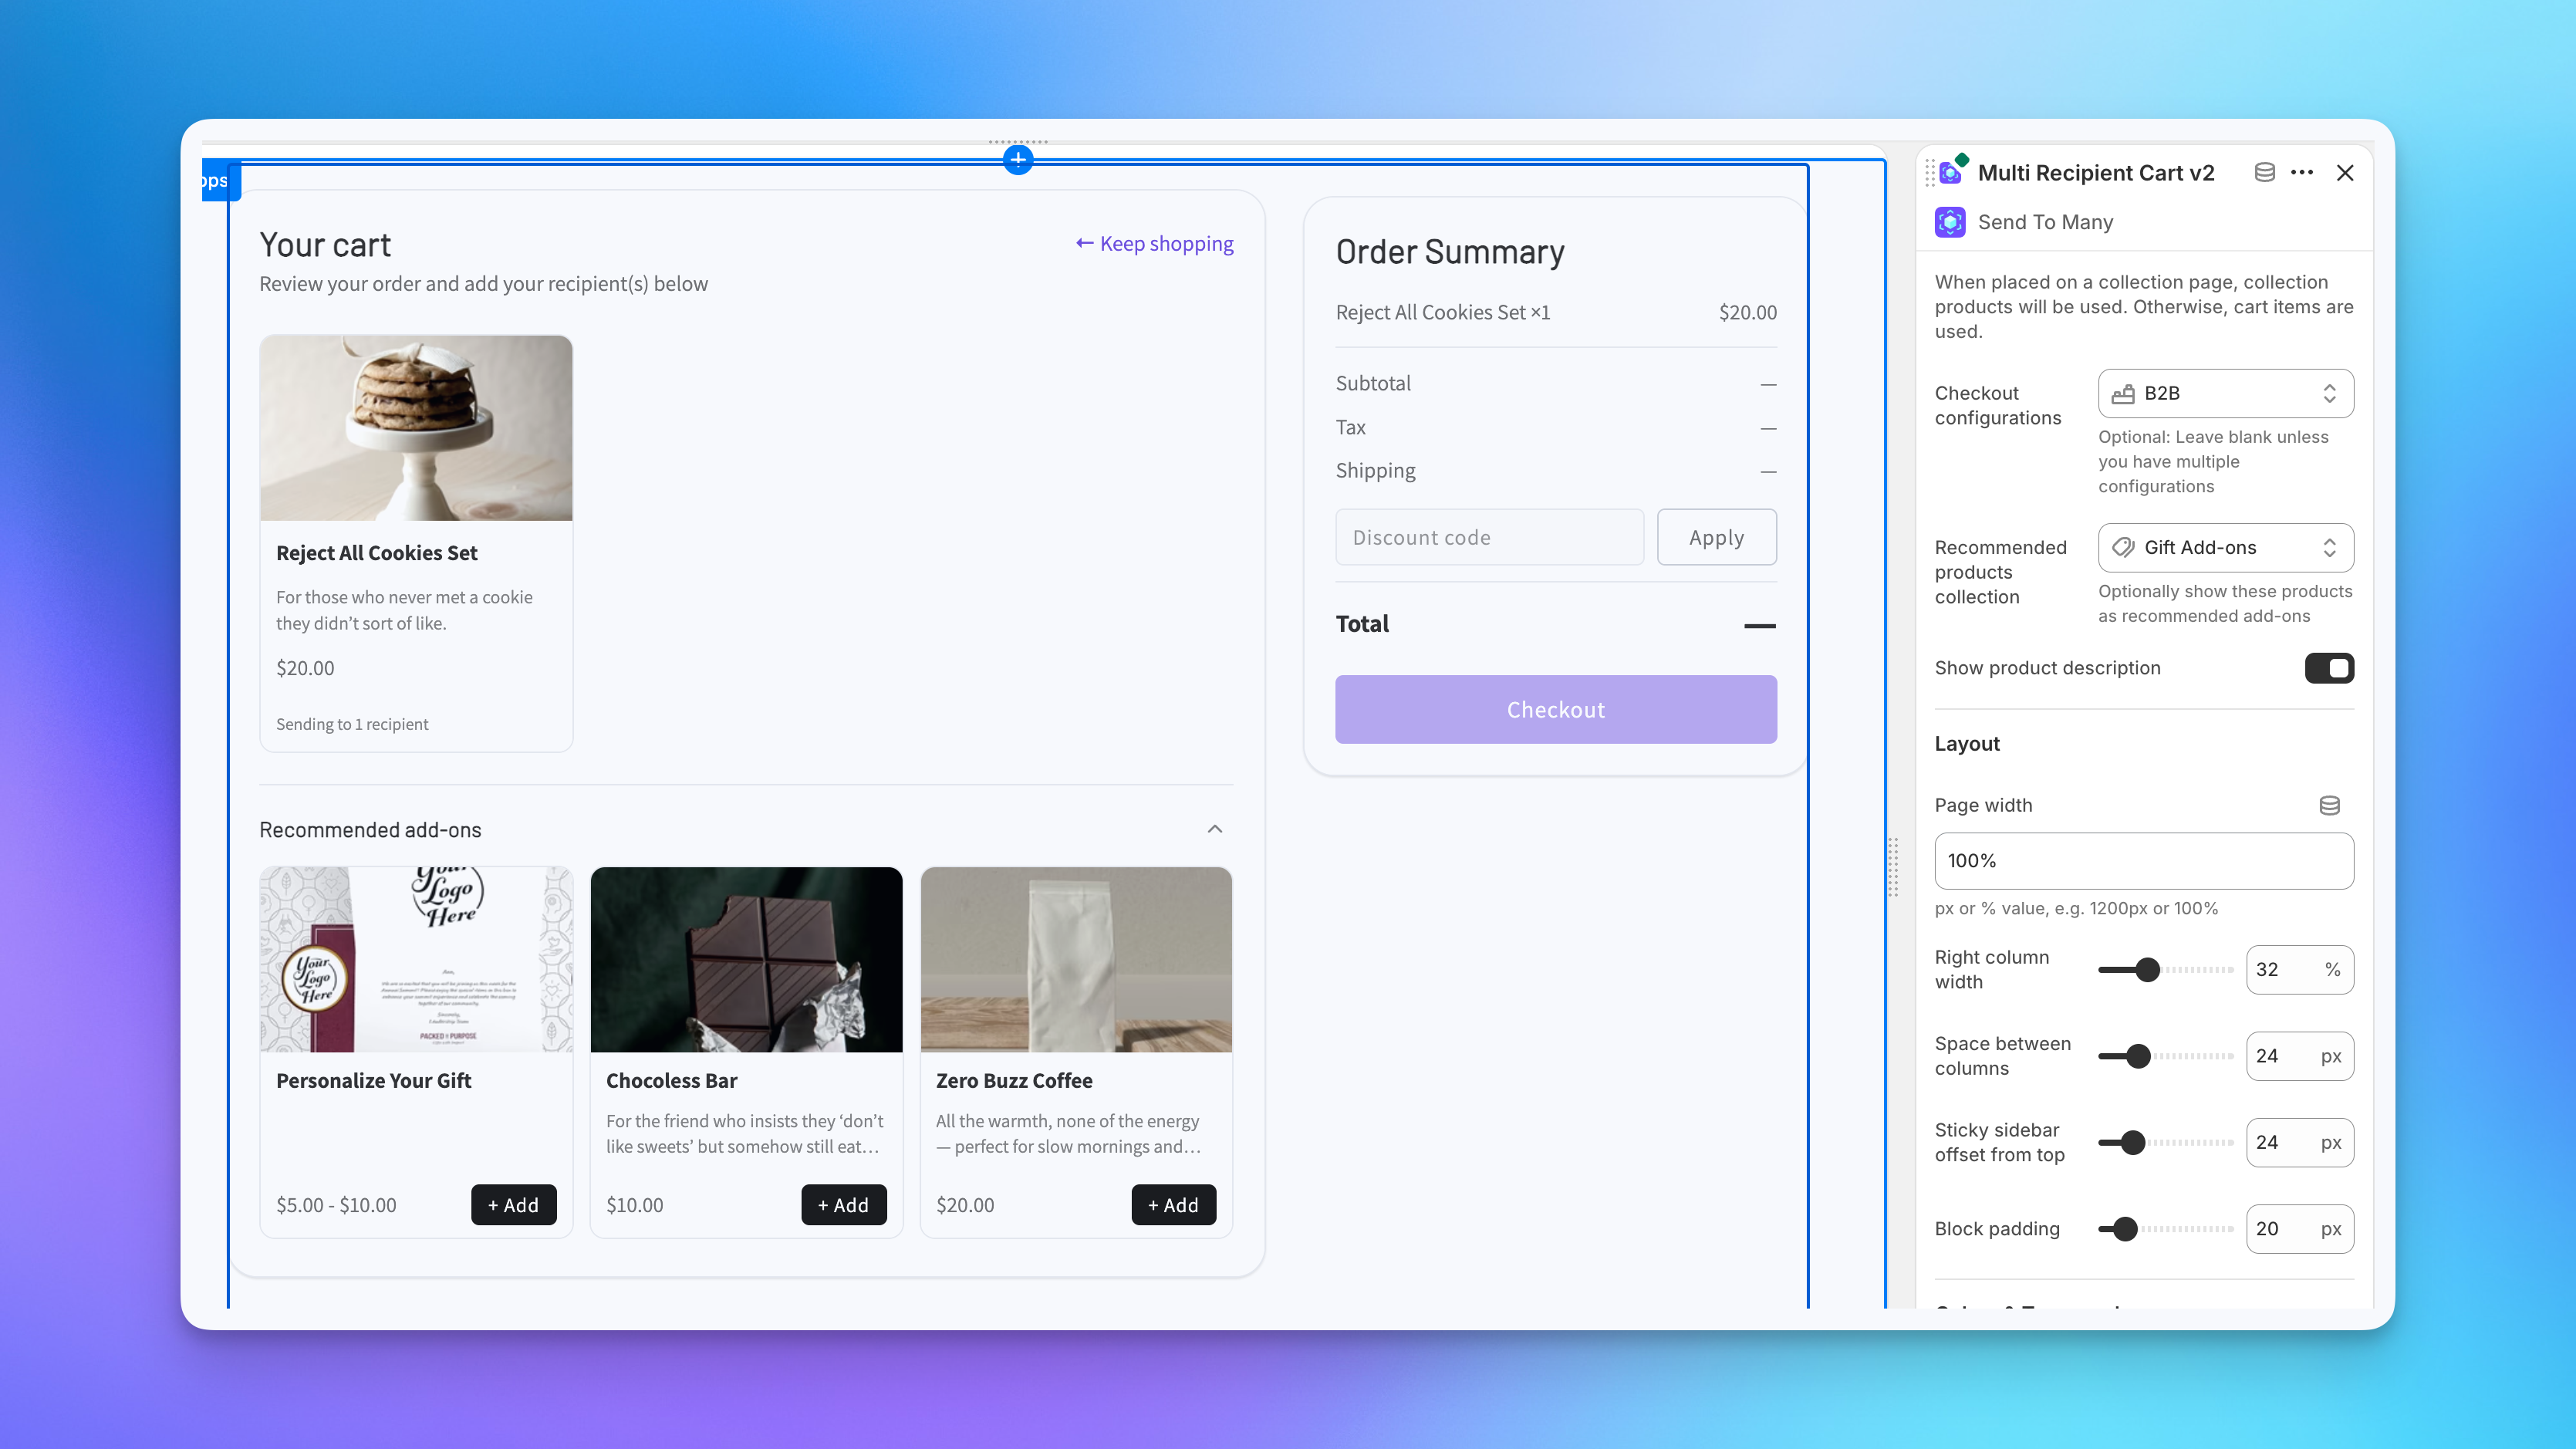
In the block settings panel on the right, you'll see options for:
- Recommended products collection: Optionally select a collection to show as add-on suggestions at the top of the checkout page.
- Layout: Page width, column widths, and spacing controls.
- Colors & Typography: Match colors, fonts, and sizing to your theme.
Save the template.
Create a Test Page
- Go to Online Store → Pages in your Shopify admin.
- Click Add page.
- Set the title (e.g., "Multi-Recipient Test").
- In the Theme template dropdown (bottom right), select the template you just created.
- Save the page.
Note the page URL. You'll use it in the next step to navigate directly to the checkout.
Step 3: Test the Full Flow
Now run through the checkout as a shopper would. This is the best way to verify your settings before going live.
- Add a product to your cart. Visit your storefront, browse to a product, and add it to your cart.
- Navigate to your test page. Go directly to the URL of the test page you created (e.g., yourstore.com/pages/multi-recipient-test).
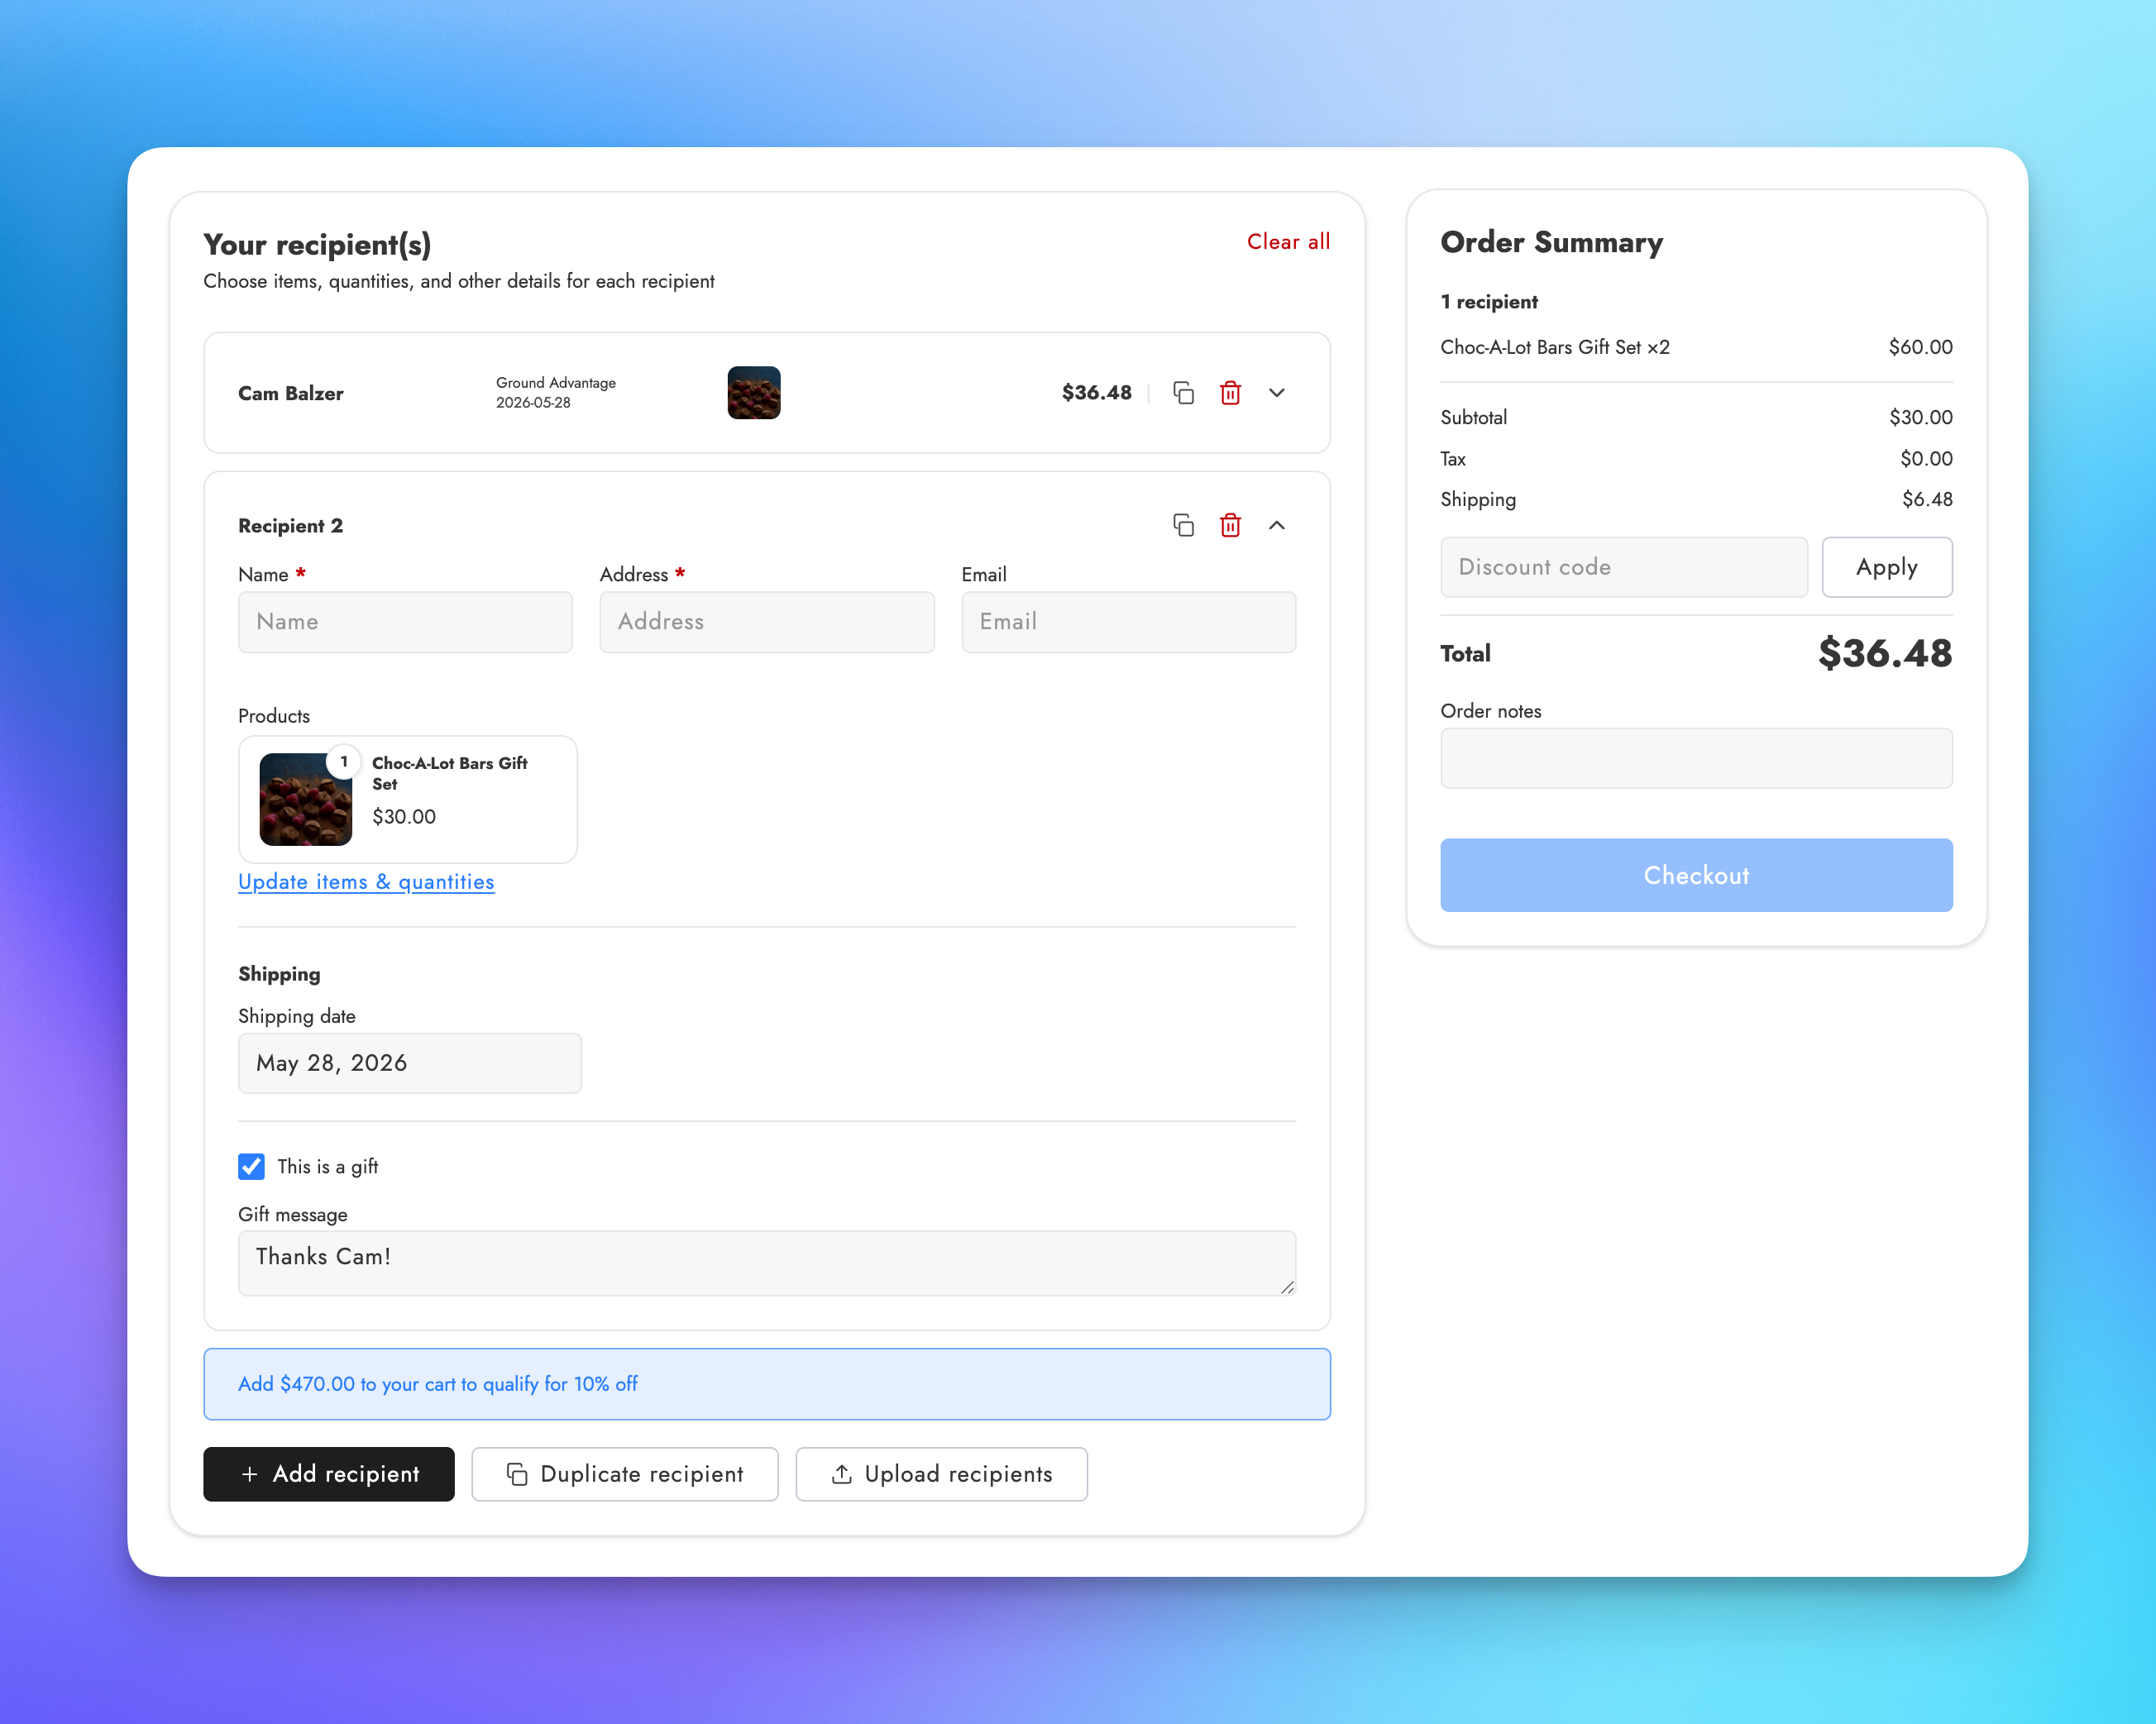
- Add a test recipient. Fill in a name and address. If you enabled gift messages, try adding one. If you have a shipping date picker, select a date.
- Review the order summary. Check that products, quantities, shipping, and totals look correct in the right-side summary panel.
- Add a second recipient. Click + Add recipient and fill in another address. Verify that shipping calculates independently for each recipient.
- Complete Shopify checkout. Click Checkout and complete the test transaction.
- Review the orders. In your Shopify admin, check that you see a gifter (aggregate) order capturing the full revenue and individual recipient orders for each address.
If something doesn't look right, adjust your settings and test again. After completing a checkout, the session is cleared and you can start fresh.
To clean up test orders afterward, see How to cancel and refund multi-recipient orders.
Step 4: Configure Order Processing
Now that you've seen the checkout working, configure how orders are handled behind the scenes. Go back to your checkout settings and click Order processing in the left navigation.
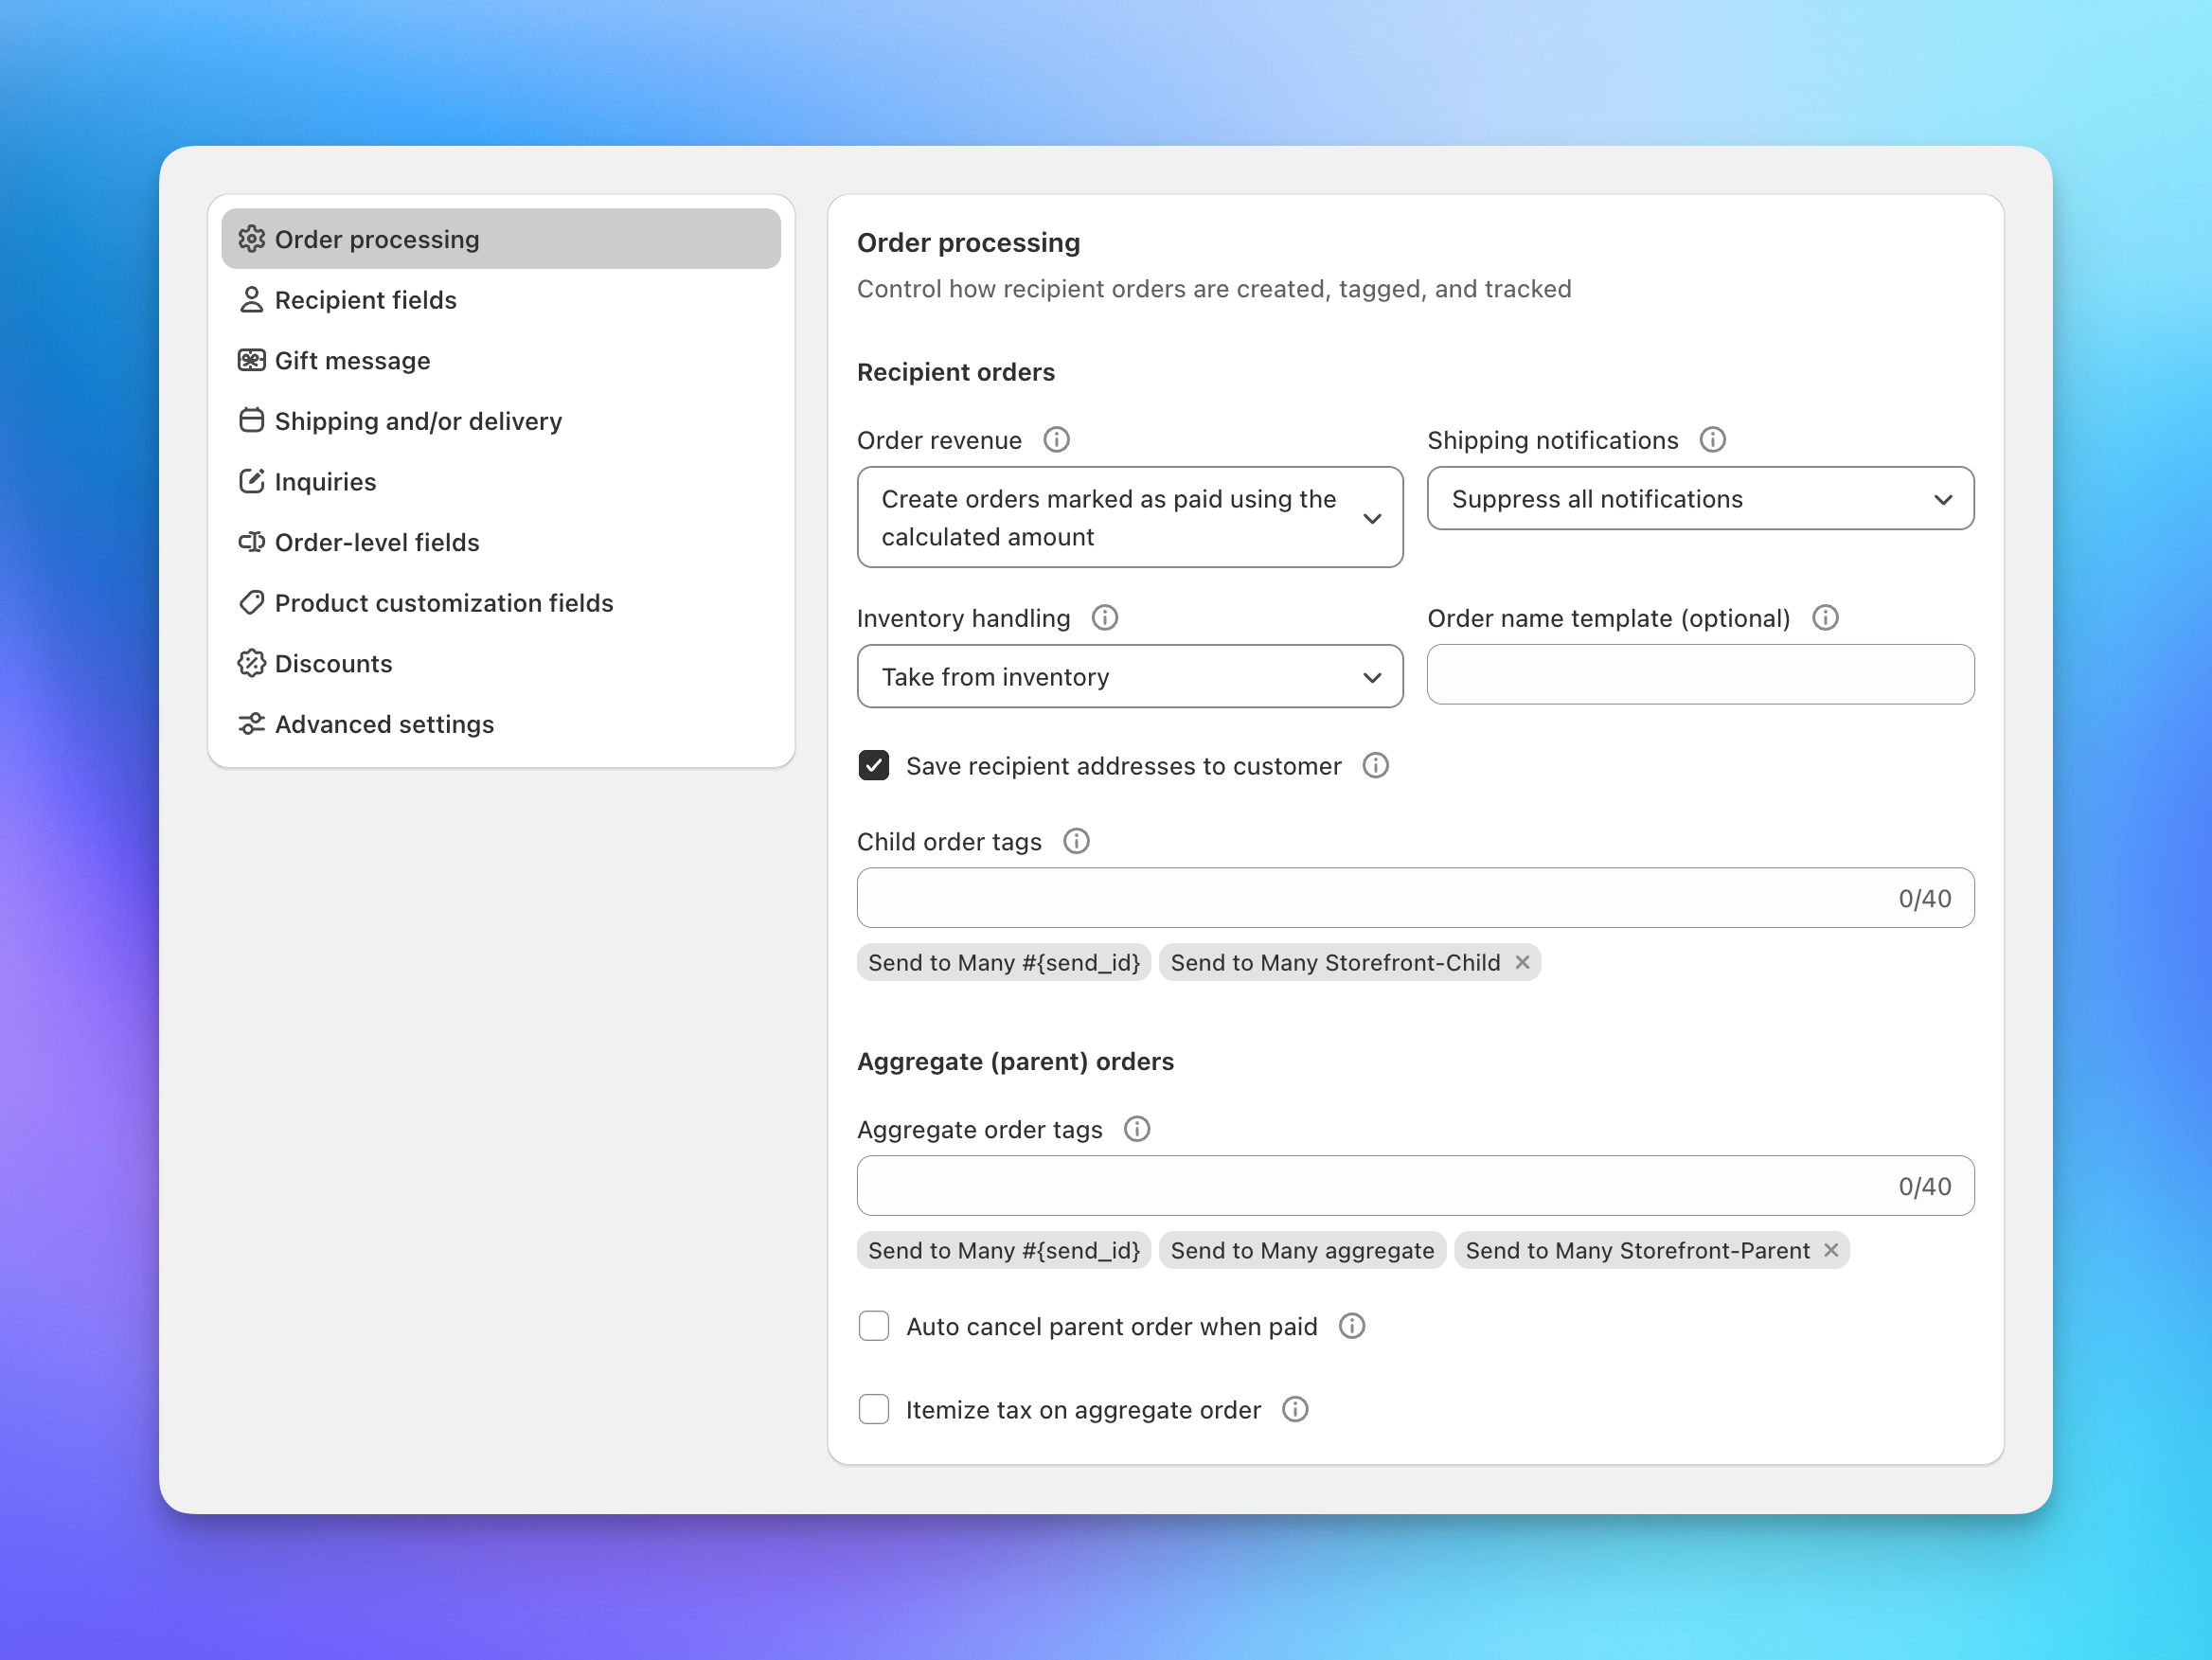
Order Revenue
This is the most important setting to get right. Choose how revenue appears on recipient orders:
- Create orders marked as paid using the calculated amount: Each recipient order shows the full price, tax, and shipping. Good for per-order accounting detail, but revenue appears on both the aggregate and recipient orders.
- Create orders marked as paid with $0 amounts: Recipient orders are created at $0. All revenue lives on the gifter order only. Avoids double-counting in Shopify reports.
We recommend using calculated amounts. It creates the most thorough reporting and the best customer experience, with full price, tax, and shipping detail on every order. The tradeoff is that revenue appears on both the aggregate order and each recipient order, which means Shopify reports will show doubled-up revenue unless you filter by order tags. See Filtering multi-recipient orders in Shopify reports for how to handle this.
Shipping Notifications
Control who gets Shopify's order confirmation and shipping notification emails:
- Suppress all notifications: No emails sent. The right choice for most gifting use cases where you don't want recipients getting order confirmations.
- Send to recipients: Shopify sends notifications directly to each recipient's email.
- Send to customer: Notifications go to the gifter. Be cautious: a 50-recipient order could generate 200+ emails to the gifter.
Other Order Settings
The order processing tab also includes:
- Inventory handling: Whether to deduct inventory from recipient orders (default: take from inventory).
- Order name template: Customize how recipient orders are named in Shopify.
- Child order tags / Aggregate order tags: Tags applied to recipient and gifter orders. Useful for filtering in Shopify, triggering Flow automations, and routing to fulfillment services.
- Auto cancel parent order when paid: Automatically cancels the gifter order after payment so it doesn't appear in your fulfillment queue. We recommend against enabling this unless it's absolutely necessary for your ERP or fulfillment workflow, as it creates confusion for customers who see a cancelled order in their account.
- Itemize tax on aggregate tax line item: Shows a detailed tax breakdown on the gifter order instead of a single lump sum.
For a full reference on every order processing option, see Core settings.
Discounts
Click Discounts in the left navigation to configure how discount codes work in your checkout.
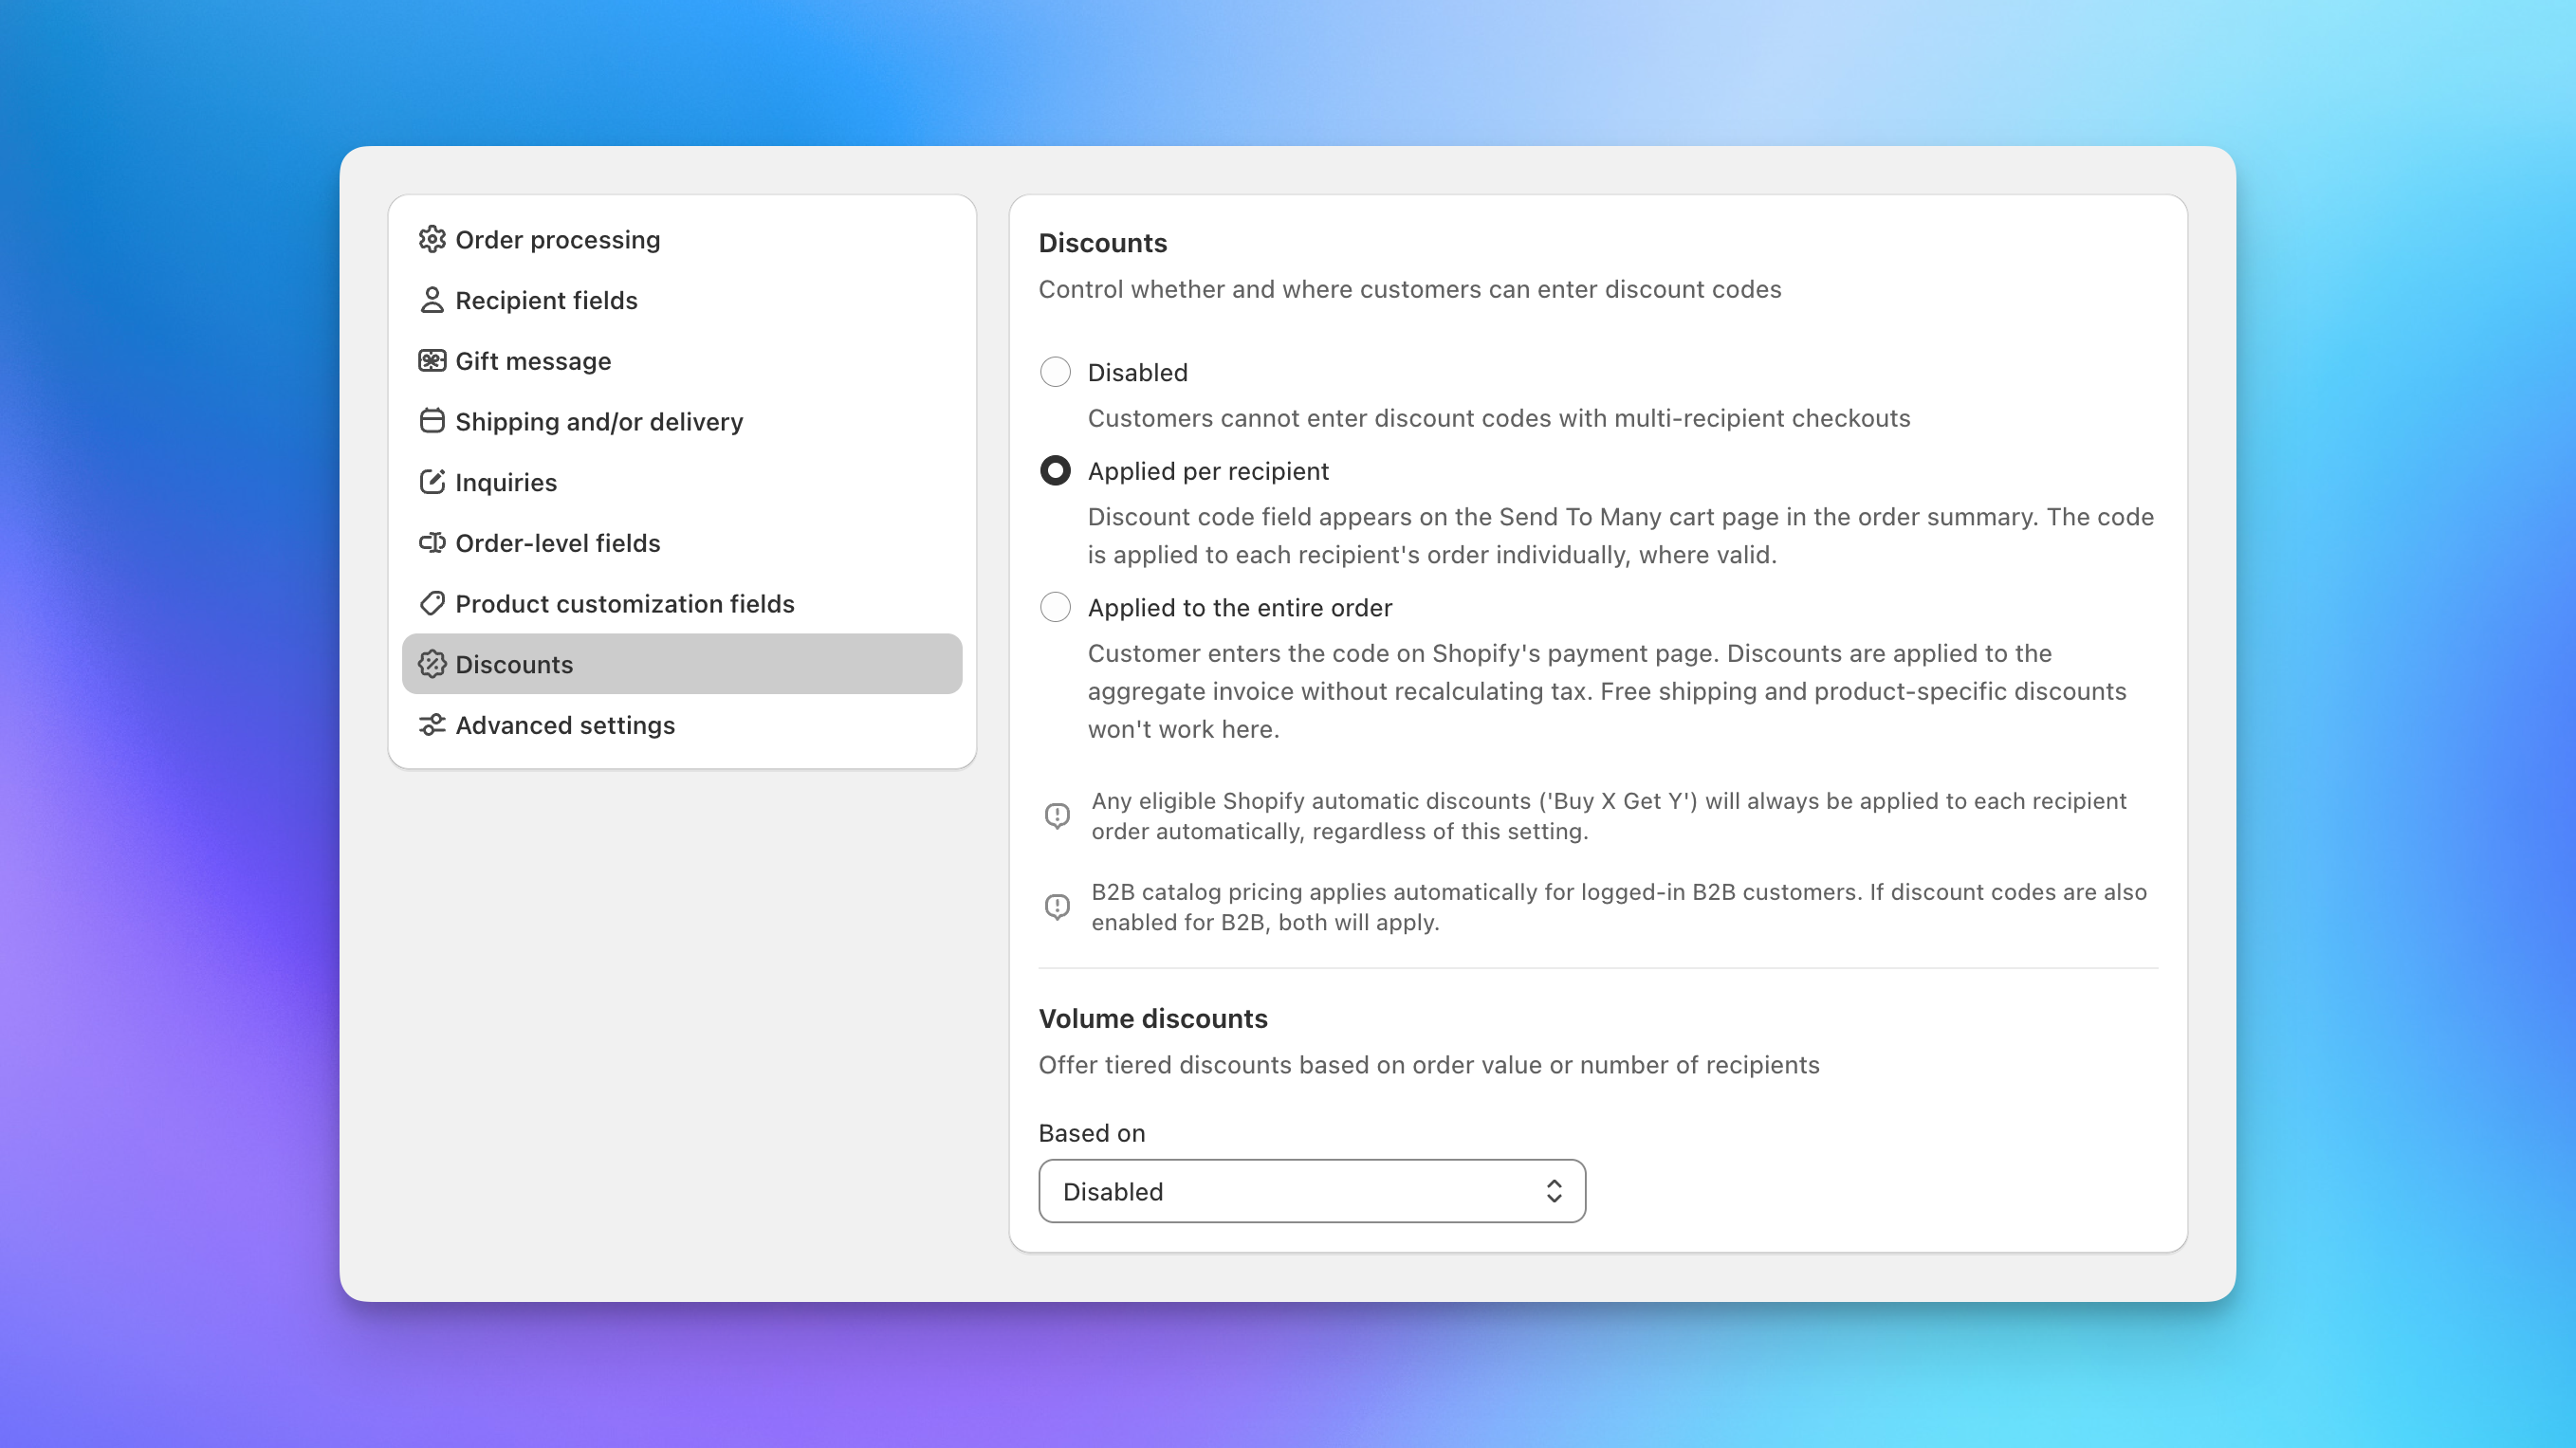
Three modes for discount codes:
- Disabled: Shoppers cannot enter discount codes.
- Applied per recipient: The discount code field appears on the checkout page. The code is validated and applied to each recipient's order individually, respecting any product or collection restrictions on the code.
- Applied to the entire order: The code is entered on Shopify's payment page and applied to the aggregate invoice. Free shipping and product-specific discounts won't work with this option.
Shopify's automatic discounts (like "Buy X Get Y") always apply regardless of this setting.
Volume discounts let you offer tiered pricing based on the number of recipients or total order value. For example, 10% off orders over $500, or 15% off when sending to 10+ recipients. Shoppers see a progress message as they add recipients, encouraging larger orders.
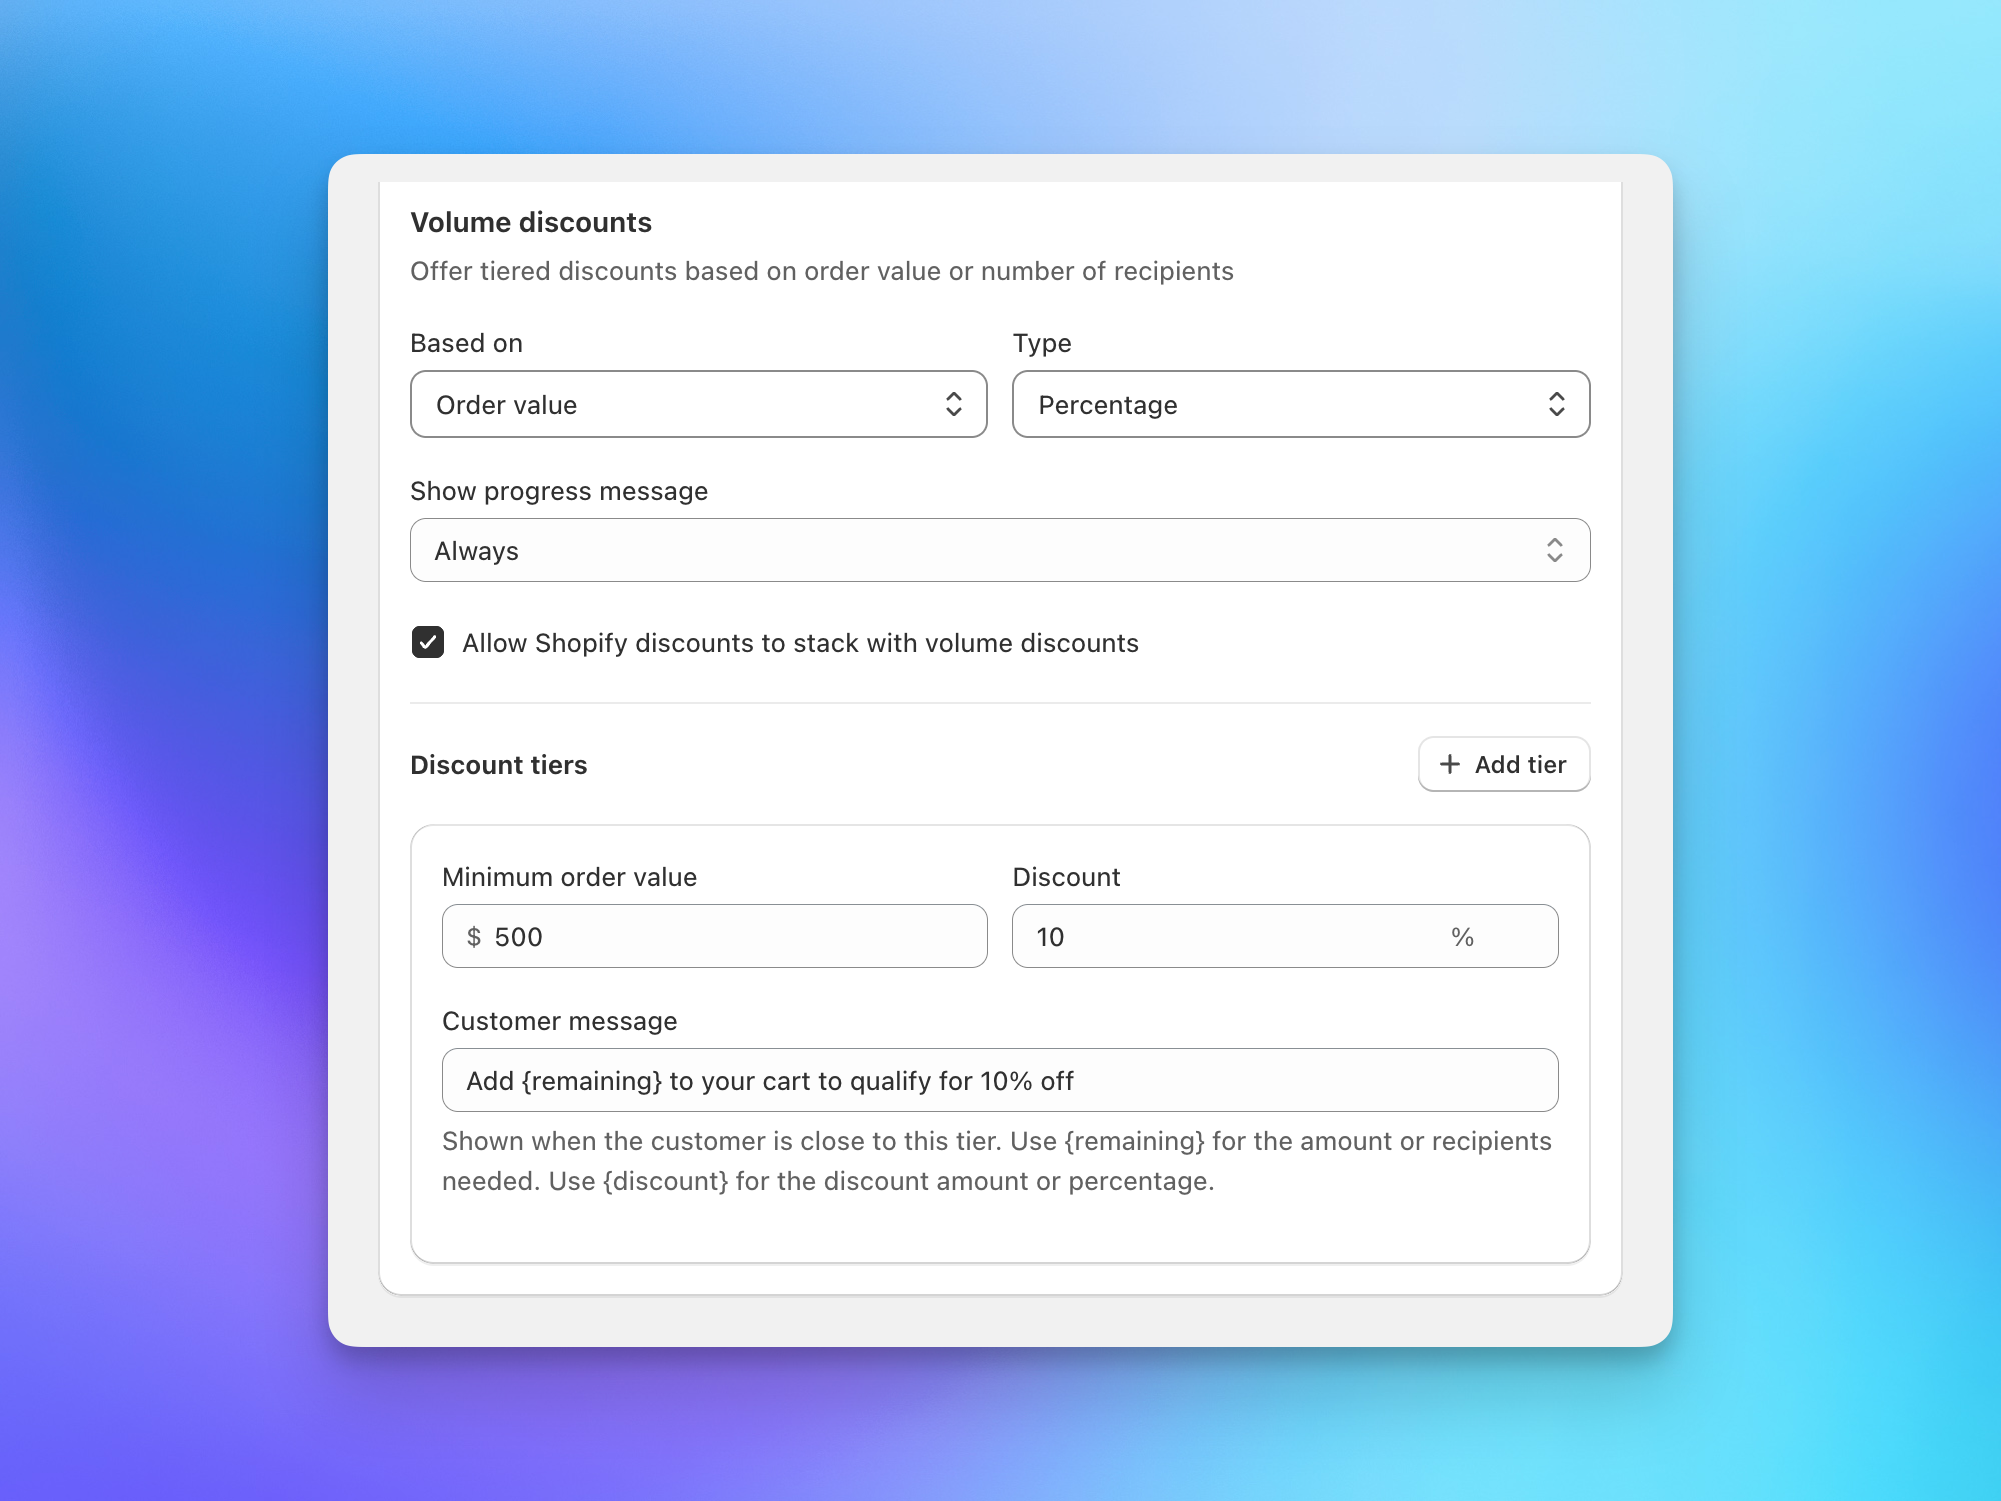
For full details on setting up discount tiers, see Discounts in multi-recipient checkout.
Step 5: What's Next?
At this point you have a working checkout with recipient fields, order processing, and discounts configured. Here are the additional capabilities you can explore.
Customize the Look and Feel
The theme editor block settings give you control over colors, typography, spacing, and card styles without writing any code. Click the checkout block in the theme editor to access these settings.
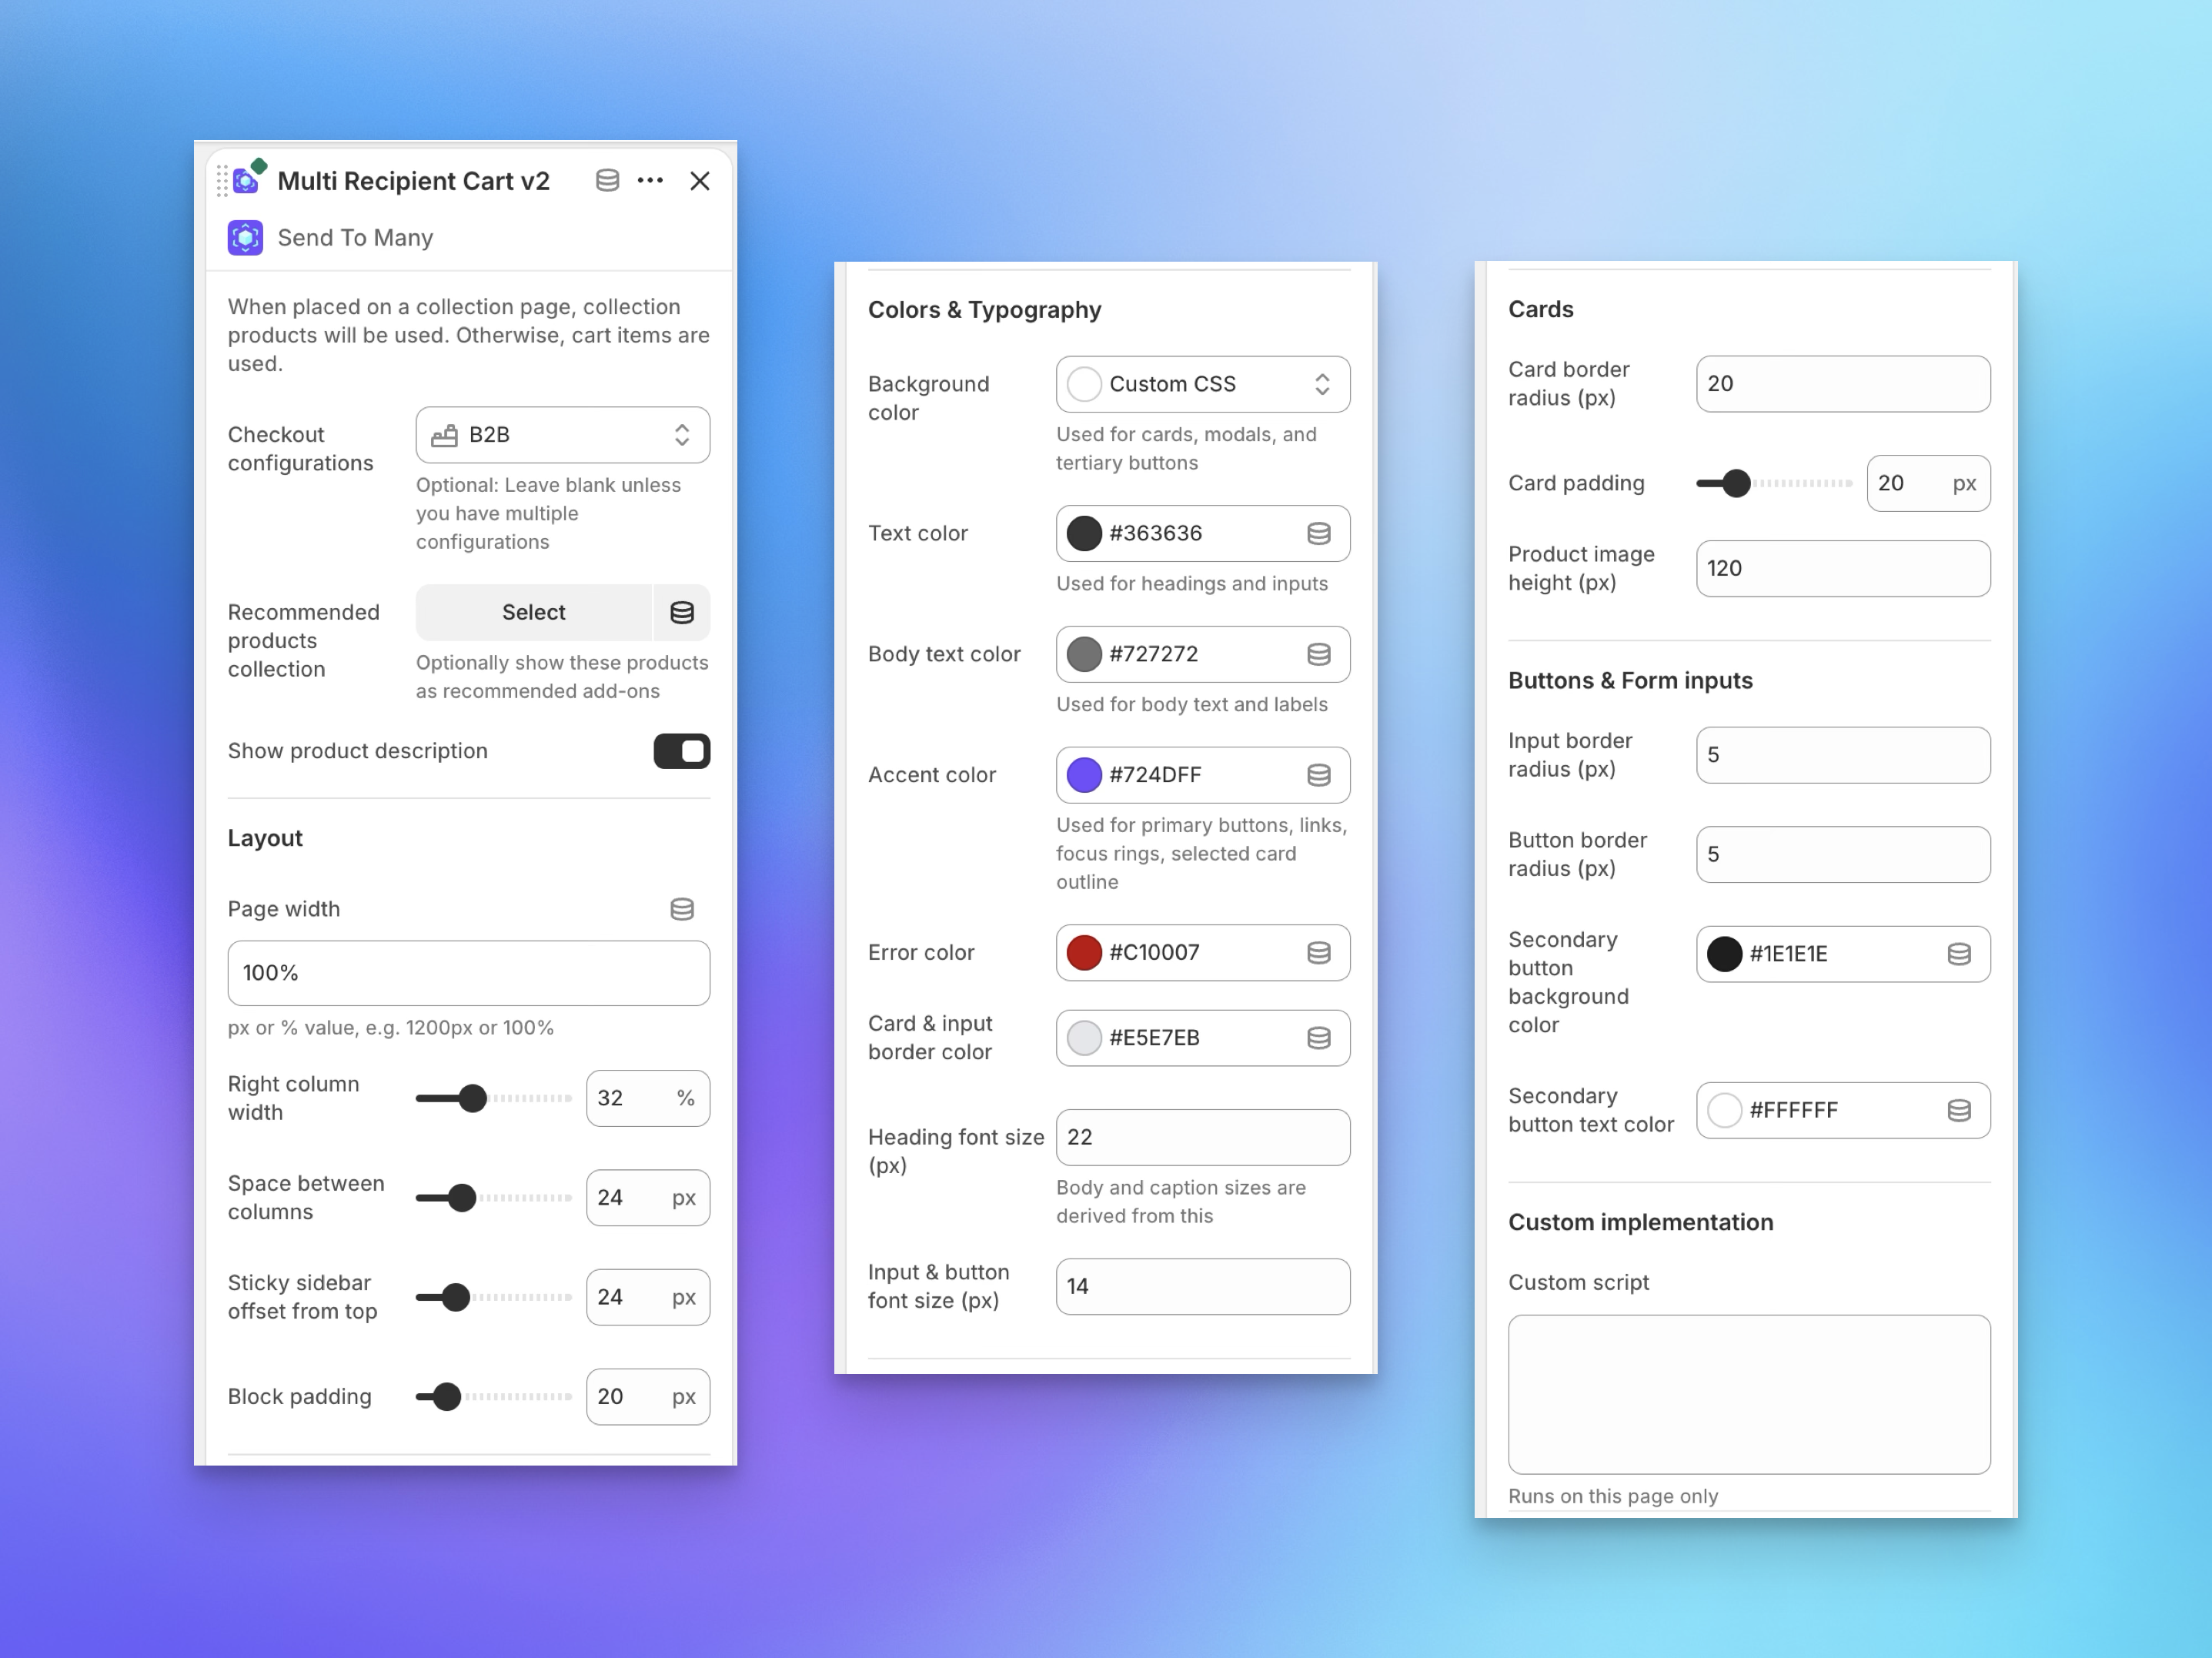
For deeper customization, you can write custom CSS that targets the checkout section. See CSS customization for selectors and examples.
Use a Collection Page
Instead of placing the checkout on a standalone page, you can add it to a collection page template. When placed on a collection page, the checkout uses the collection's products instead of the cart contents. This is useful for creating dedicated gifting pages where shoppers browse and select from a curated set of products.
Edit Text and Translations
Every label, button, and message in the checkout can be customized. Go to Settings → Text and translations in Send To Many to edit the copy.
Product Customization Fields
If you sell products that require personalization (custom engravings, card messages, logo uploads), you can add custom fields that appear in the checkout for specific products.
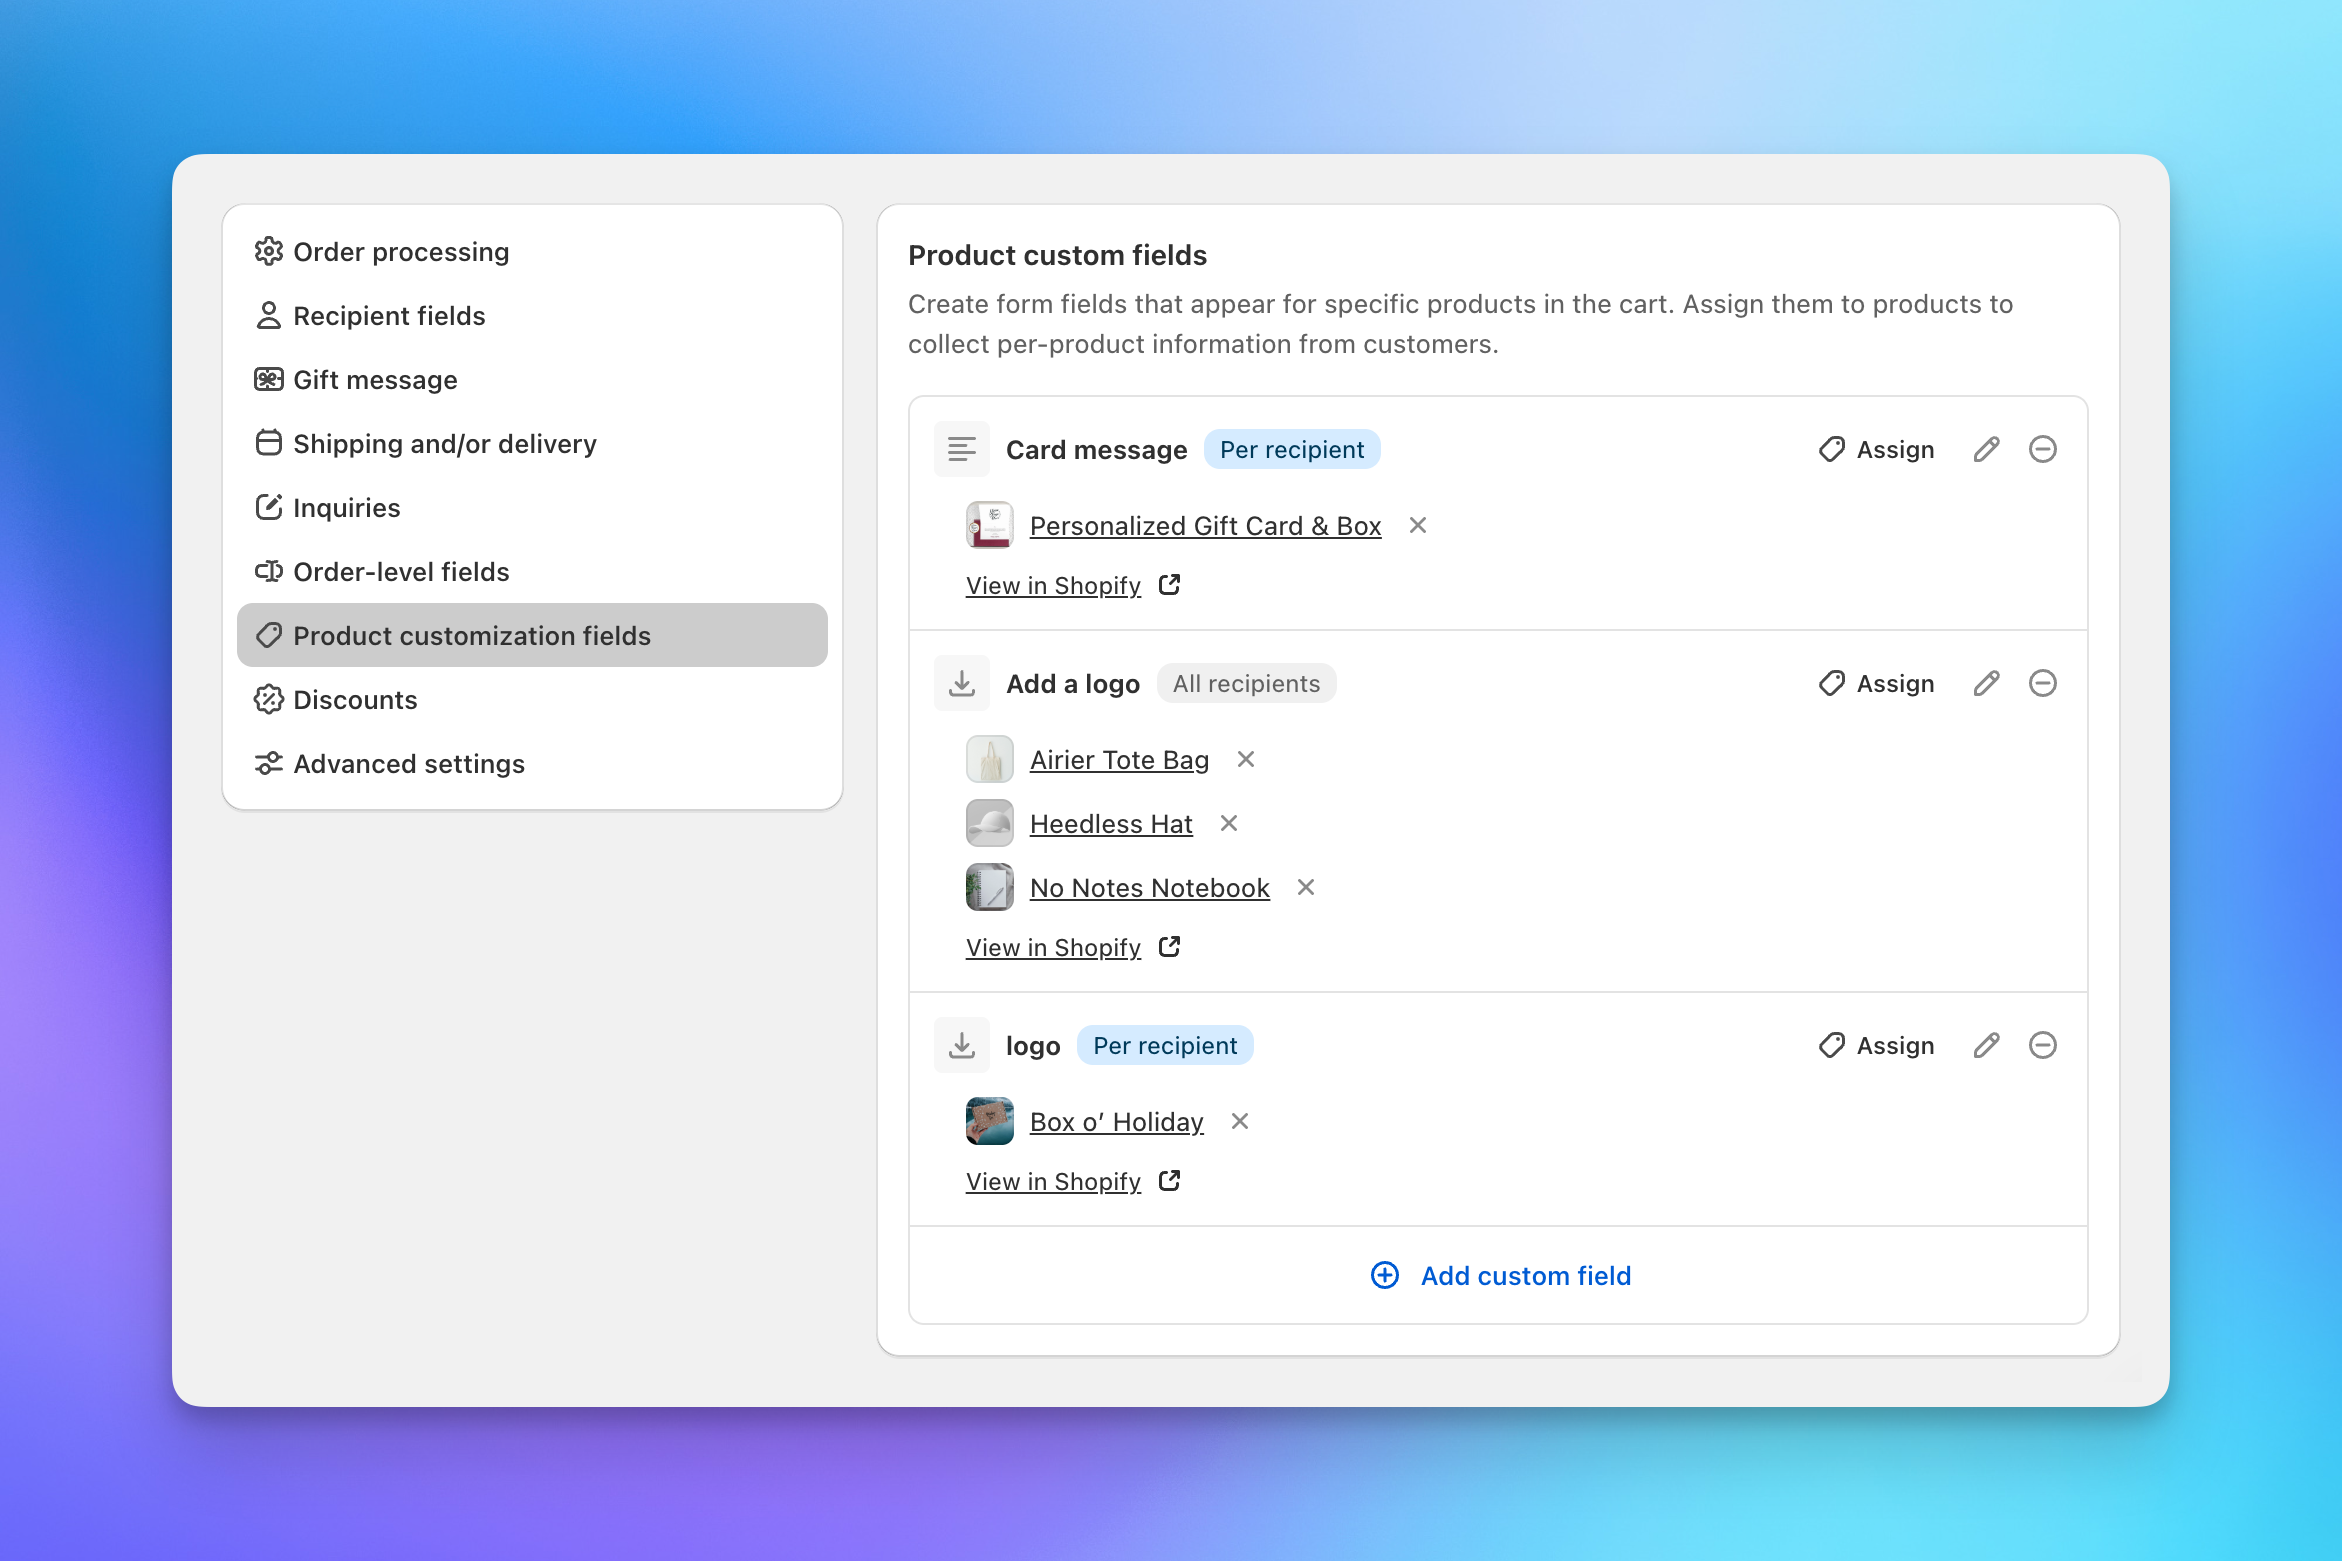
Each field is configured with a type (text input or file upload), scope (global or per-recipient), and the products it applies to. When a shopper adds a product with custom fields to a recipient, the fields appear on the recipient card.
Product customization is available on Pro plans and higher. See Product customization for setup details.
Order-Level Fields
Order-level fields collect information from the gifter that applies to the entire order, not individual recipients. These appear once in the order summary section above the checkout button.
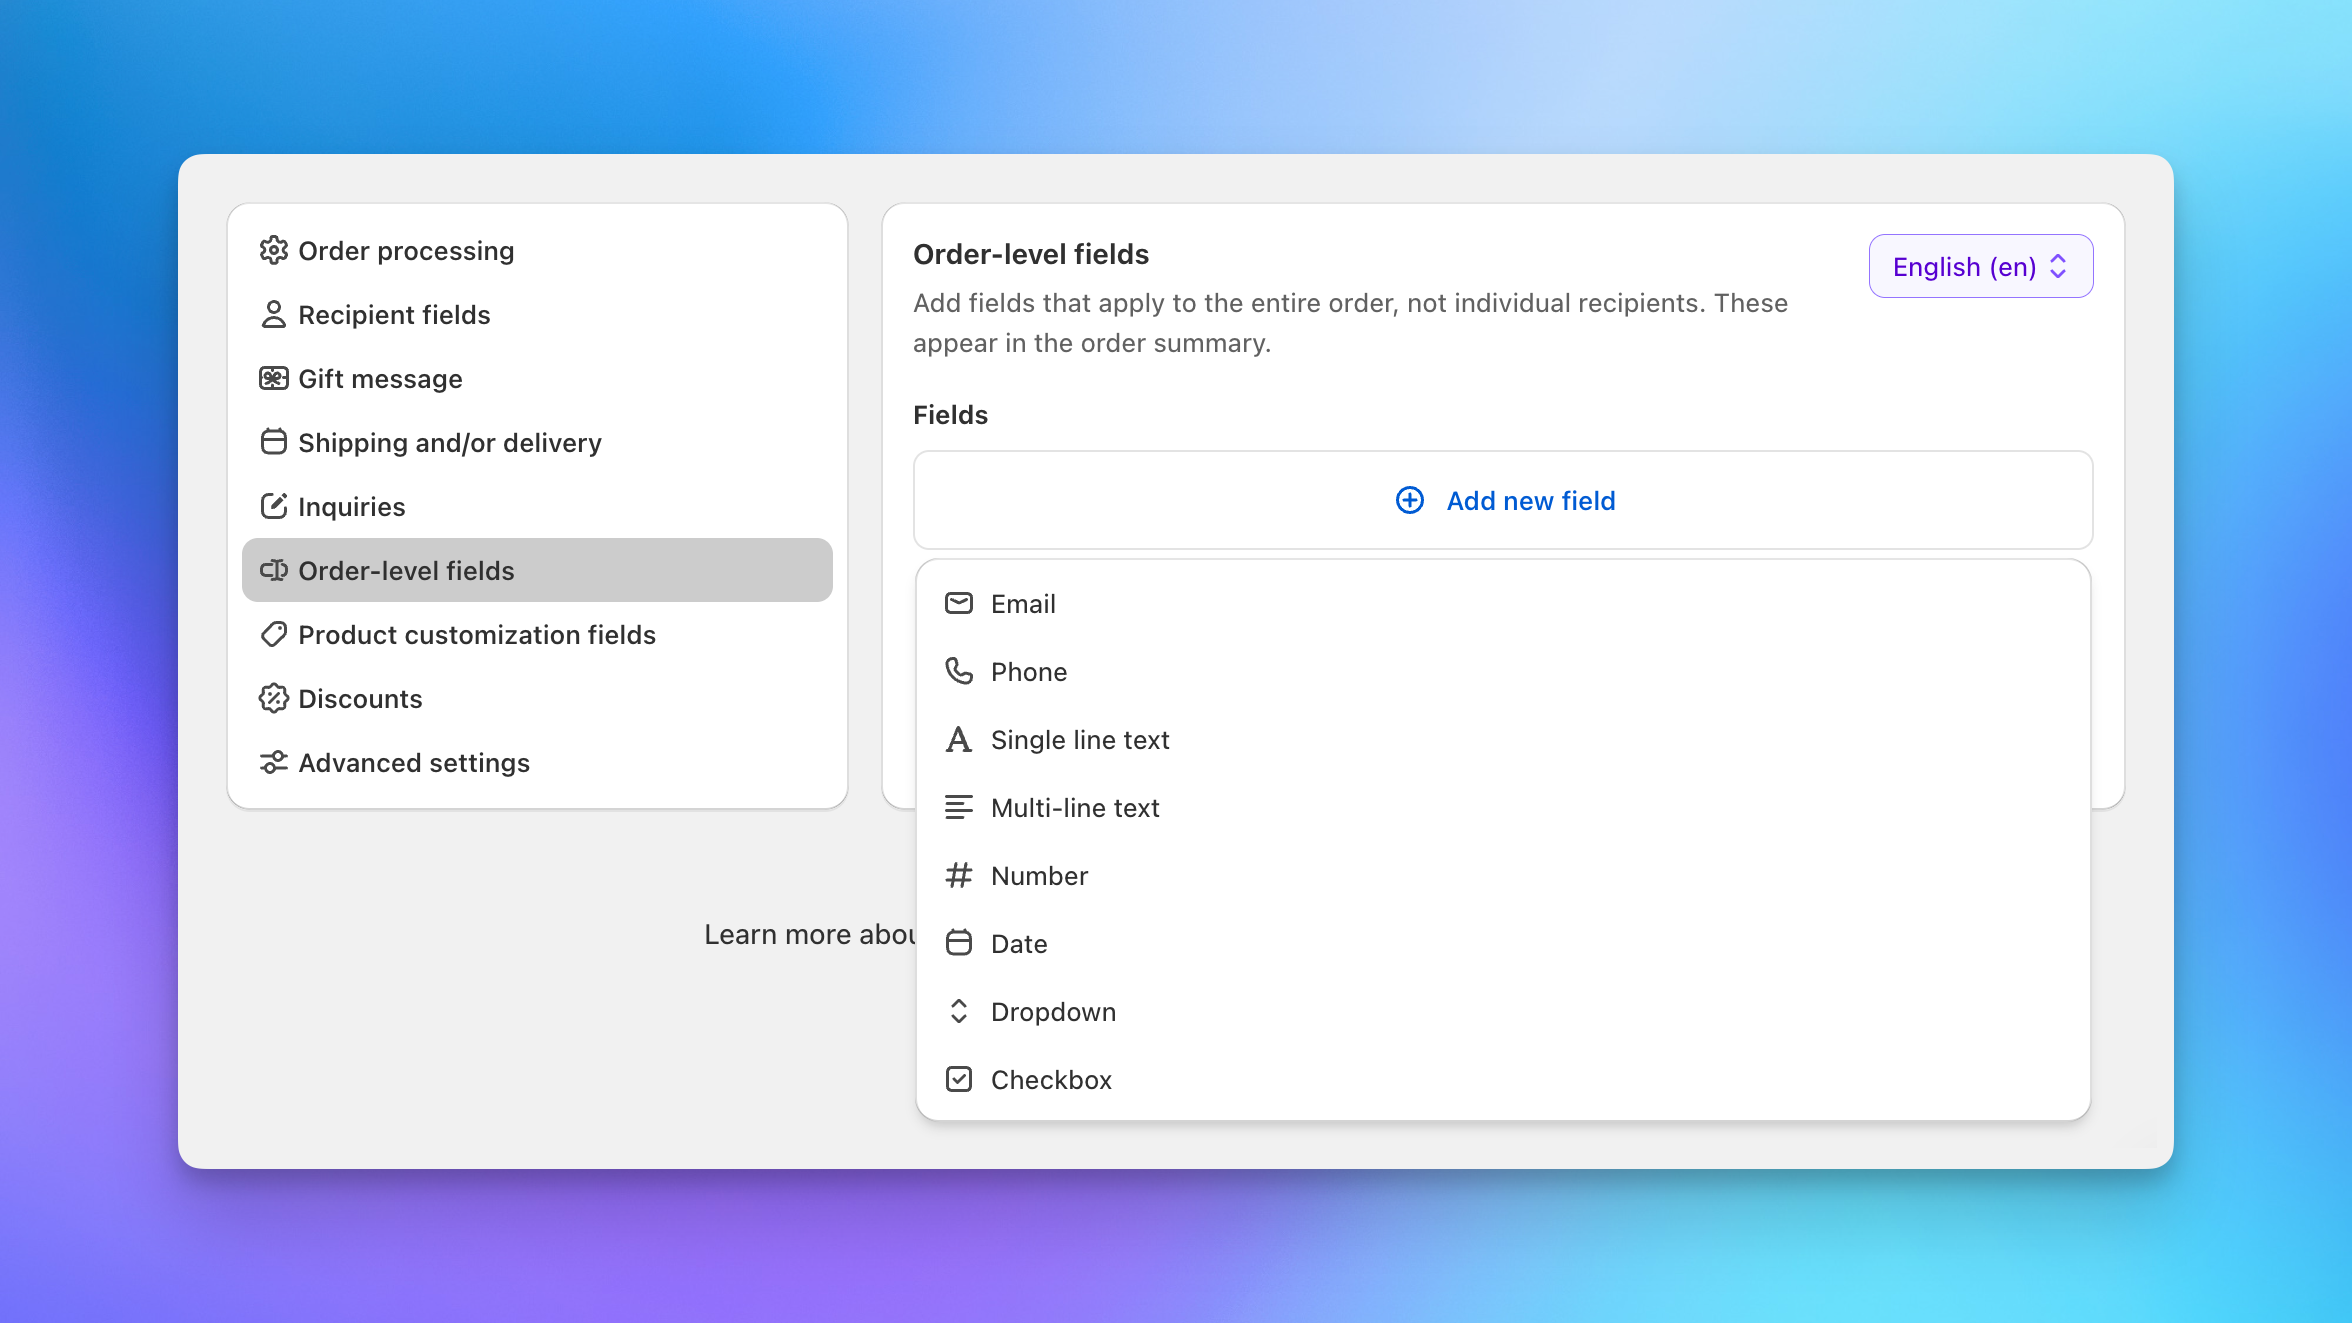
Field types include text, number, date, dropdown, checkbox, and more. You can also set up conditional logic so certain fields only appear based on the value of another field.
Bundle and Customization App Compatibility
If you use Shopify bundle apps or product customization apps, enable Keep cart line item properties in the advanced checkout settings tab. This passes through line item properties from the cart to recipient orders, preserving bundle components, engraving text, and other customization data for fulfillment.
Advanced Shipping
By default, the checkout uses your Shopify shipping rates. For more advanced setups:
- Local delivery and pickup: Enable Include local rates from Shopify in your checkout shipping settings to show local delivery and pickup options alongside standard shipping.
- Third-party shipping integrations: Send To Many supports Zapiet (store pickup and local delivery) and custom shipping API integrations. See Zapiet store pickup and local delivery integration or Custom shipping API integration for setup.
- Shipping rate filters: Hide specific rates from shoppers during checkout. Configure in the advanced checkout settings.
Multiple Checkout Configurations
On Pro plans and higher, you can create multiple checkout configurations with different settings for different use cases. For example, a standard storefront checkout, a private B2B page with different products and payment terms, and a staff-facing order entry page. Each configuration is assigned to a specific page template in the theme editor and can have its own recipient fields, discounts, order processing settings, and translations.
Step 6: Go Live
Once you're happy with your test checkout, it's time to add it to your real storefront. There are three common approaches depending on your cart setup.
Option A: Replace Your Cart Page
The simplest approach. Add the checkout block directly to your cart page template. Shoppers see the multi-recipient checkout whenever they view their cart.
- In the theme editor, navigate to your Cart page template.
- Add the Multi Recipient Cart v2 app block to the template.
- Save and publish.
With this setup, customers check out through the multi-recipient flow whether they're sending to one recipient or many. There's no need for them to choose between checkout options, and single-recipient orders work just as smoothly as multi-recipient ones.
Option B: Link from the Cart Page
Keep your standard cart page and add a button that takes shoppers to a separate multi-recipient checkout page. This is the most common setup for stores that want to offer both a standard single-recipient checkout and the multi-recipient flow side by side.
In the theme editor, add the Multi Checkout Button app block to your cart page template. Use the auto-format and auto-position options to place it next to your existing checkout button.
Option C: Drawer or Slide Cart
If your store uses a drawer cart, slide-out cart, or flyout cart, the auto-positioning may work automatically. If it doesn't, you can add a button directly to your cart drawer's theme code with a link to the checkout page.
See Drawer and slide cart setup for step-by-step instructions.
After Going Live
Once the checkout is live on your storefront:
- Place a real test order to verify the full flow with actual payment processing.
- Check your order tags in Shopify to make sure recipient and aggregate orders are tagged correctly for your reporting workflow.
- Review notification settings to confirm emails are going where you expect (or being suppressed).
- Monitor the first few orders to catch any issues with shipping rate calculation, inventory, or discount code behavior.
Next Steps
- How multi-recipient checkout works: Full overview of the shopper experience and order lifecycle
- Core settings: Detailed reference for every order processing and shipping option
- Discounts: Discount codes, volume discounts, and Shopify automatic discounts
- Product customization: Custom fields for logos, text, and file uploads
- Multiple configurations: Different checkout setups for different pages
- CSS customization: Match the checkout to your store's branding
- Drawer and slide cart setup: Add the checkout button to non-standard cart layouts