How Shoppers Find Multi-Recipient Checkout
Ways to present Send To Many's multi-recipient checkout to shoppers on your Shopify storefront: replace your cart, add a single-vs-multi toggle, add a cart button, or wire up a drawer or slide cart.
Once you've added the checkout block to a page, the last step is connecting shoppers to it. There are several ways to do this, and you can combine them. Pick what fits your store's cart setup and how prominent you want the multi-recipient option to be.
The options:
- Replace your cart page so every shopper uses multi-recipient checkout.
- Add a single-vs-multi toggle to your cart so shoppers choose between standard checkout and sending to multiple recipients.
- Add a button to your cart with our Multi Checkout Button block.
- Add a button to a drawer or slide cart with a small theme edit.
Replace Your Cart Page
The simplest approach. Add the Multi Recipient Cart v2 block directly to your Cart page template and publish. Shoppers see multi-recipient checkout whenever they view their cart, and single-recipient orders work just as smoothly as multi-recipient ones. There's nothing for shoppers to choose between.
Add a Single vs. Multiple Recipient Toggle
Cart page mode adds a toggle to your cart that lets shoppers switch between Send to single recipient (your standard Shopify checkout) and Send to multiple recipients (Send To Many's checkout). It's a good middle ground: your regular cart stays intact for one-off purchases, and the multi-recipient option is right there for shoppers who need it.
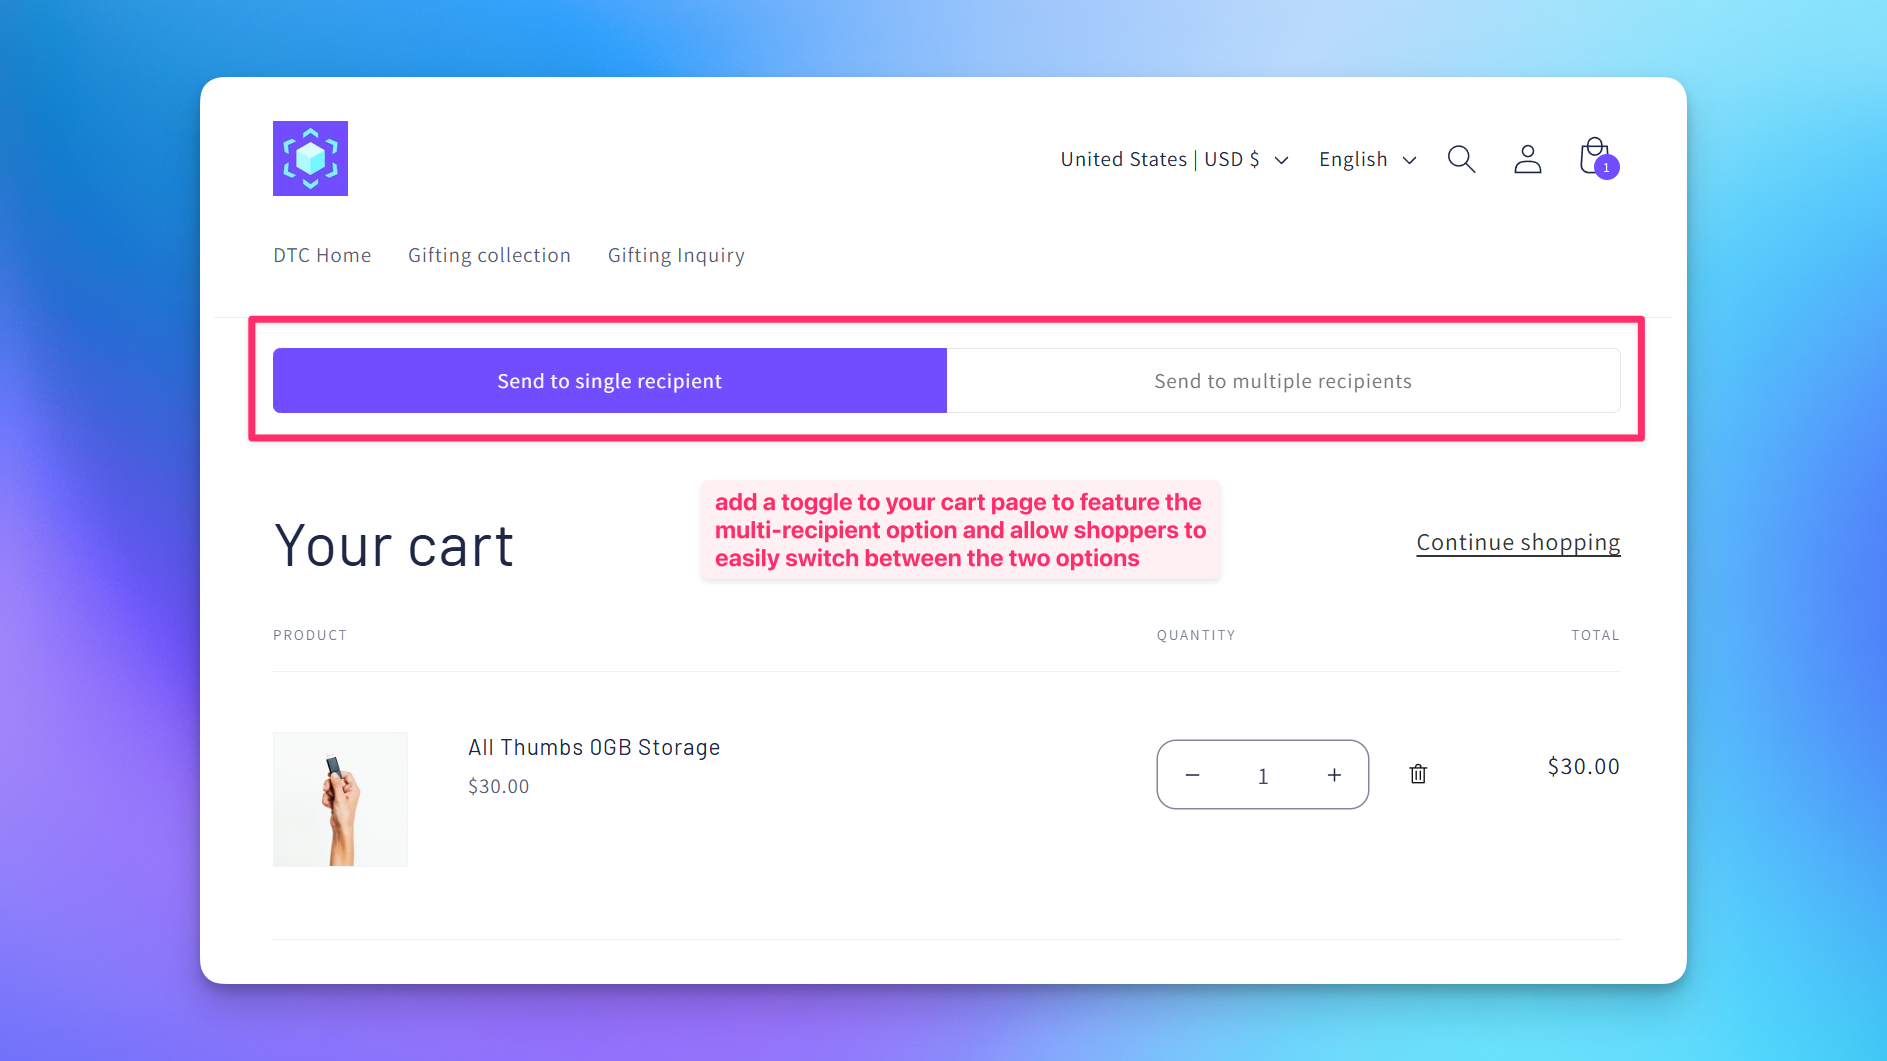
How the Toggle Works
You place the Multi Recipient Cart v2 block at the top of your cart page template, above your theme's normal cart sections. The toggle then controls which one shows:
- In single recipient mode, your theme's native cart shows as usual and the shopper checks out through standard Shopify checkout.
- In multiple recipients mode, the native cart sections are hidden and the Send To Many checkout takes over on the same page.
Send To Many hides the native cart by applying CSS to the cart sections you specify, so nothing is deleted from your theme. The shopper's choice is remembered, so they stay in their preferred mode as they move around your store.
Enabling the Toggle
Cart page mode lives in your checkout Advanced settings. These settings are locked by default, so contact us at help@evenbetterapps.com if you need them enabled for your store. For the full list of advanced settings, see Advanced settings.
- Make sure the Multi Recipient Cart v2 block is added to the top of your Cart page template.
- In Send To Many, open your multi-recipient checkout settings and go to Advanced settings.
- Under Cart page mode, check Enable cart page mode toggle.
- Set your Native cart selectors (see below).
- Save.
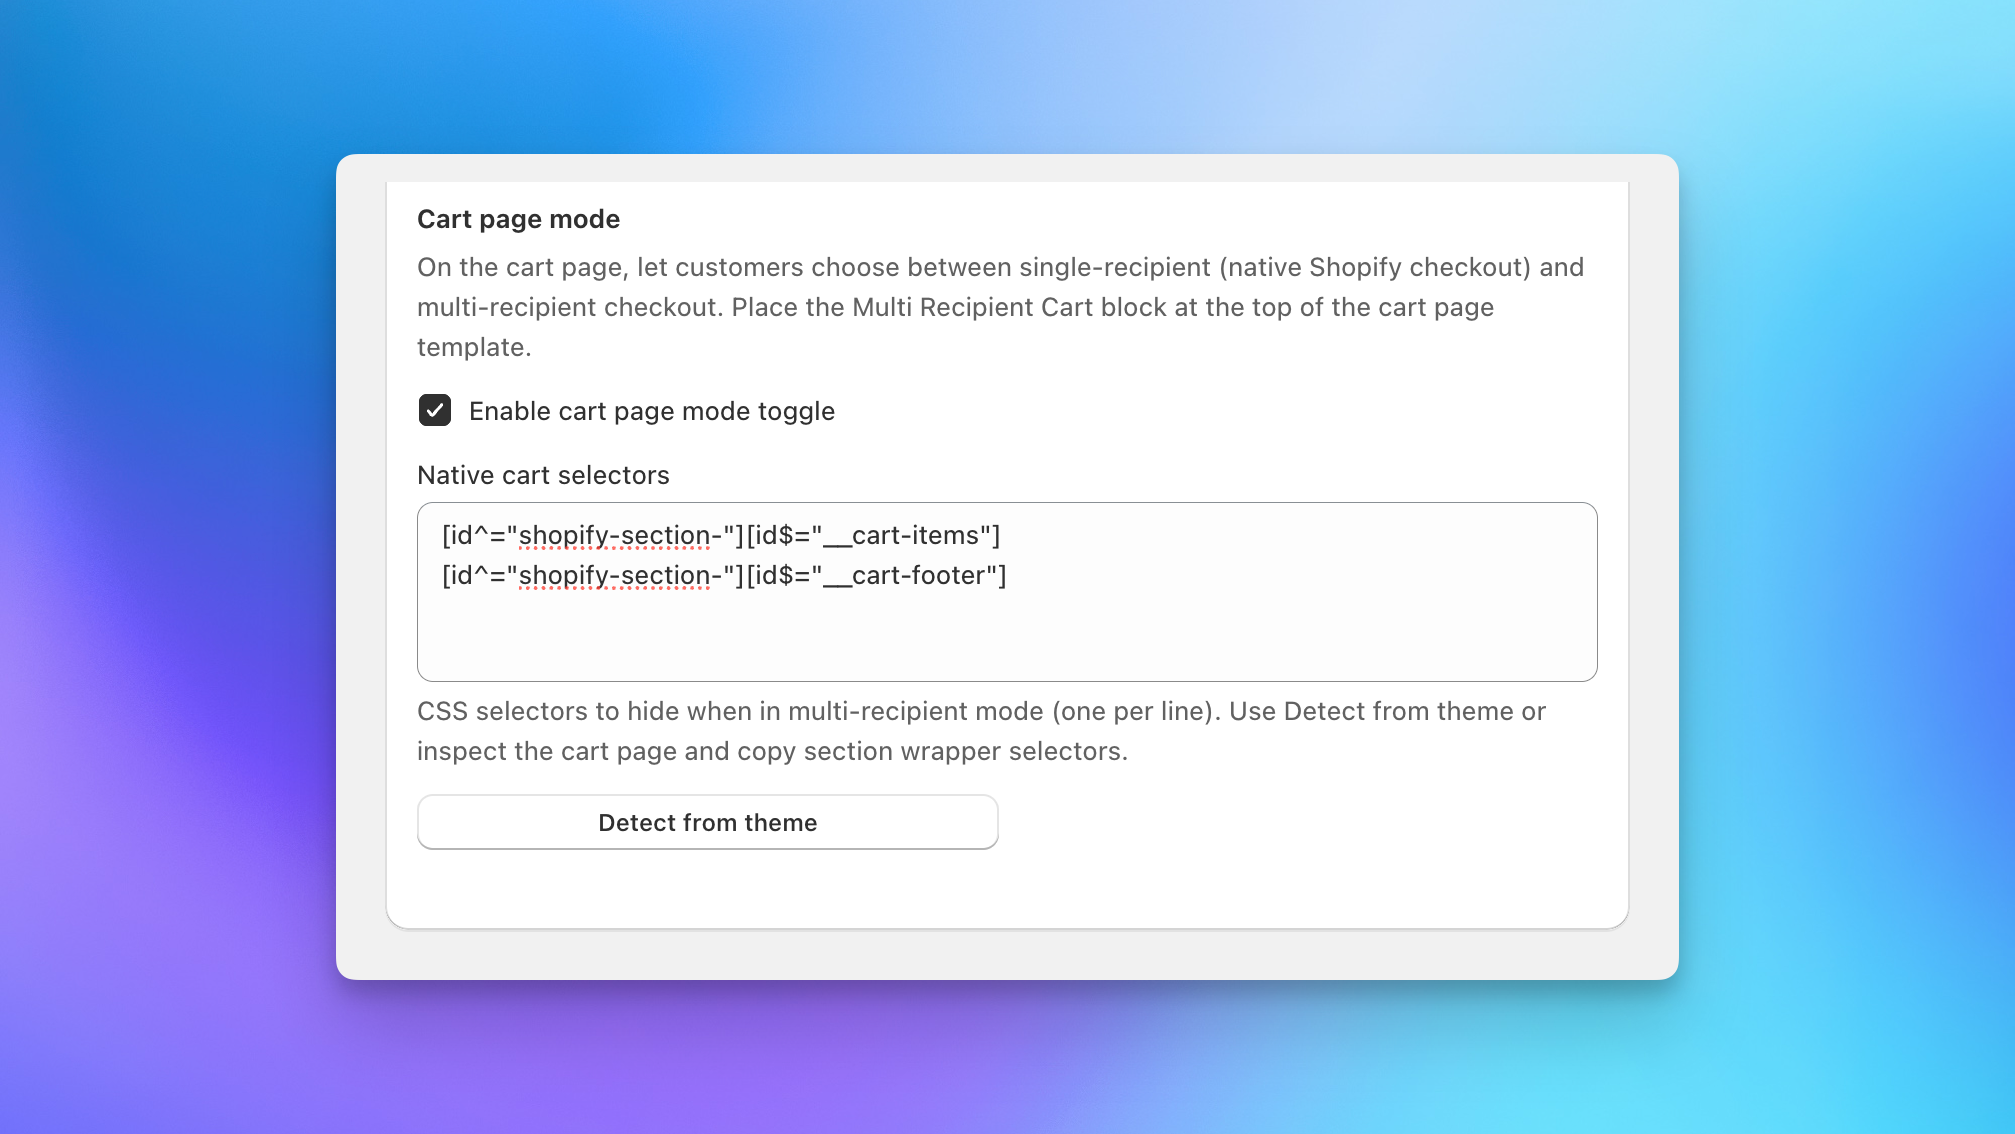
Native Cart Selectors
Native cart selectors are the CSS selectors for the cart sections that should be hidden when a shopper switches to multiple recipients mode (typically your cart items and cart footer). There are two ways to set them:
- Detect from theme (recommended): Click Detect from theme and Send To Many reads your cart template, finds the native cart sections, and fills in the selectors automatically. This works for most themes.
- Add them manually: If your theme is highly customized, inspect your cart page, find the wrapper element for each cart section, and add one selector per line. Shopify section wrappers usually look like
[id^="shopify-section-"][id$="__cart-items"].
You need at least one selector so the native cart can be hidden in multiple recipients mode. If the native cart still shows behind the checkout after enabling the toggle, your selectors aren't matching: re-run Detect from theme, or inspect the cart and add the missing section wrapper manually.
Add a Button with the Multi Checkout Button Block
If you'd rather keep your standard cart page and add a clear call to action, use the Multi Checkout Button app block. It adds a "send to multiple recipients" button to your cart, typically right under your Add to cart or checkout button.
- In the theme editor, open your Cart page template (or product template, depending on where you want the button).
- Click Add block and select Multi Checkout Button.
- Position it next to your existing checkout button. The block's auto-format and auto-position options match it to your theme's button styling.
- Save.
This is the most common setup for stores that want a standard checkout and the multi-recipient flow side by side, without the toggle.
Add a Button to a Drawer or Slide Cart
Send To Many works with any cart style, including drawer carts, slide-out carts, and flyout carts. In many cases the button appears automatically. The cart button uses its href as a fallback, so it always links to the correct checkout page even when your theme's auto-positioning doesn't fire. If the button doesn't appear in your drawer, add it with a small theme edit.
1. Find your checkout page URL
You need the URL of your multi-recipient checkout page. If you've already set up checkout, you'll have a page with the Send To Many block on it, with a URL like /pages/multi-recipient-checkout. Find it in Online Store → Pages.
2. Open your theme's cart drawer file
- Go to Online Store → Themes in your Shopify admin.
- Click "..." next to your active theme and select Edit code.
- In the file list, look in the Snippets or Sections folder for your cart drawer template. Common file names include
cart-drawer.liquid,header-cart-drawer.liquid,cart-sidebar.liquid, ormini-cart.liquid. The exact name depends on your theme.
3. Add the button code
Every theme structures its cart drawer a little differently, so you'll find the right spot, usually right next to the existing checkout button. Below are three examples.
Shopify Sidekick can help. Ask it something like: "In my theme's cart drawer, add a button right below the checkout button that links to /pages/multi-recipient-checkout with the text 'Send to multiple recipients'."
Dawn
In Dawn, the cart drawer lives in snippets/header-cart-drawer.liquid. Find the cart__footer section where the checkout button is rendered, and add a new element_button render right after it:
{% render 'element_button',
  type: "button",
  name: "send_to_many",
  text: "Send to multiple recipients",
  href: "/pages/multi-recipient-checkout",
  classlist: "cart__checkout",
  style: "margin-top:10px;"
%}
Horizon
In Horizon, the cart drawer content is in snippets/cart-summary.liquid. Find the cart_ctas section with the existing checkout button, and add a link right after it:
<a href="/pages/multi-recipient-checkout"
   class="cart__checkout-button button"
   style="display:block; text-align:center;">
  Send to multiple recipients
</a>
Plain HTML (fallback for any theme)
If your theme doesn't use a button snippet, add a plain HTML link next to the existing checkout button:
<a href="/pages/multi-recipient-checkout"
   class="button btn cart__checkout-btn"
   style="display:block; text-align:center; margin-top:10px;">
  Send to multiple recipients
</a>
Match the CSS classes to whatever your theme uses for its existing checkout button so the styling stays consistent.
4. Save and preview
Click Save, then open your store and add a product to your cart. Open the cart drawer and confirm the "Send to multiple recipients" button appears below the checkout button.
The button you add is standard HTML/Liquid, so it inherits your theme's styles. To adjust its appearance, modify the inline styles or add a custom CSS class. For styling the checkout page itself, see CSS customization.
Next Steps
- Installing the app in your theme: Add the checkout block and configure its settings
- How multi-recipient checkout works: The shopper experience from cart to order
- Advanced settings: Cart page mode and other specialized settings
- Setting up multi-recipient checkout: Full setup walkthrough