Staff Order Entry for Multi-Recipient Orders
Place multi-recipient orders on behalf of customers with staff mode. Your team shops your storefront, searches saved addresses, builds the order, and submits it into Send To Many as a draft for invoicing.
Staff order entry mode (staff mode) lets your team place multi-recipient orders on behalf of a customer using your own storefront checkout. It is built for orders that come in by phone or email, where a customer wants to ship to several addresses and your team enters the order for them. Staff shop your storefront and add recipients the same way a customer would, then submit the order into Send To Many as a draft, where you create and send the invoice or take payment.
Staff mode is the best fit when your storefront has product customization, personalization, or bundle features that would be hard to recreate in an order spreadsheet. When the order is more straightforward, uploading a recipient spreadsheet is often faster. Reach for staff mode when shopping the storefront directly is easier than setting the order up in a spreadsheet.
How Staff Mode Works
When staff mode is on, a logged-in staff member sees a version of the checkout built for order entry instead of self-checkout. Rather than logging in as themselves and paying, they shop the storefront, search for the customer, build the order, and submit it as a draft Send. The order lands in the Send To Many admin, where you finish invoicing or take payment.
What staff mode requires:
- A Send To Many Enterprise plan: Contact us to enable staff mode for your store.
- Shopify B2B with New Customer Accounts: Staff mode uses Shopify's B2B functionality, which requires New Customer Accounts. B2B was once limited to Shopify Plus, but is now available to some extent on all Shopify plans.
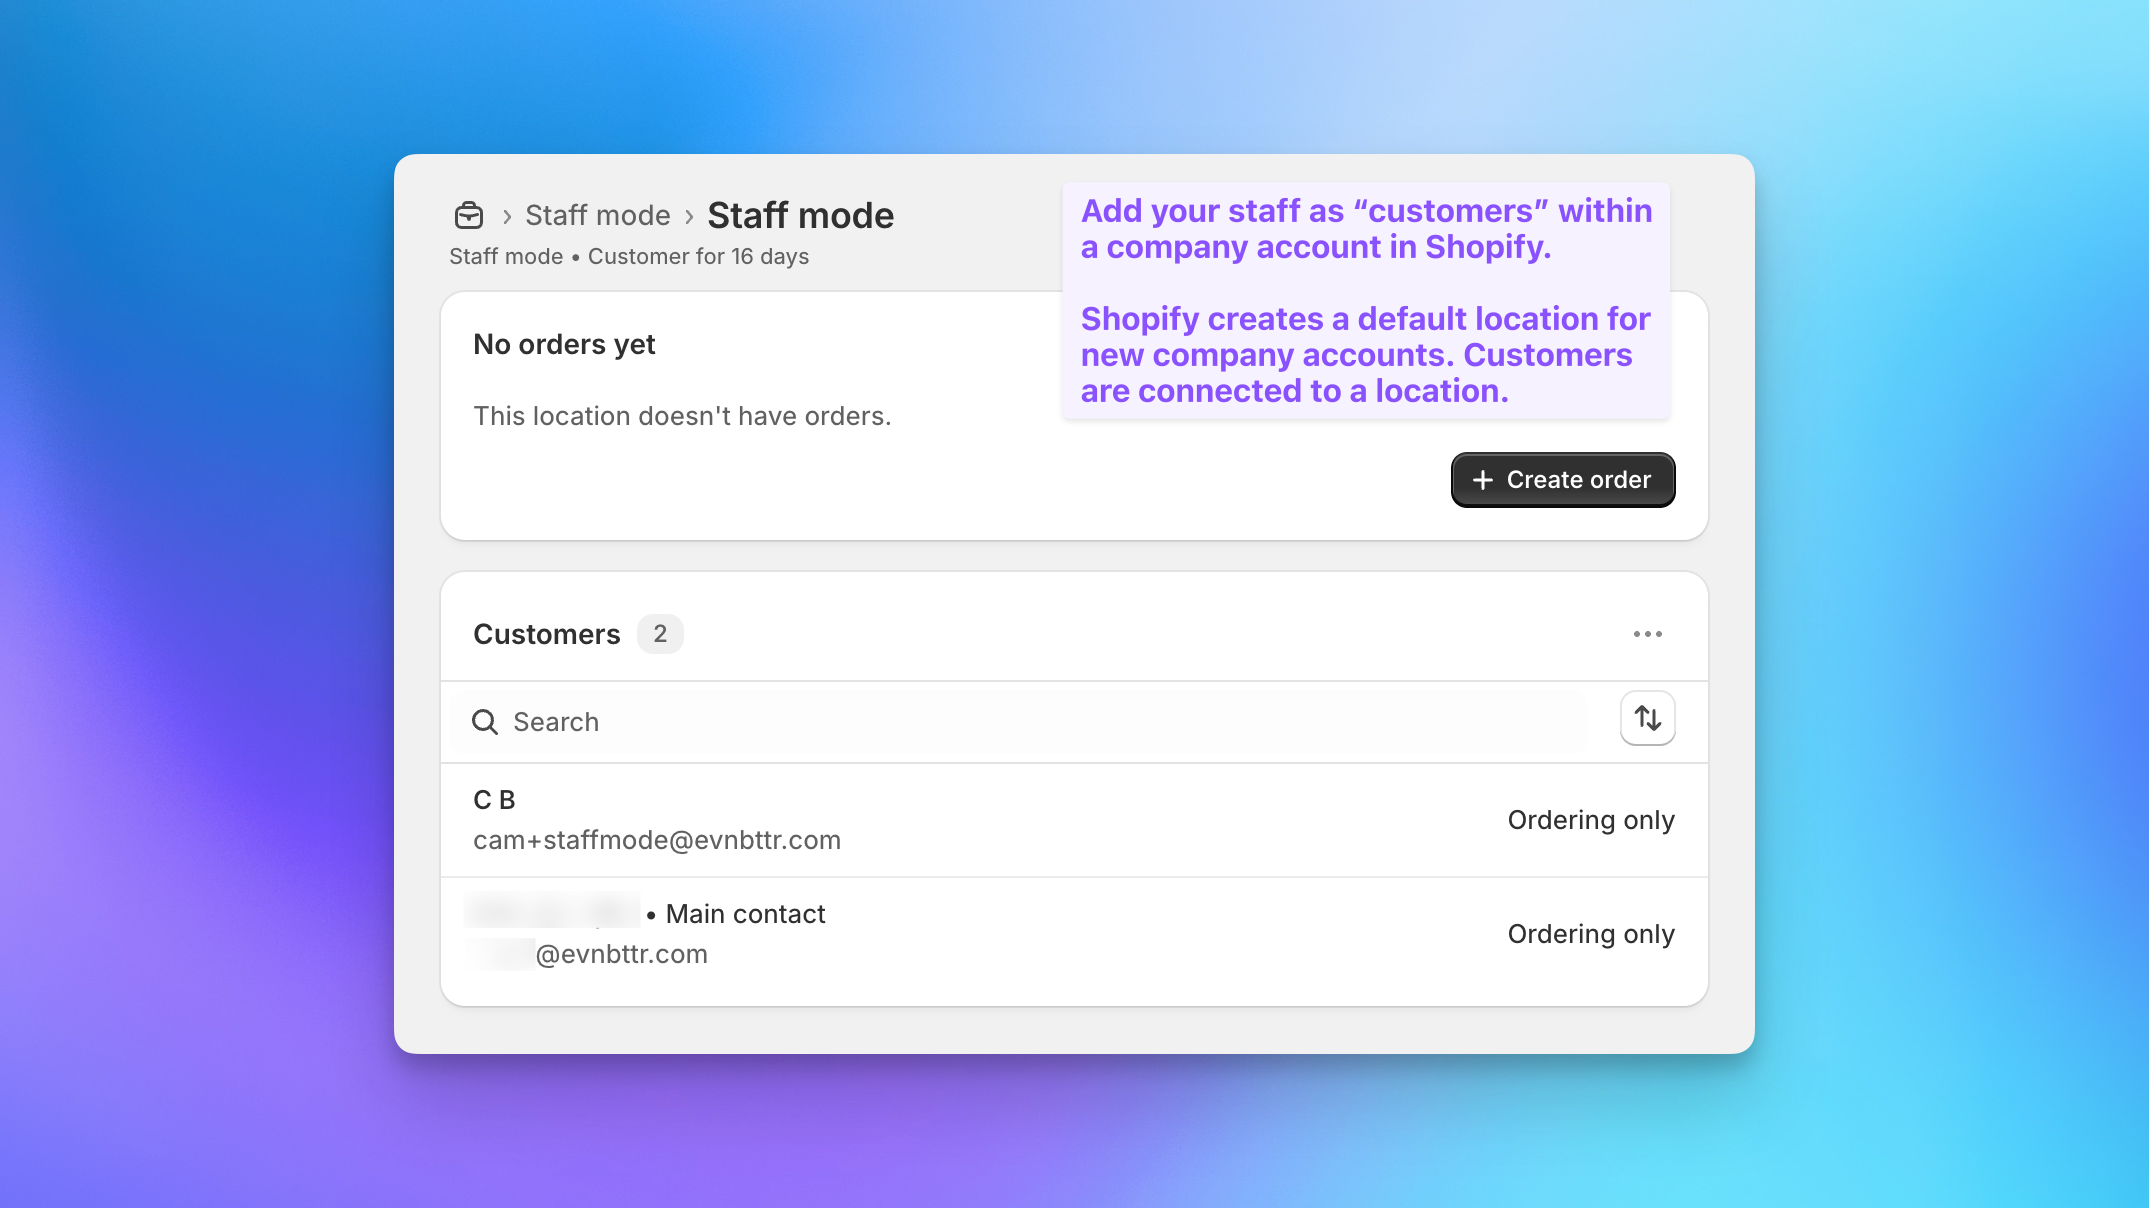
- A company your staff accounts belong to: A company is a Shopify B2B account that groups customer contacts under one or more locations. When a staff member is logged in under that company, the checkout switches into staff mode.
Setting Up Staff Mode
Step 1: Create a company for your team
In your Shopify admin, create a company account for your team. You can use a name like "Staff Ordering." Assign your team's customer accounts to it using the email addresses they will log in with. See using Shopify B2B for corporate gifting for how companies and locations work.
A few notes:
- Existing staff accounts can be associated with the new company. This should not affect the staff member's order history or access in Shopify.
- You can use a "+" email alias if you need to create separate accounts for ordering, for example
cam+staffmode@evnbttr.com. - Staff are associated with a company location. Shopify creates a default location for new companies. See Shopify's B2B documentation for more detail.
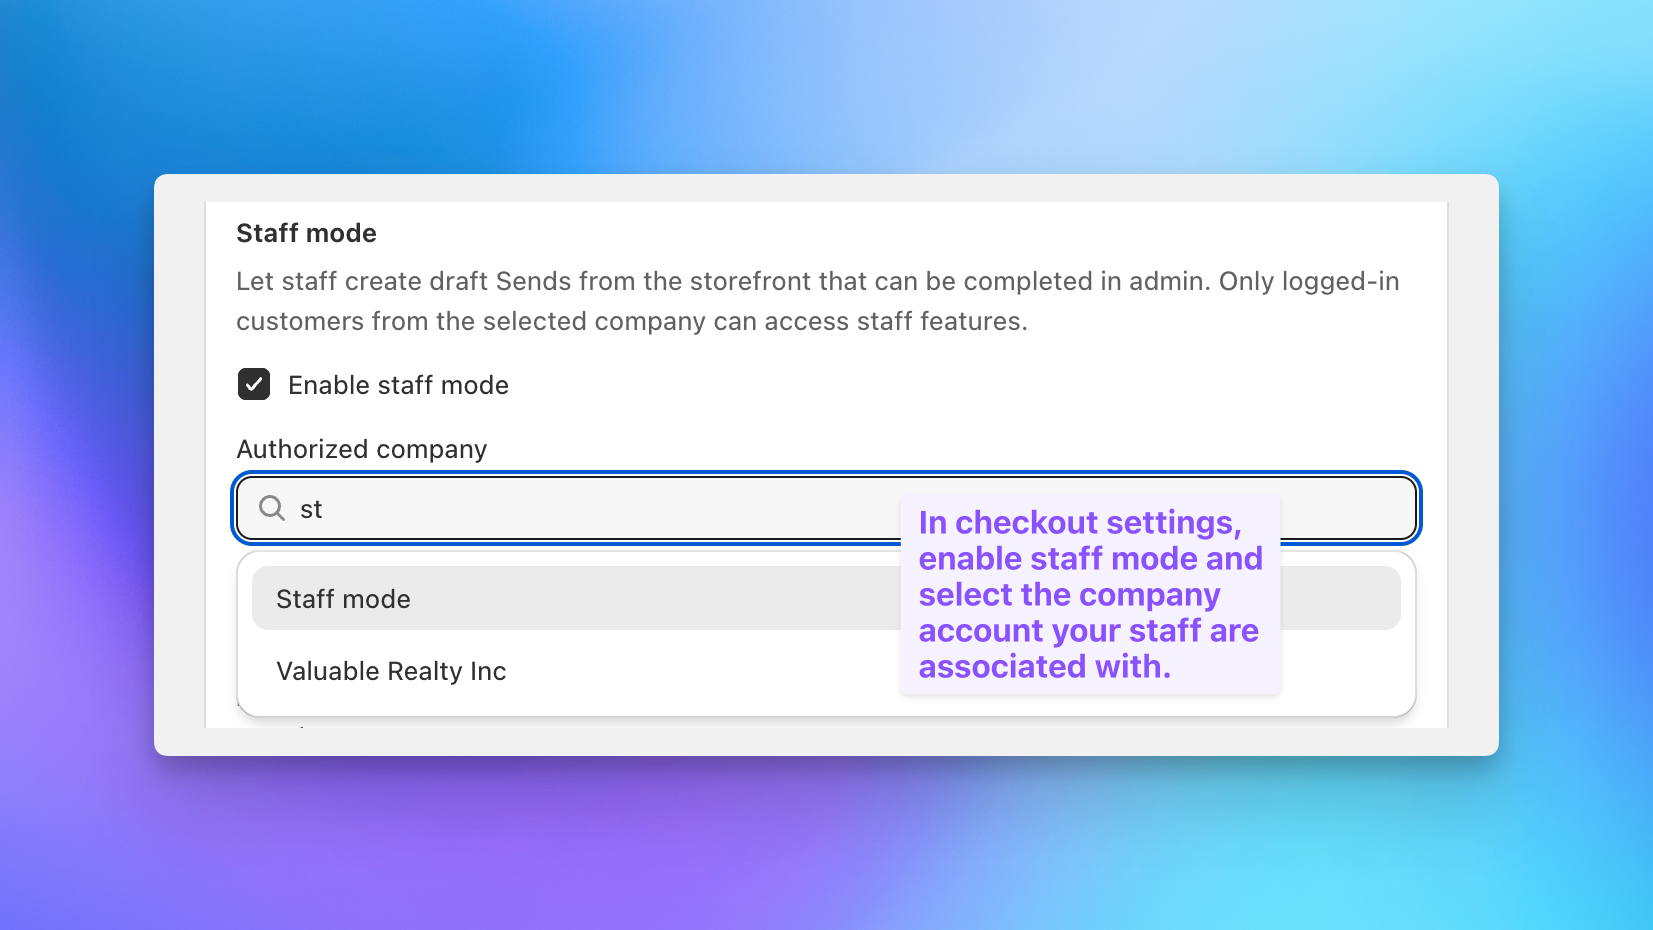
Step 2: Turn on the staff mode setting
In Send To Many, open your multi-recipient checkout settings, go to advanced settings, and enable staff mode. Select the company account your staff are associated with.
Step 3: Have staff log in
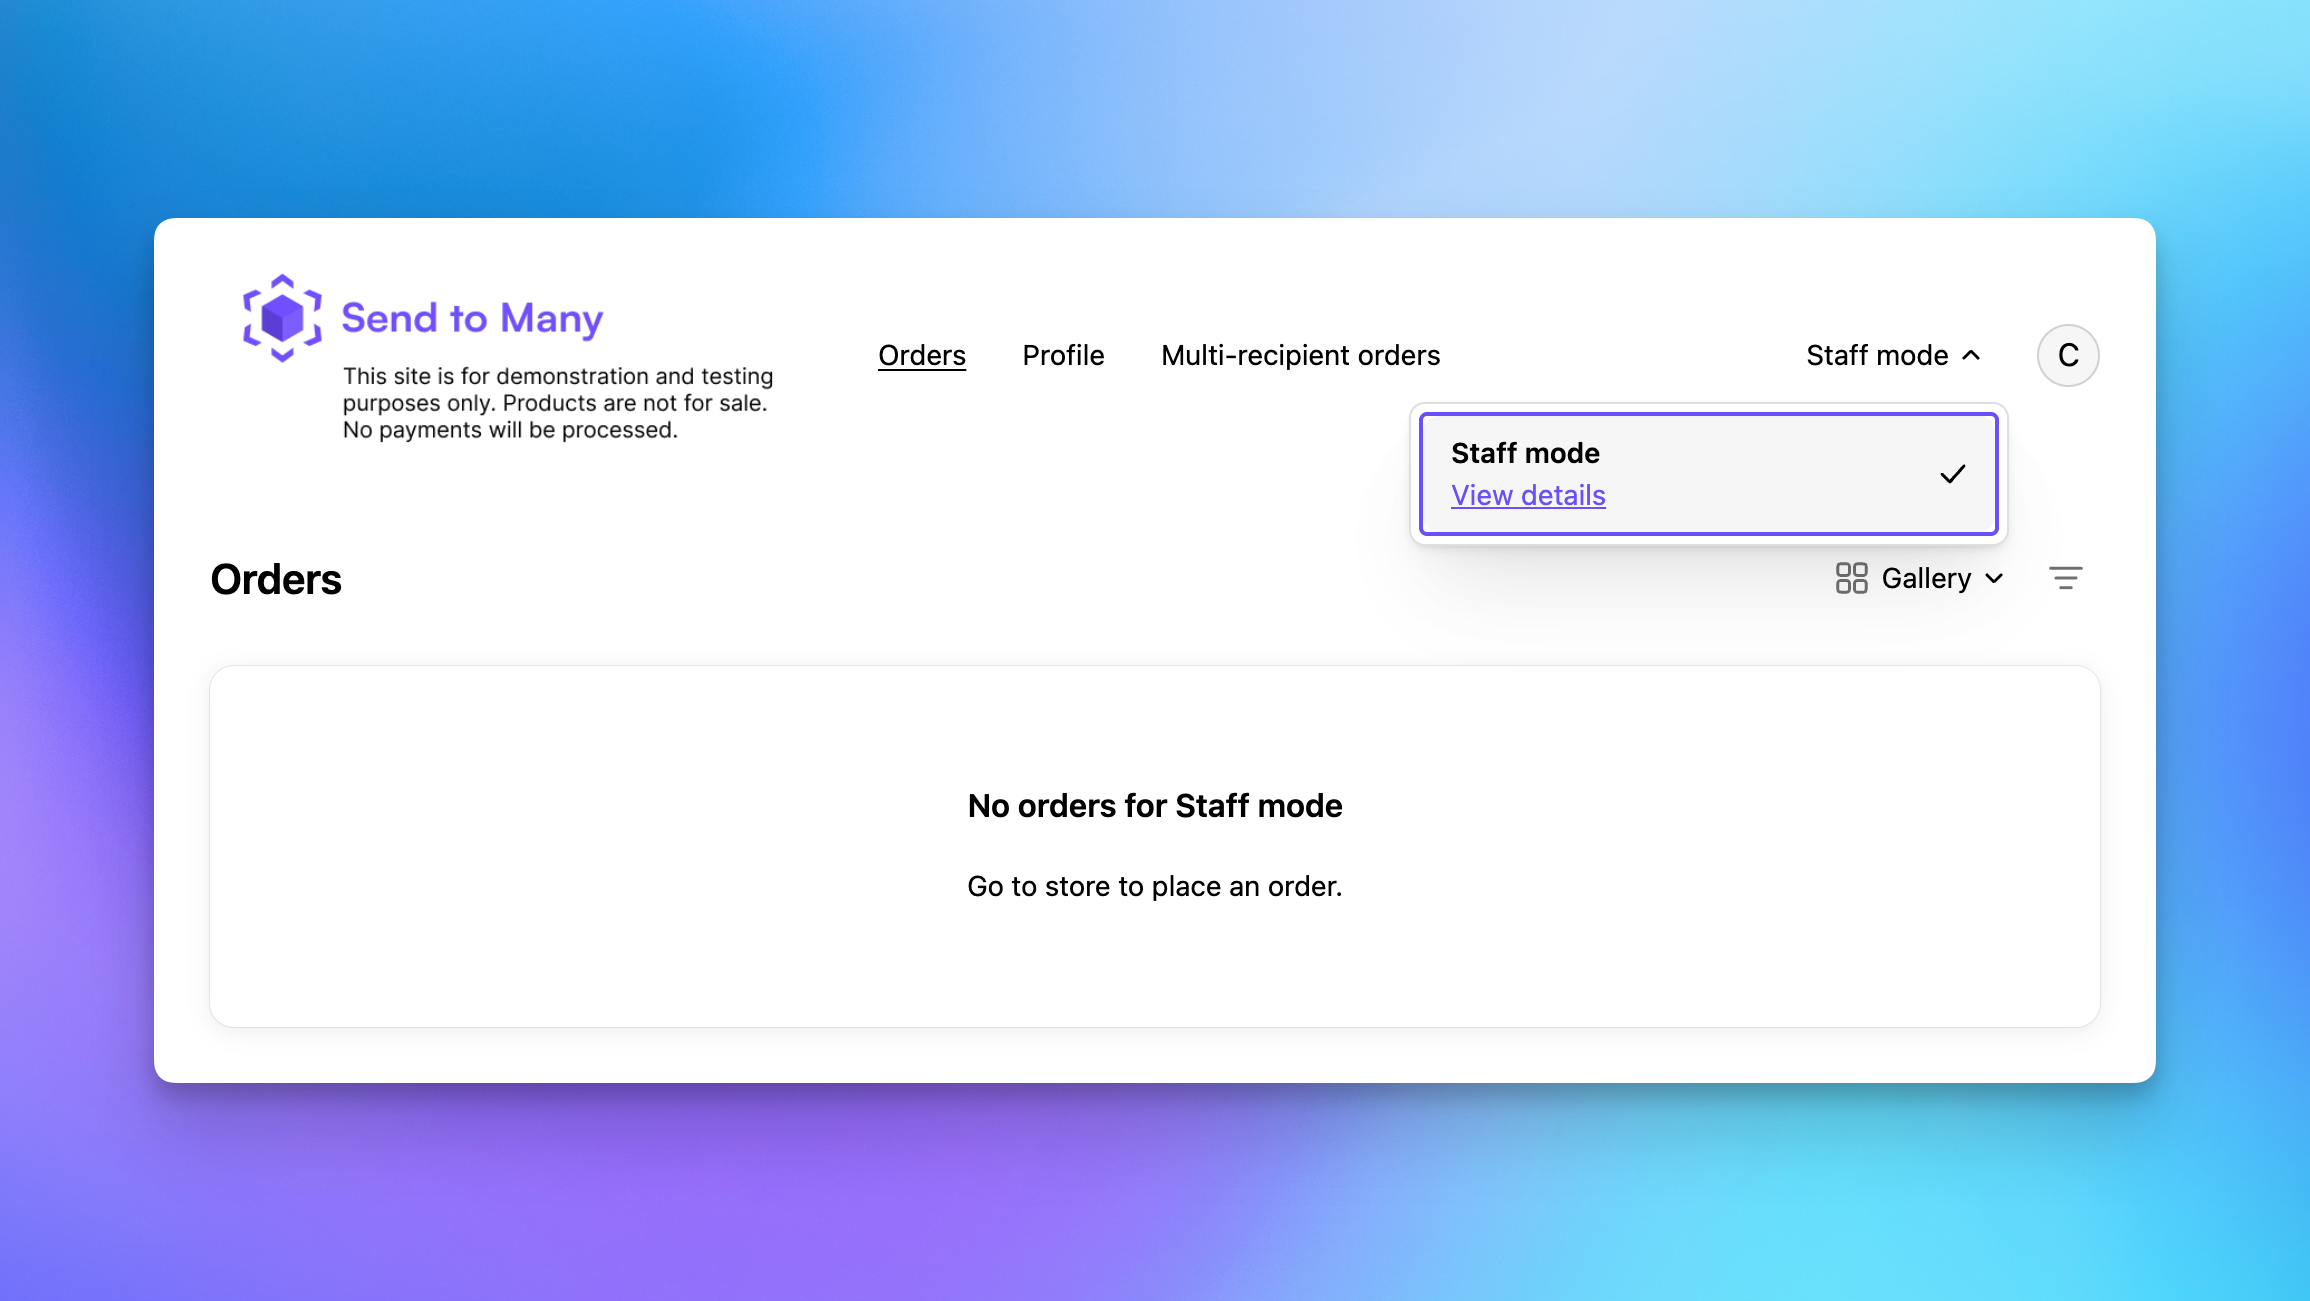
Staff log into your storefront with the account assigned to the staff company. The login box is replaced by a customer search, which is the signal that staff mode is active. Staff can confirm which account they are logged into from the customer account section of your site.
Entering an Order as Staff
Once staff mode is active, staff use the normal shopping experience on your storefront with a couple of key differences.
Step 1: Shop the storefront
Add products, including any customization, personalization, or bundles, just as a customer would.
Step 2: Go to the cart page
The multi-recipient checkout and staff features appear on the cart page.
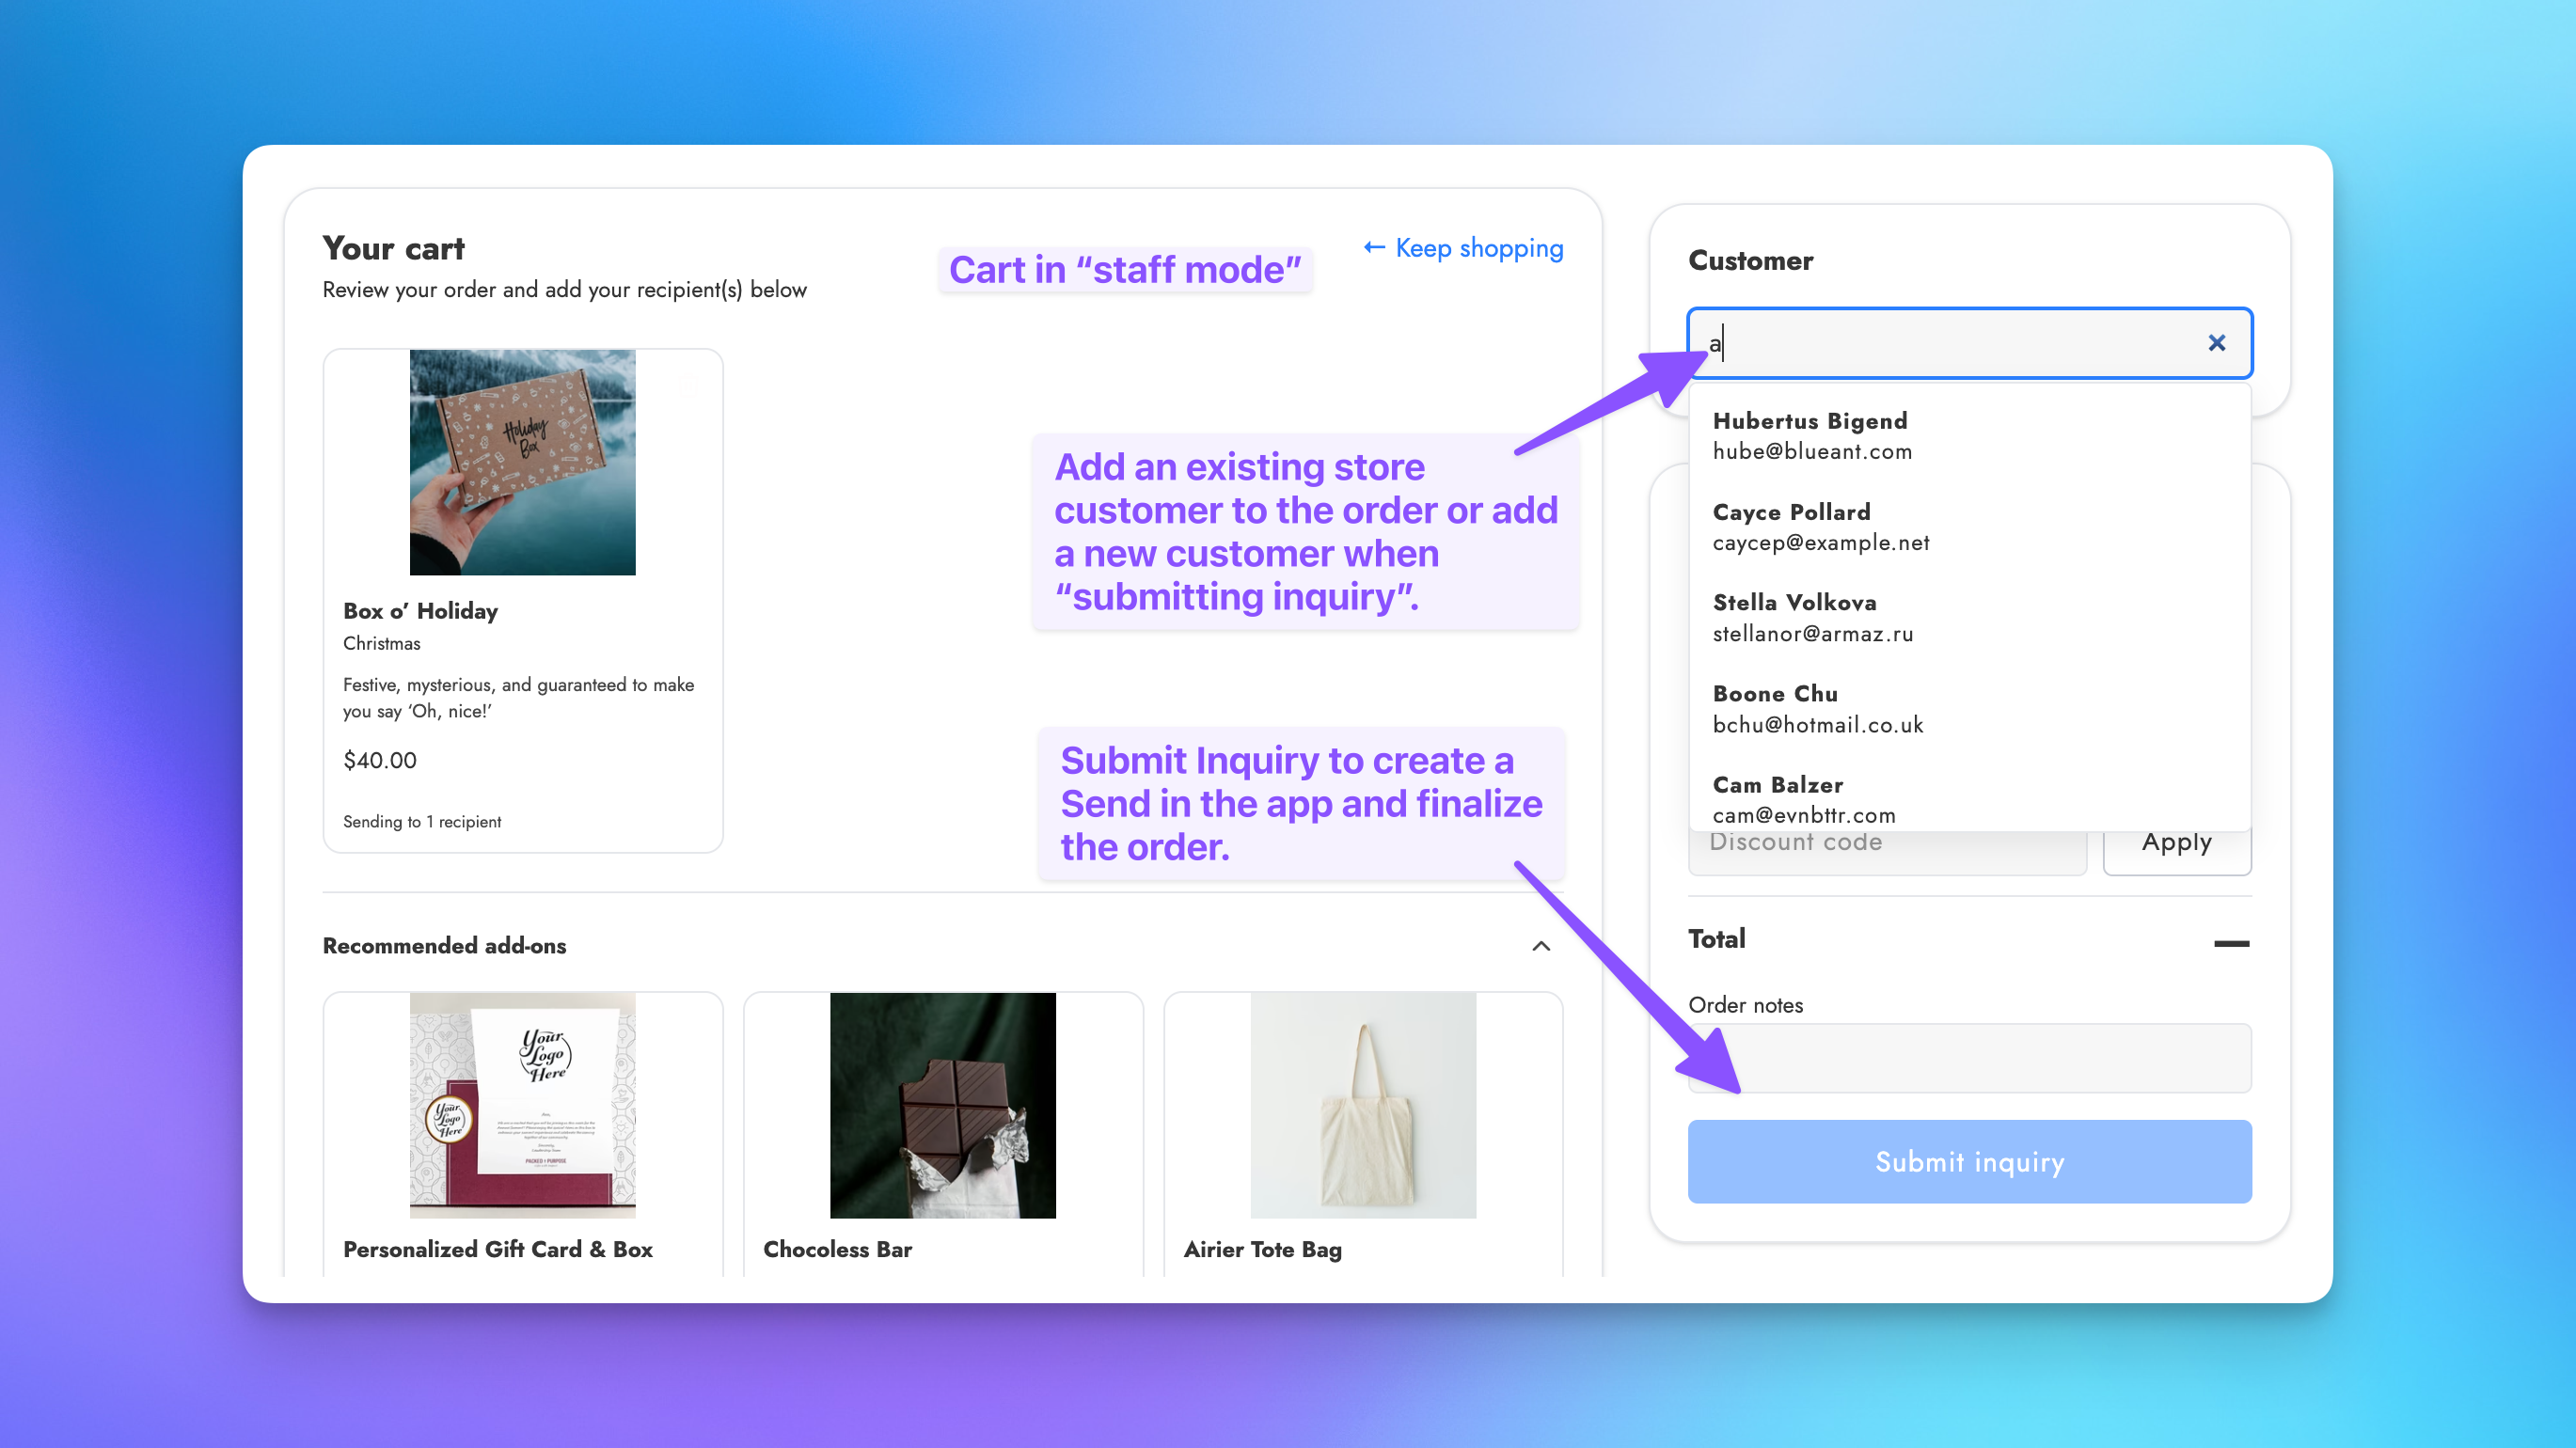
Step 3: Search for the customer
In place of the login box, use the customer search to find the customer by name or email. When you select an existing customer, their saved address book loads and becomes available to auto-fill recipient cards. Large accounts can hold thousands of saved addresses, so the list may take a few seconds. If the customer is not in your store yet, you do not need to add them here. Build the order first and enter their details at the submit step.
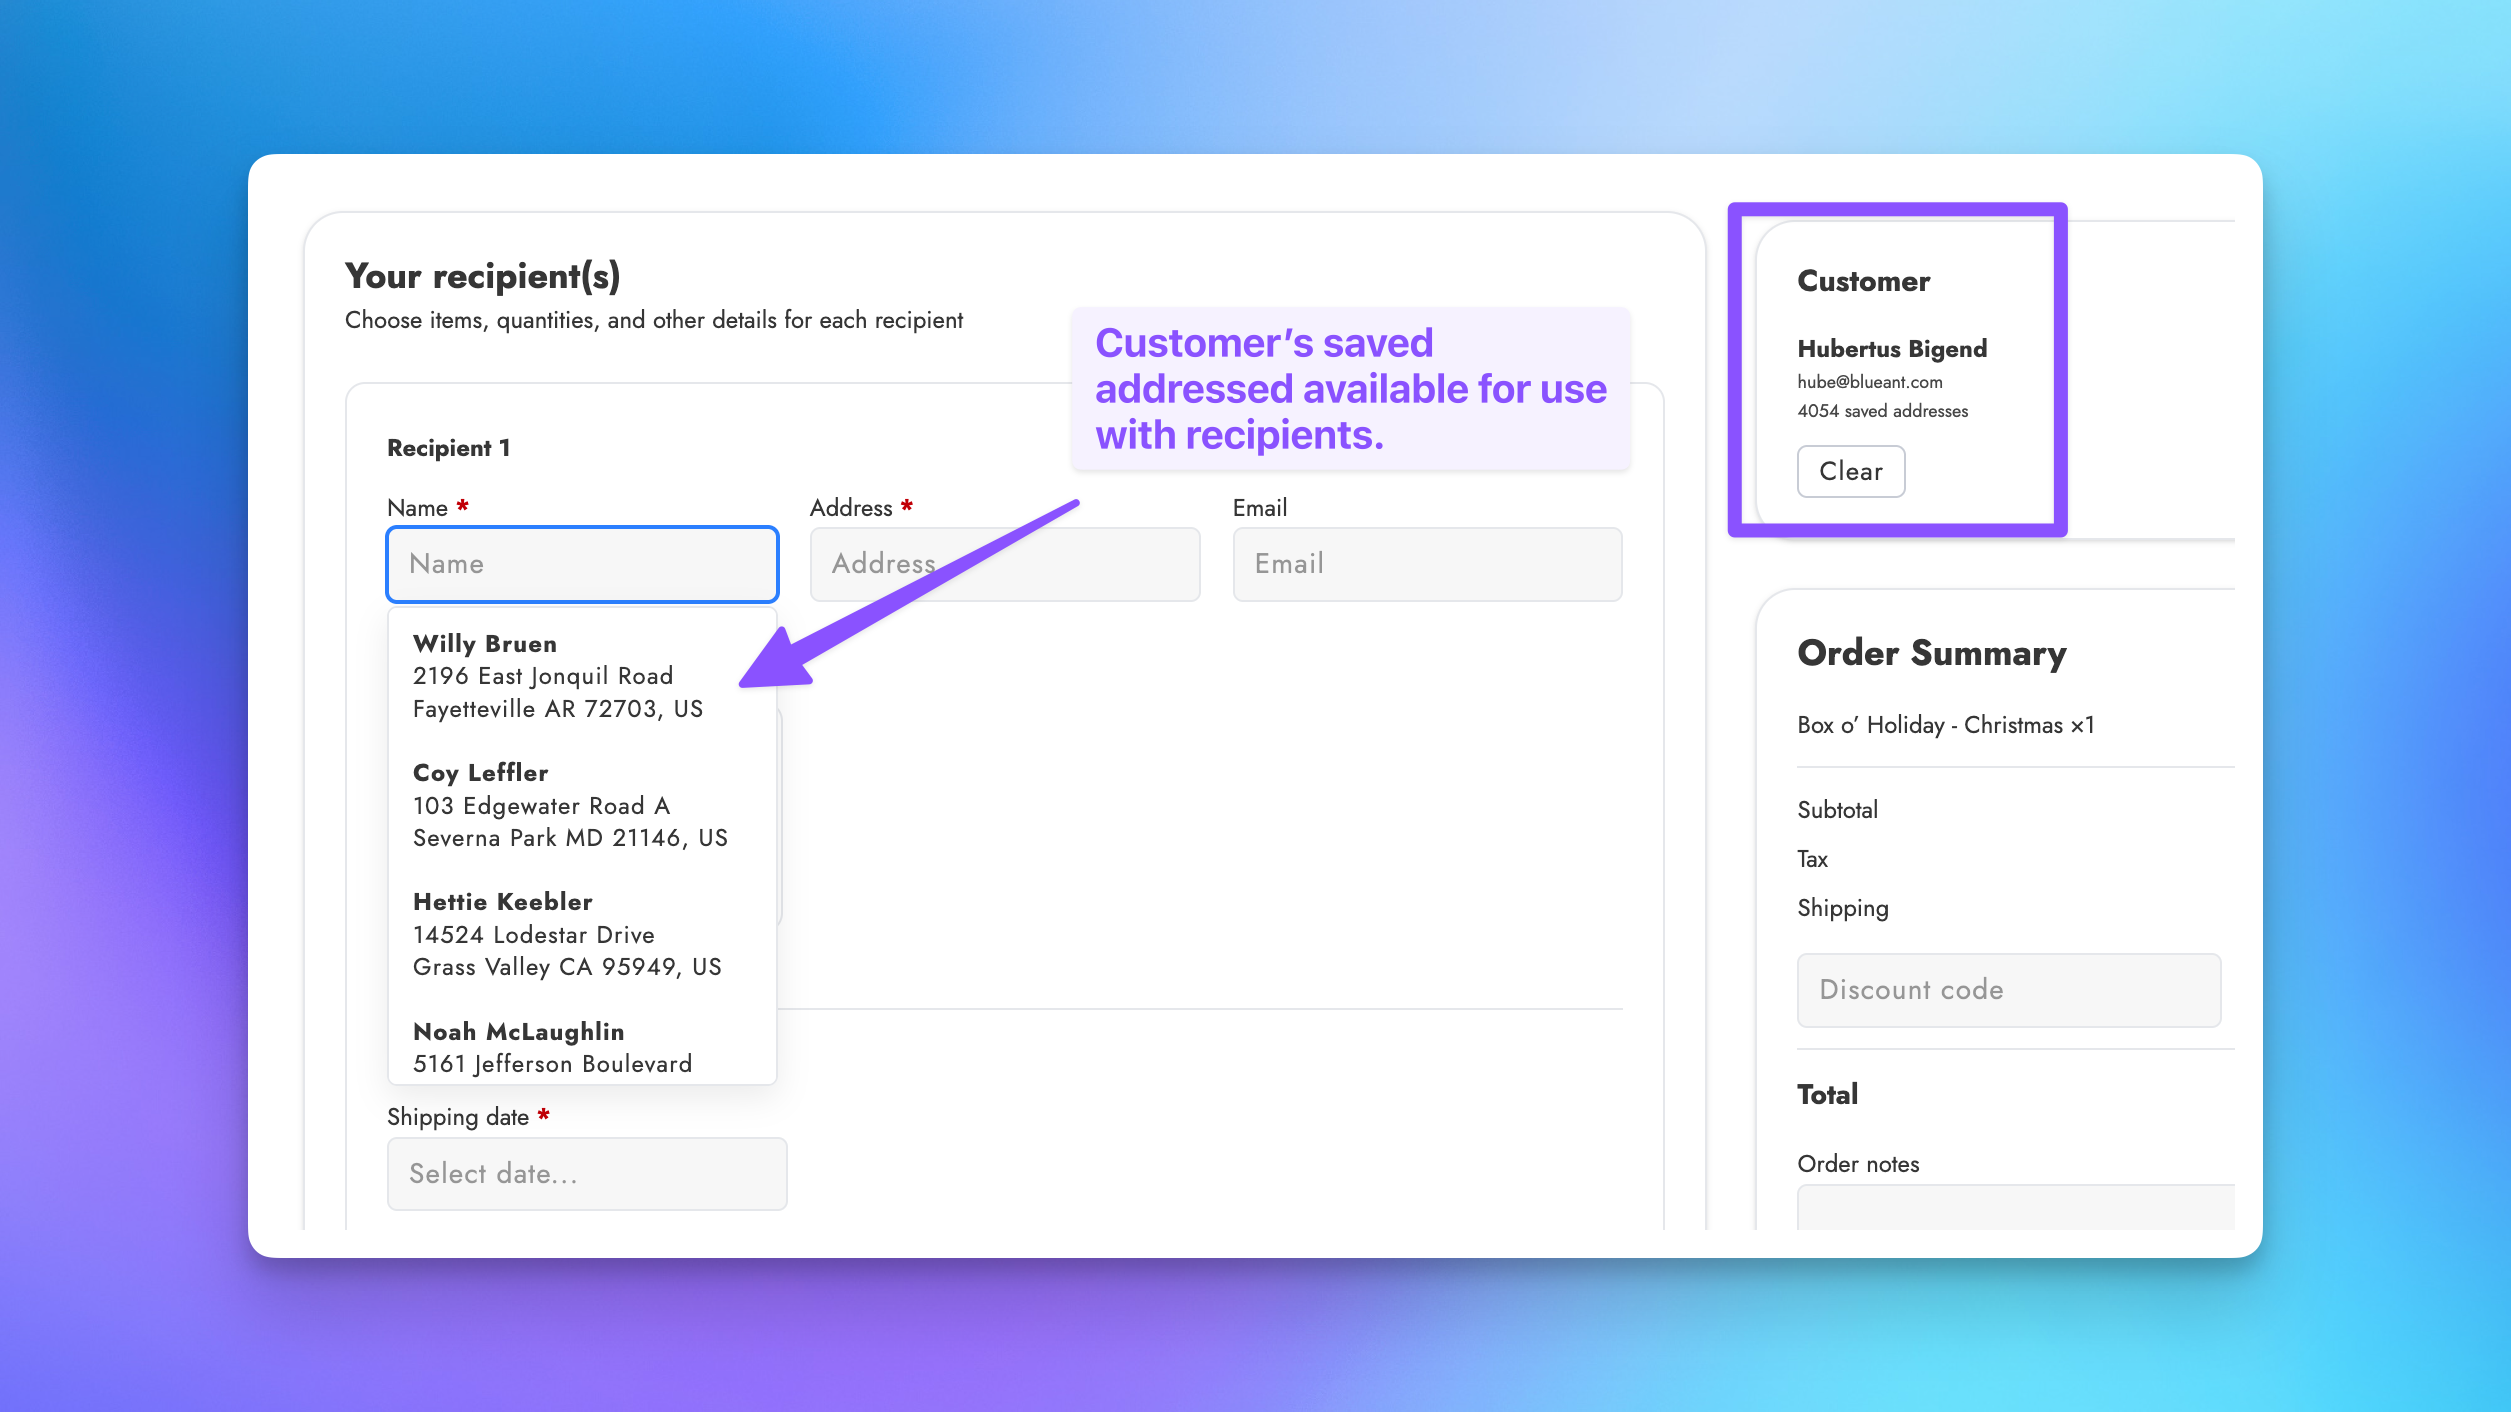
Step 4: Add recipients
Add each recipient from the saved address book when available, or enter the address manually. Assign products to each recipient and customize the gift message and other options as needed. The same validation rules apply: addresses entered through autocomplete or address suggestions are validated.

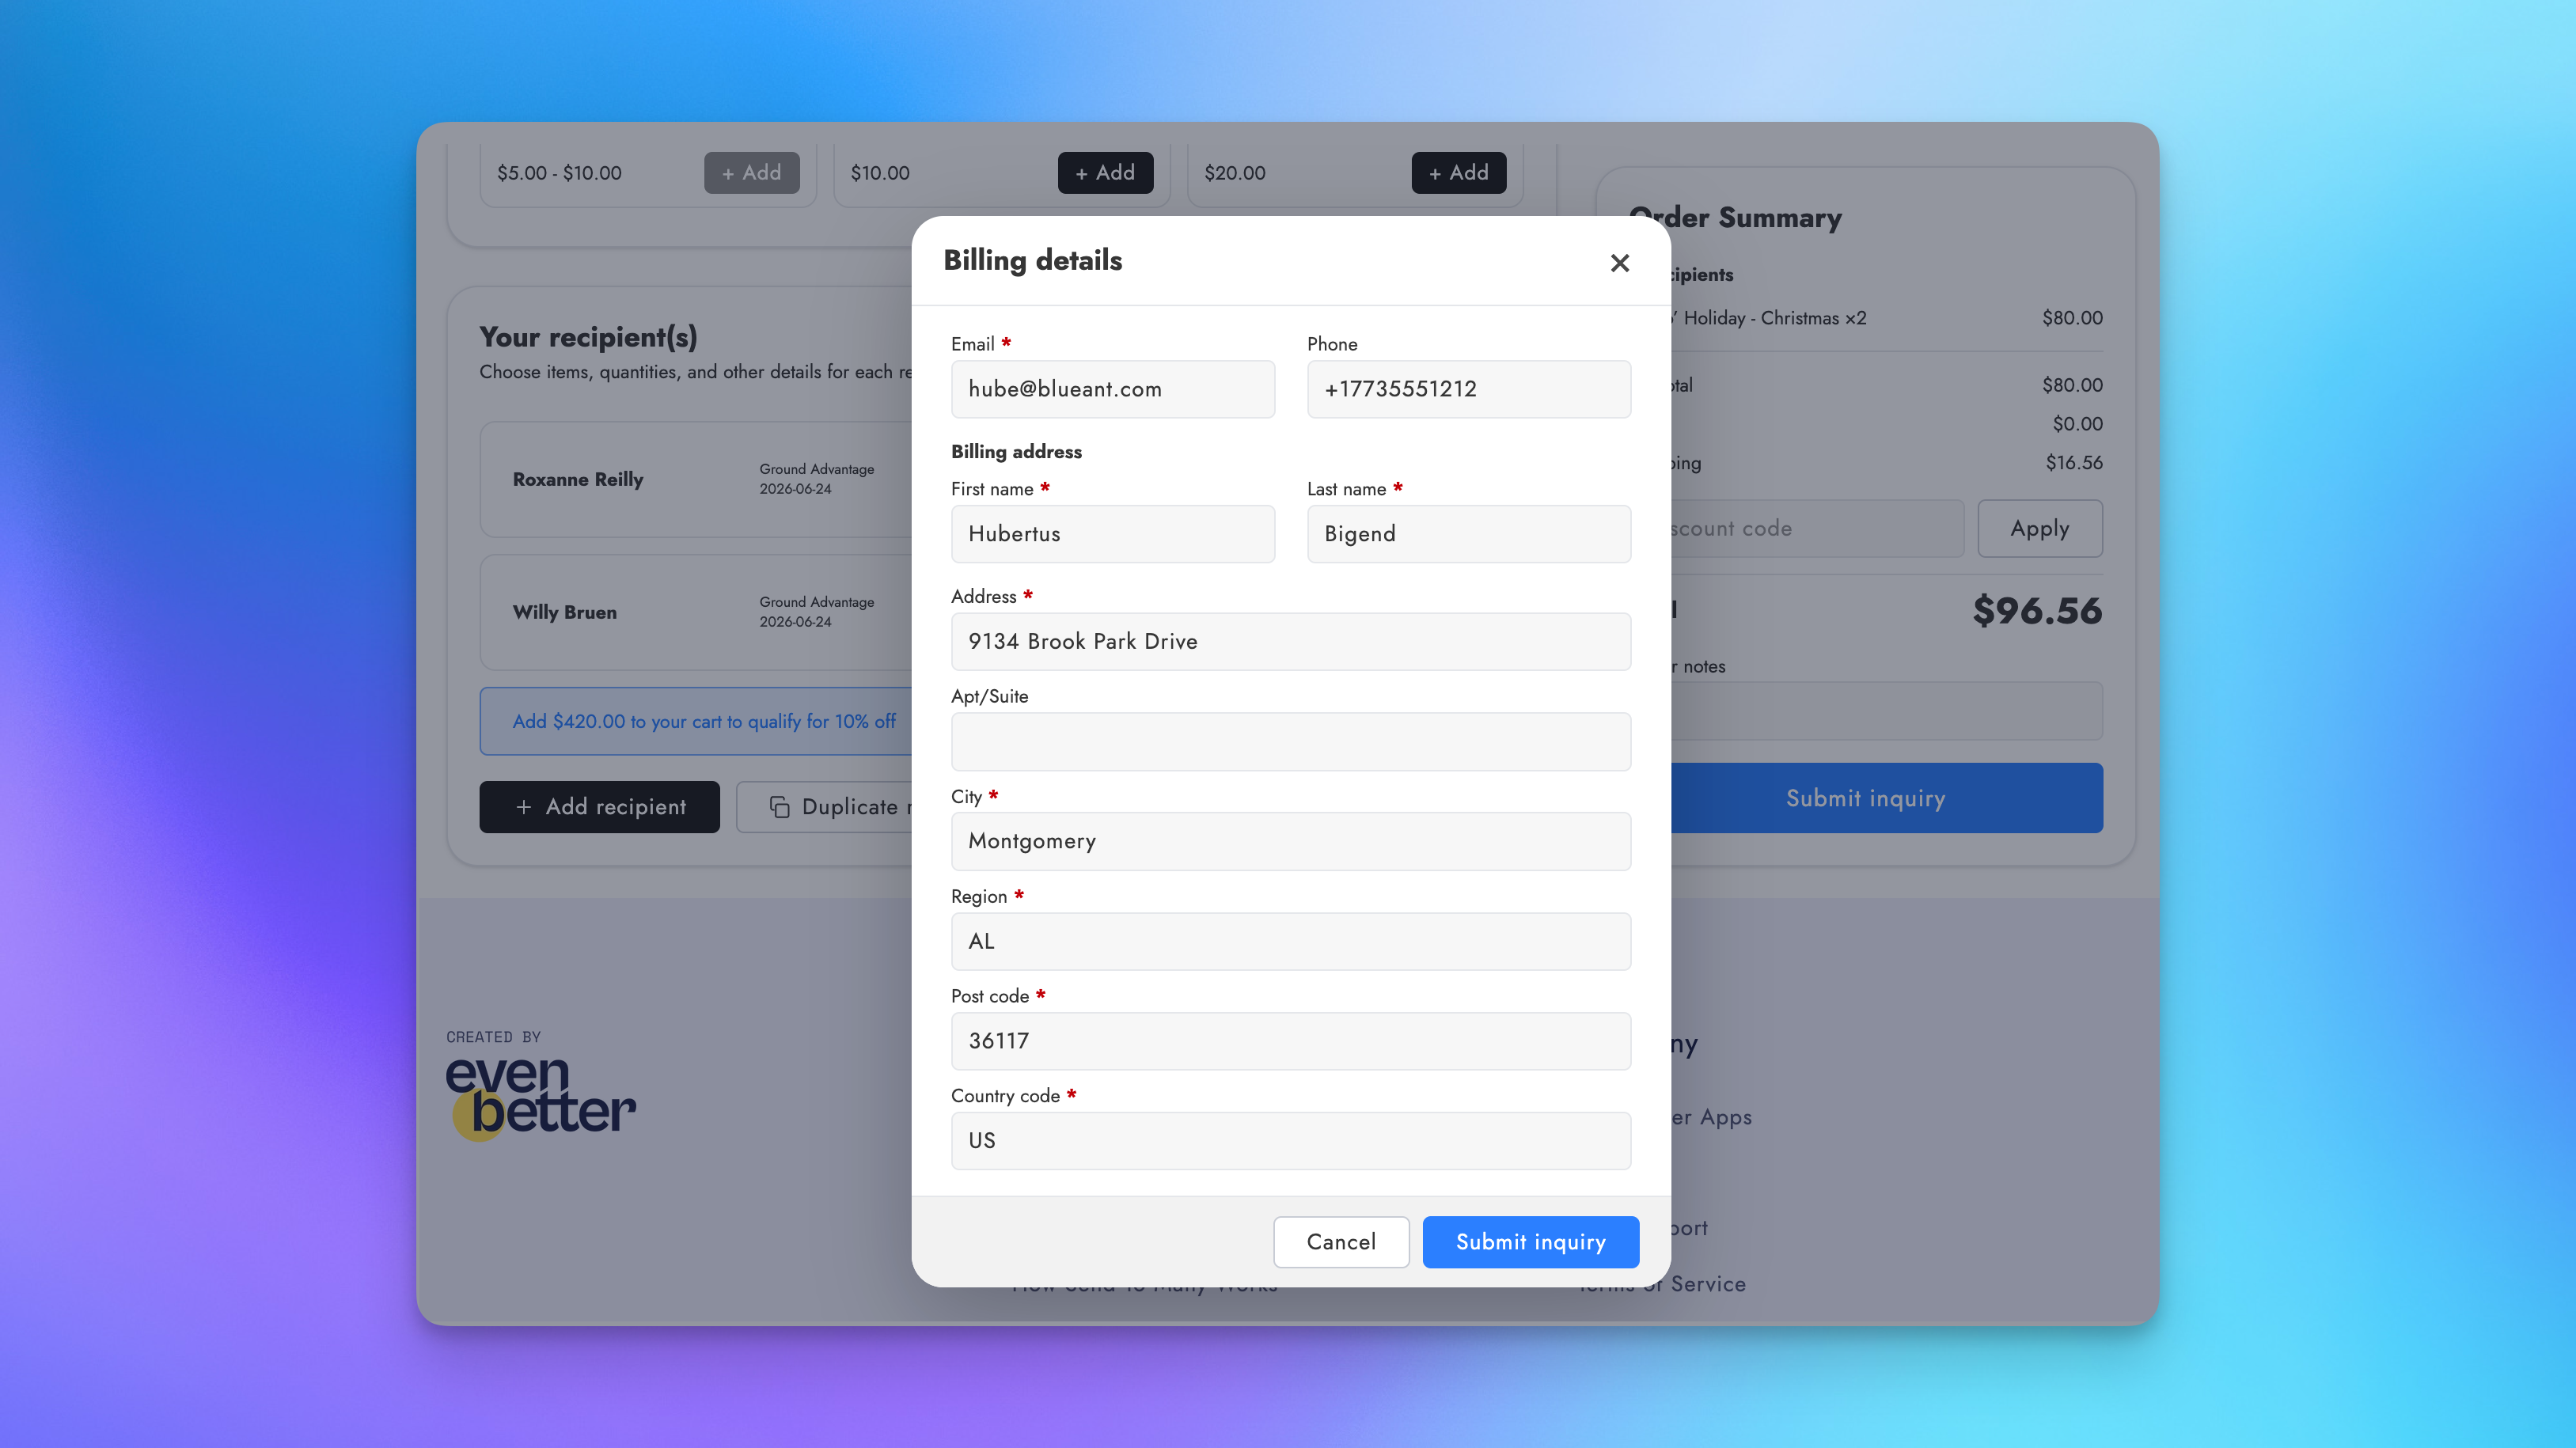
Step 5: Submit the order
Instead of a Checkout button, staff mode shows a submit action (Submit inquiry). When you submit, enter the customer's billing contact information and billing address. For an existing customer, this is pre-filled from their account default.
Step 6: Finish in the admin
Submitting creates a draft Send and takes the staff user directly to the Send in the Send To Many app in Shopify admin. From there you create and send the invoice.
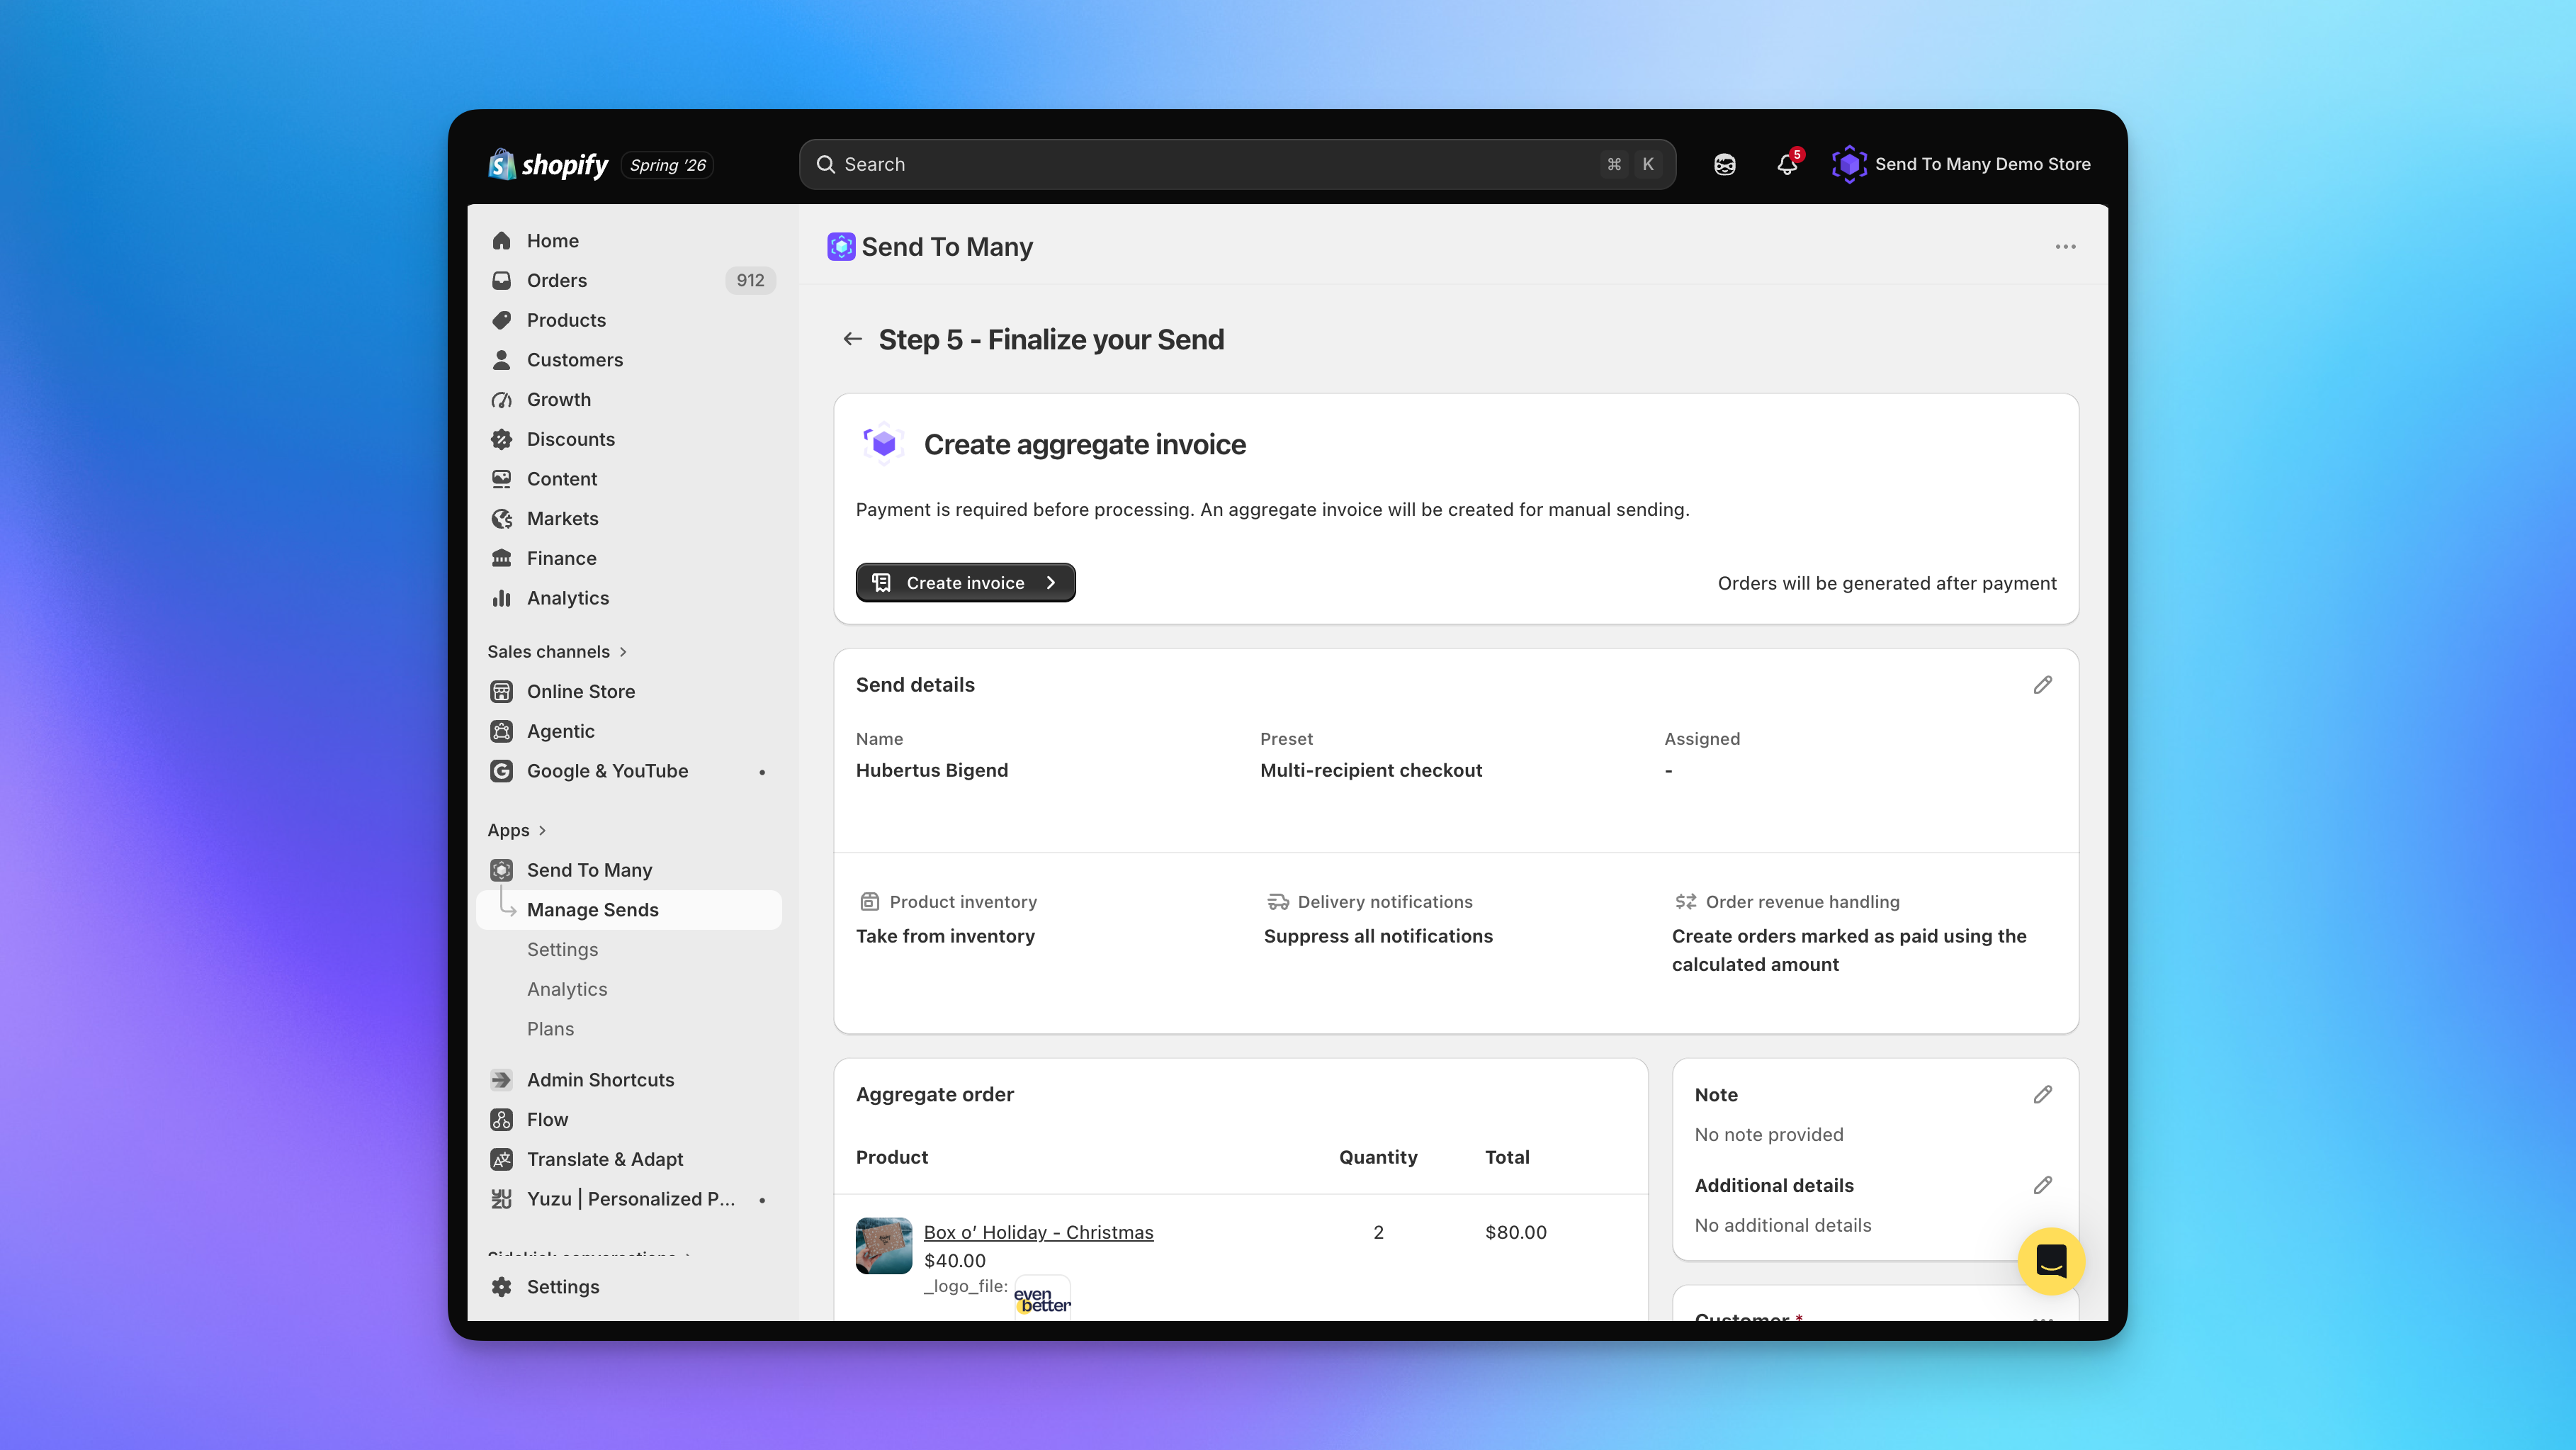
Editing a submitted send is limited in this version. Recipient addresses can be edited on the draft, but products cannot. For extensive product changes, download the recipient list from this page and re-upload it on the first step of the send using order upload. Support for editing products directly on a draft send is planned for a future version of staff mode.
Step 7: Take payment
Charge a card from the draft order page to take payment over the phone, or send the draft order invoice to the customer through Shopify. If a charge is declined, for example a billing ZIP that does not match the card, edit the billing address on the draft order and run it again.
Staff Mode Using Theme Contexts
Staff mode works on your existing pages once a staff member is logged in. It shows a different version of your primary checkout page to anyone logged into a staff account. If Send To Many lives on your /cart page, staff will see the staff mode page there instead of the regular Send To Many checkout, while customers continue to see the standard checkout.
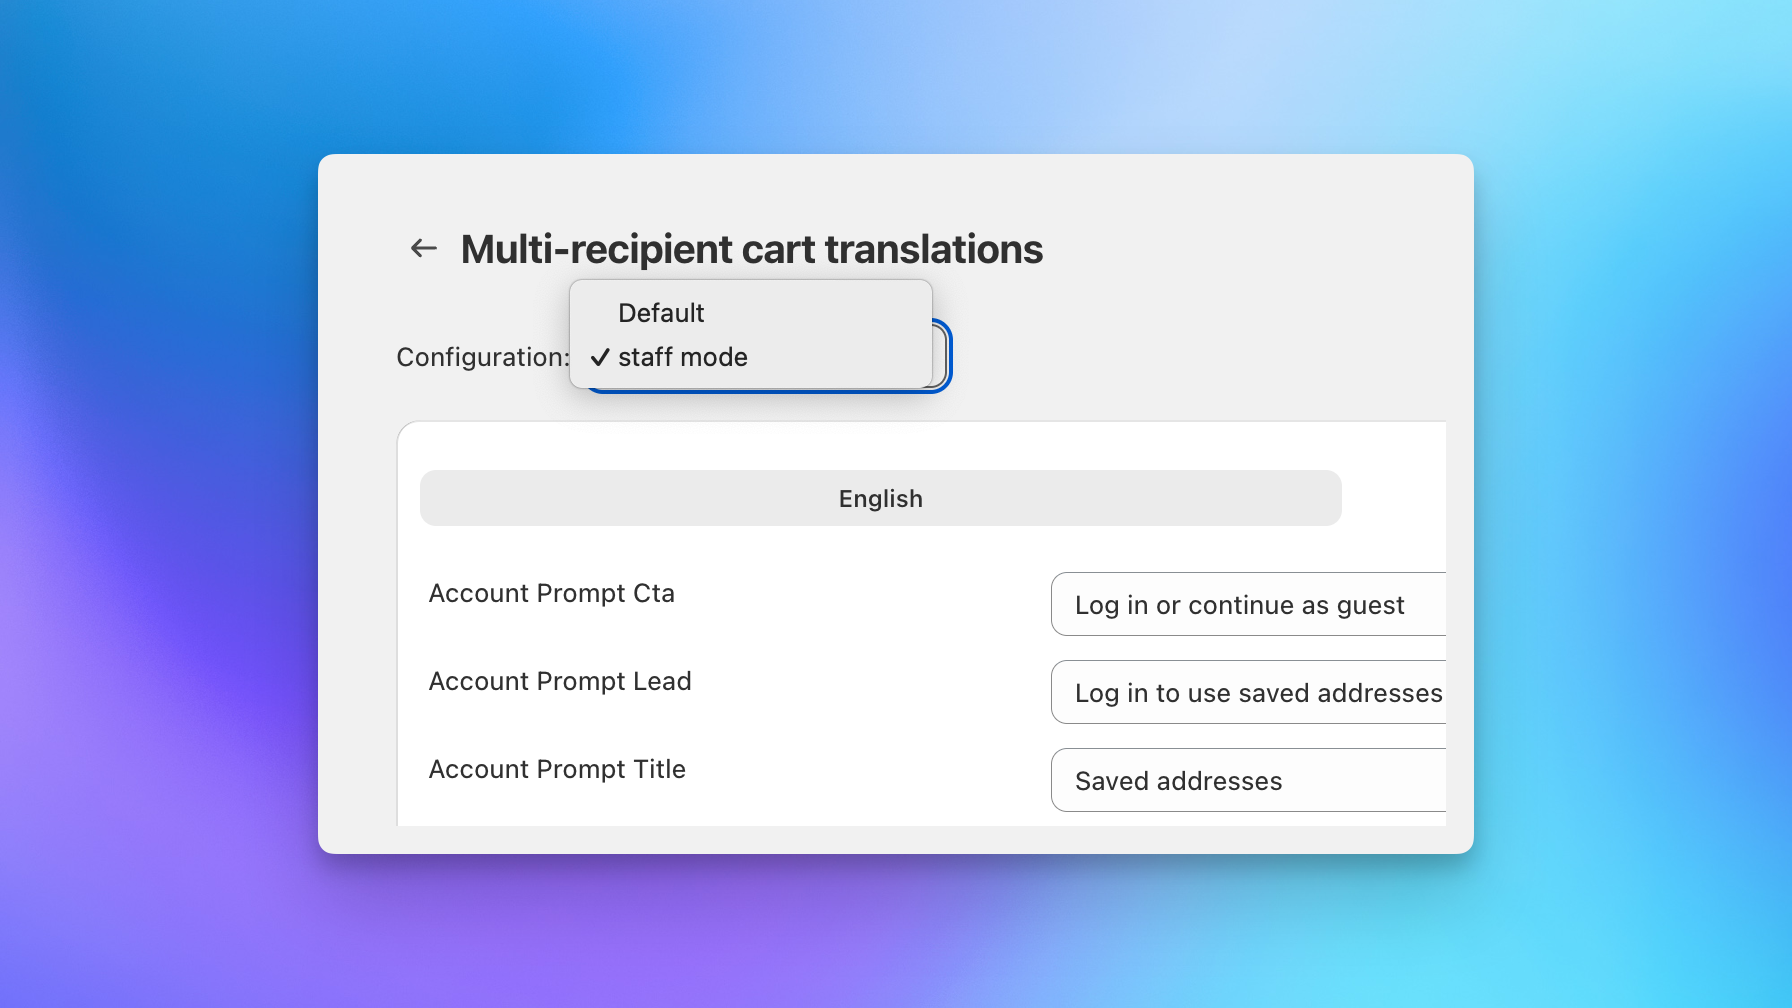
If you want a dedicated, staff-only order entry experience, you can set staff mode up as its own checkout configuration and assign it to a specific page using theme contexts. Create a separate configuration (for example, "Staff Order Entry"), enable staff mode on just that configuration, and assign it to its own page template in the theme editor. See multiple checkout configurations for how to create a configuration and assign it to a page template.
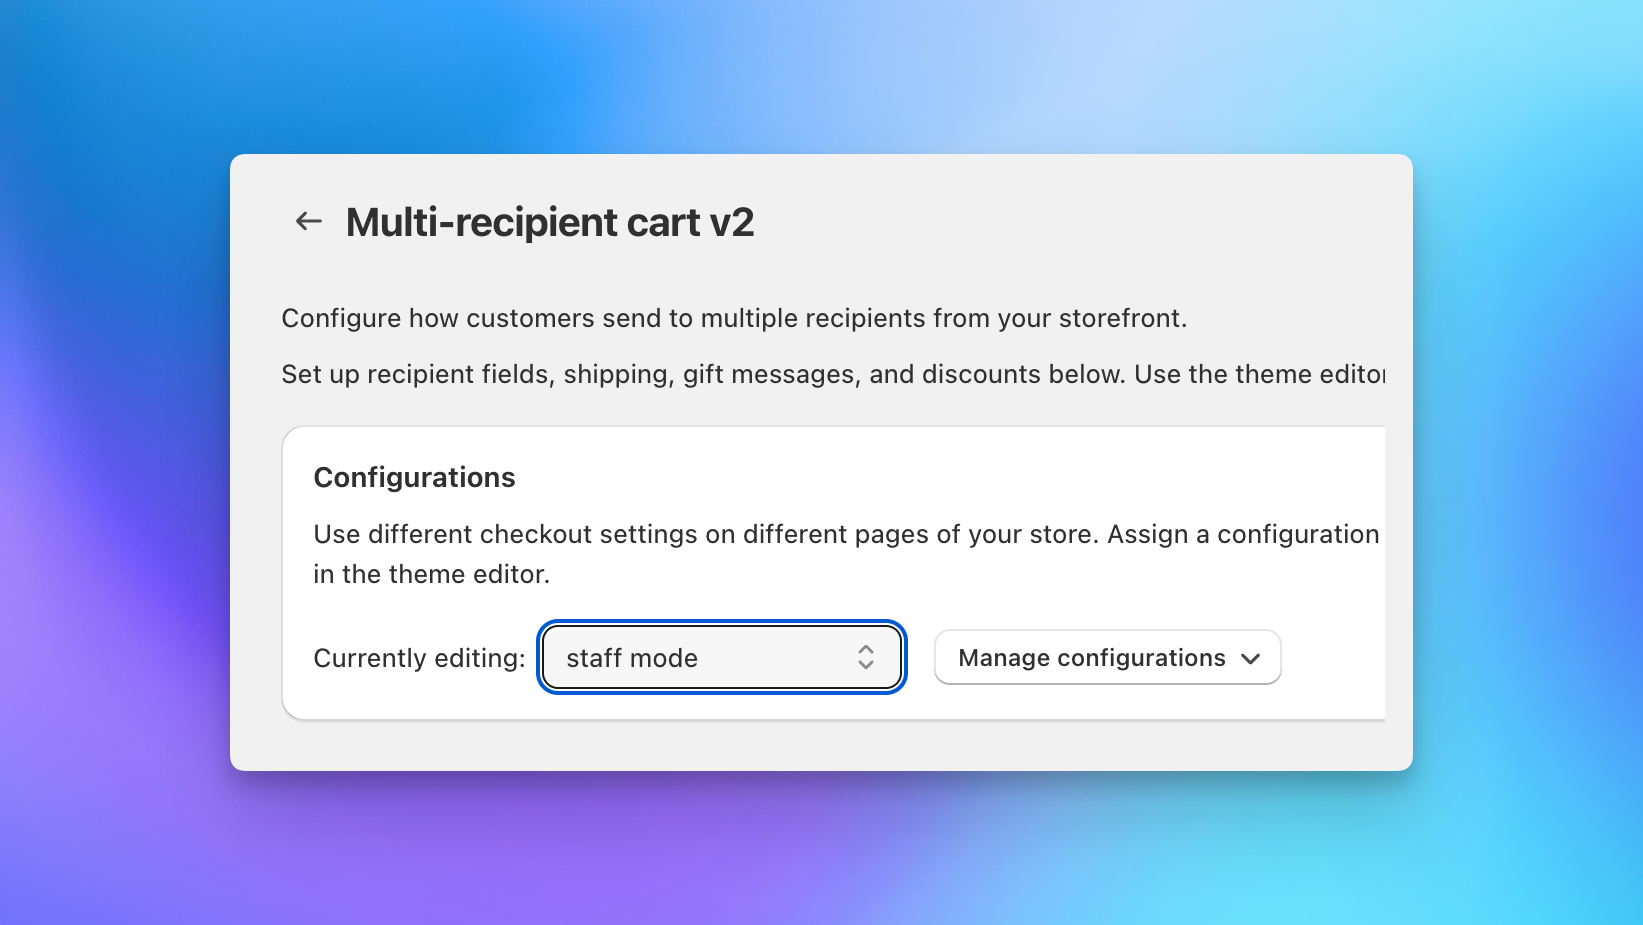
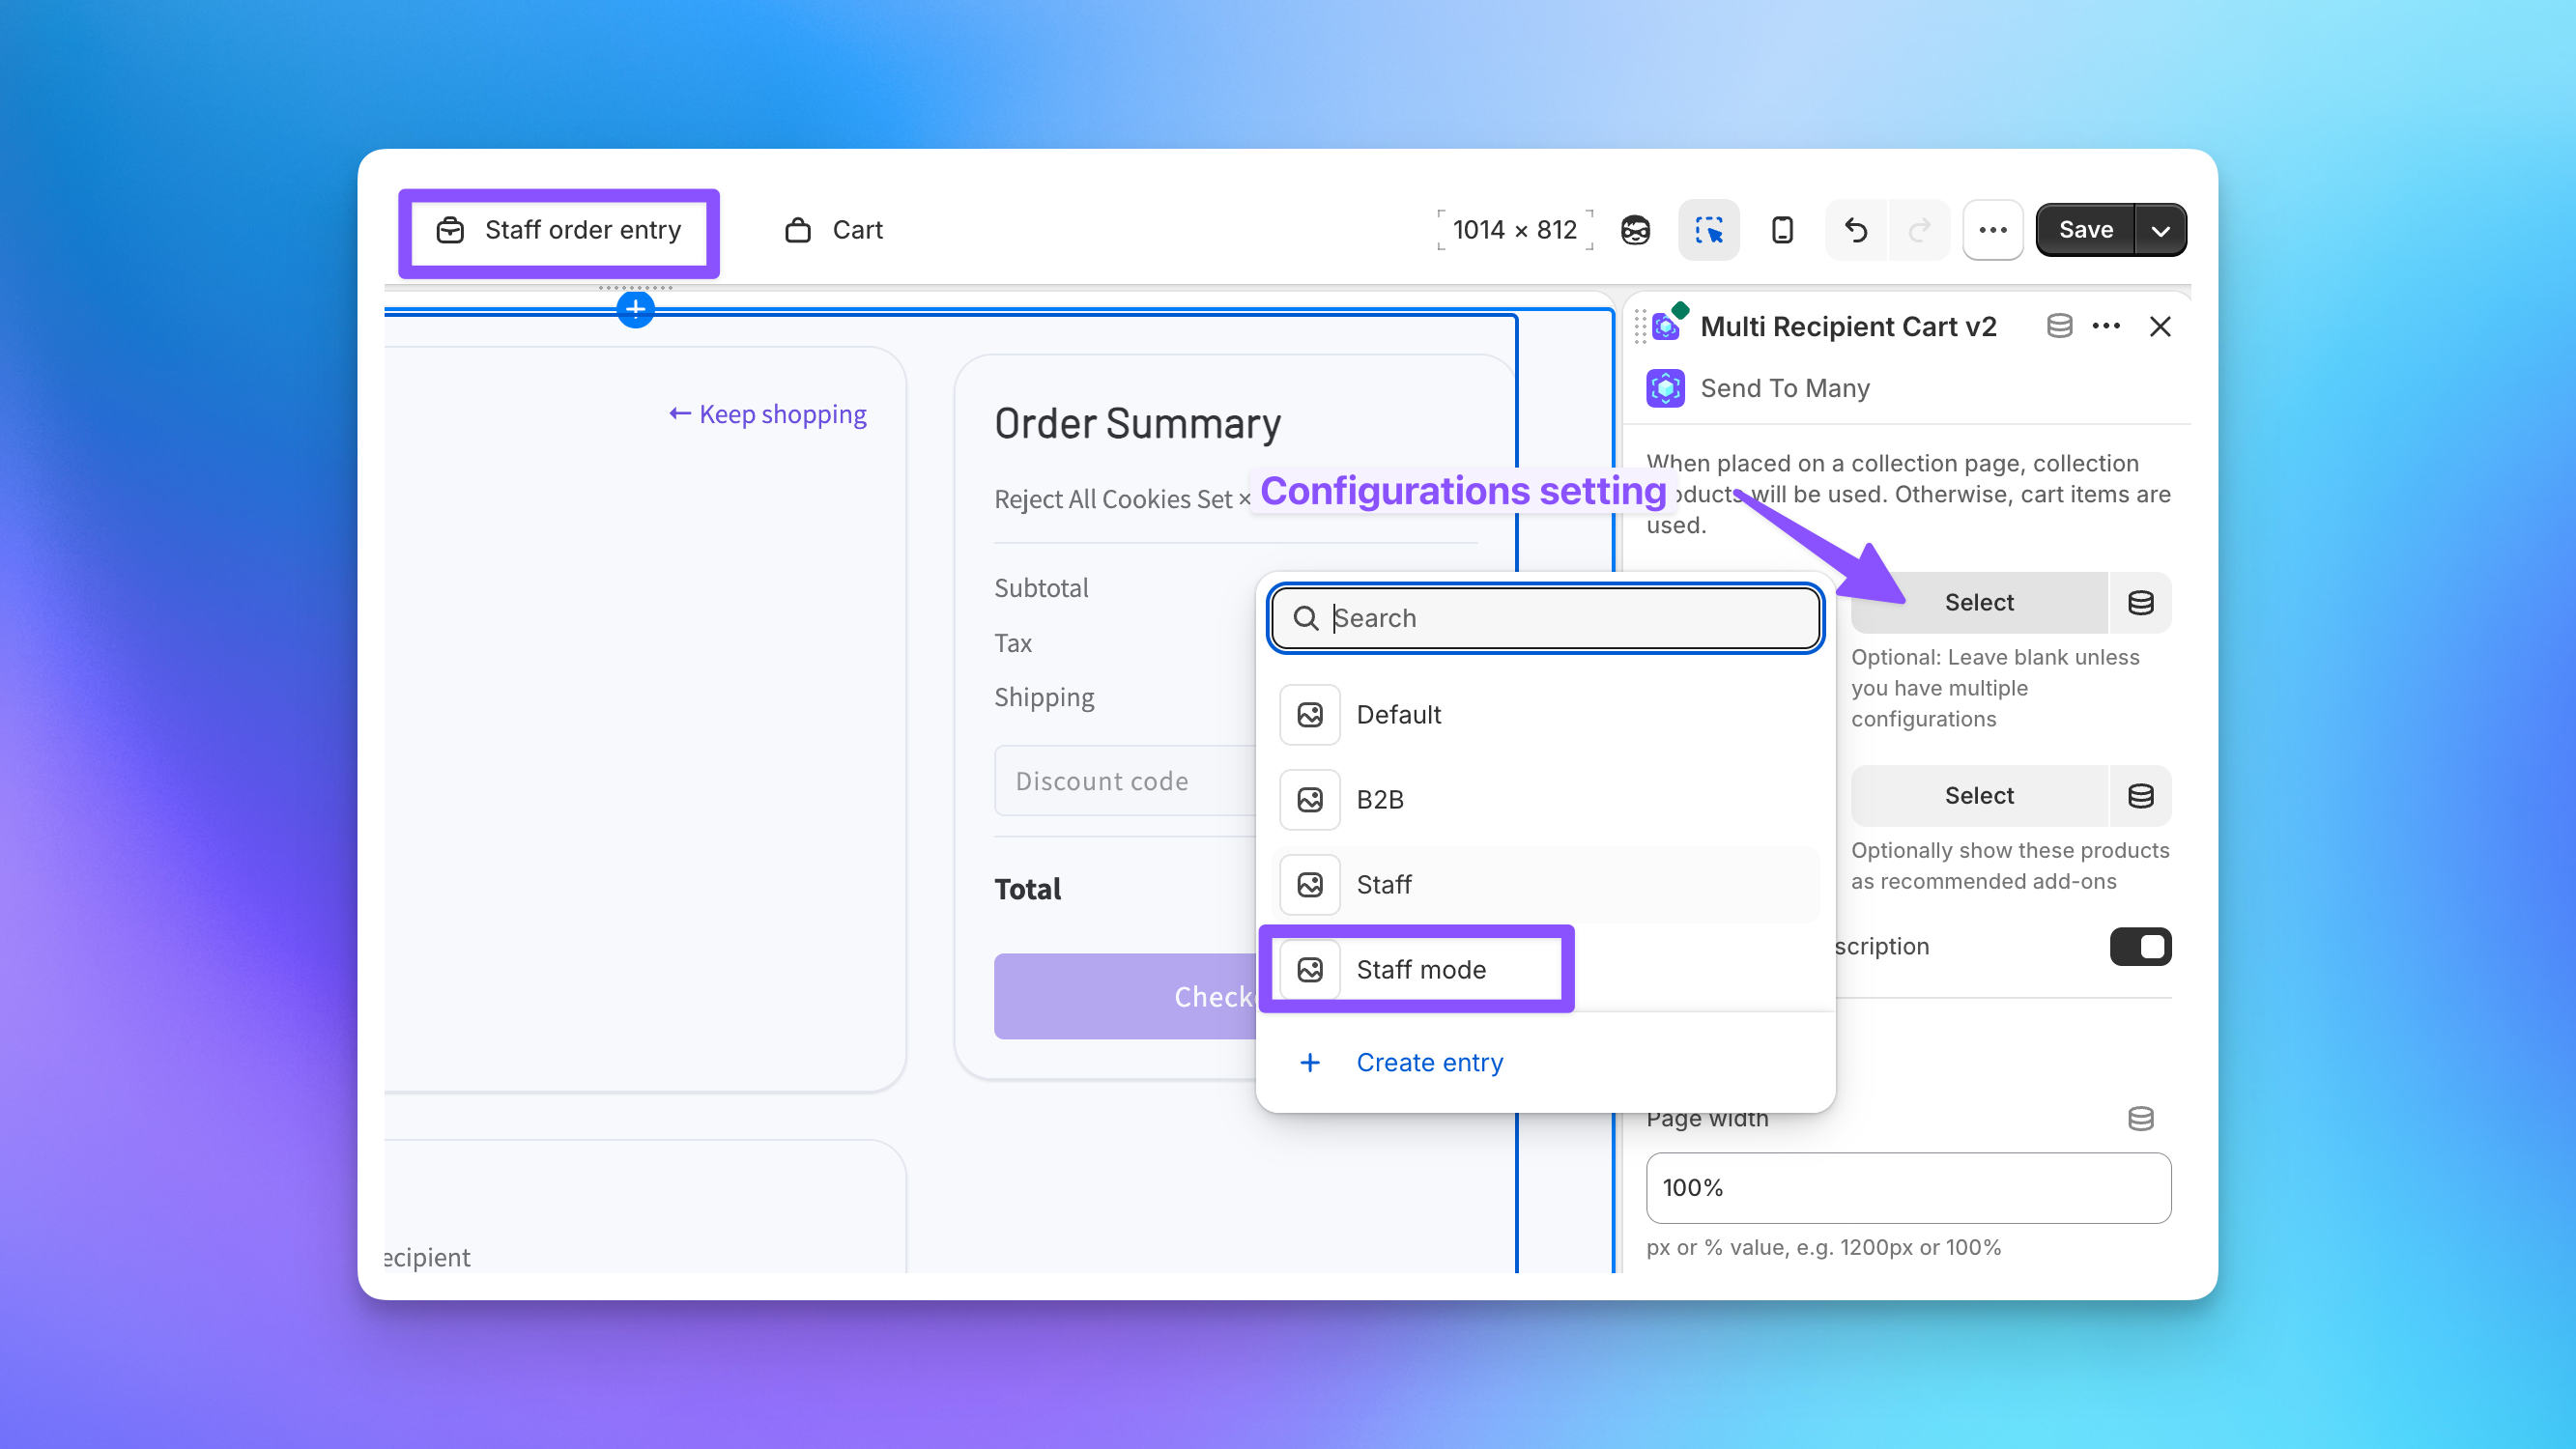
Because each configuration has its own text and translations, you can tailor the on-page copy for your team. Add instructions, internal notes, or seasonal guidance such as holiday cutoffs that your team sees but customers never do.
A staff-only configuration is useful when your team needs different fields, copy, or discount options than your customers. Build it once and point a private page at it.
Things to Know
Discount codes and companies. Shopify blocks discount codes for customers who are logged in as a company, which includes staff in staff mode. By default a code returns "promo codes not allowed for company." To use discount codes, the store owner must contact Shopify support and ask them to enable discount codes for company customers. There is no storefront setting for this. Once Shopify enables it, discount codes work in the staff checkout like any other.
Billing address entry. The billing address at the submit step is entered manually. Recipient address validation is unchanged.
Editing a submitted send. A submitted staff order stays a draft until you create and send the invoice or complete payment. In this version, you can edit recipient addresses and the billing contact on the draft, but you cannot change products. For extensive product changes, download the recipient list and re-upload it through order upload on the first step of the send. Support for editing products directly on a draft send is planned for a future version.
Next Steps
- Multiple checkout configurations: Create a staff-only checkout and assign it to a page
- Multi-recipient checkout advanced settings: Where the staff mode setting lives
- Using Shopify B2B for corporate gifting: Companies, locations, and payment terms
- Invoicing and payment collection: Send invoices and take payment on draft orders