Customer Account Extensions: Sends Page & Order Send Banner for Shopify
Give gifters a Sends page in their Shopify customer account with every recipient order and delivery status, add Send context to order pages, and deep link to a Send from emails and digests.
Send To Many adds two extensions to Shopify's customer accounts that work together. The Order Send Banner appears on any order that belongs to a multi-recipient Send and links it to the full Send. The Sends page is where that link lands: a dedicated view of the Send with every recipient order and its delivery status. Together they give gifters a self-serve place to track everything, without contacting your support team or digging through email.
Both extensions work with Shopify's new customer accounts (not legacy accounts) and integrate directly into the native account interface where customers already manage orders, addresses, and payment methods.
What Customers See
The usual path starts in the customer's order history. They open an order, see the banner, and click through to the Send.
The Order Send Banner
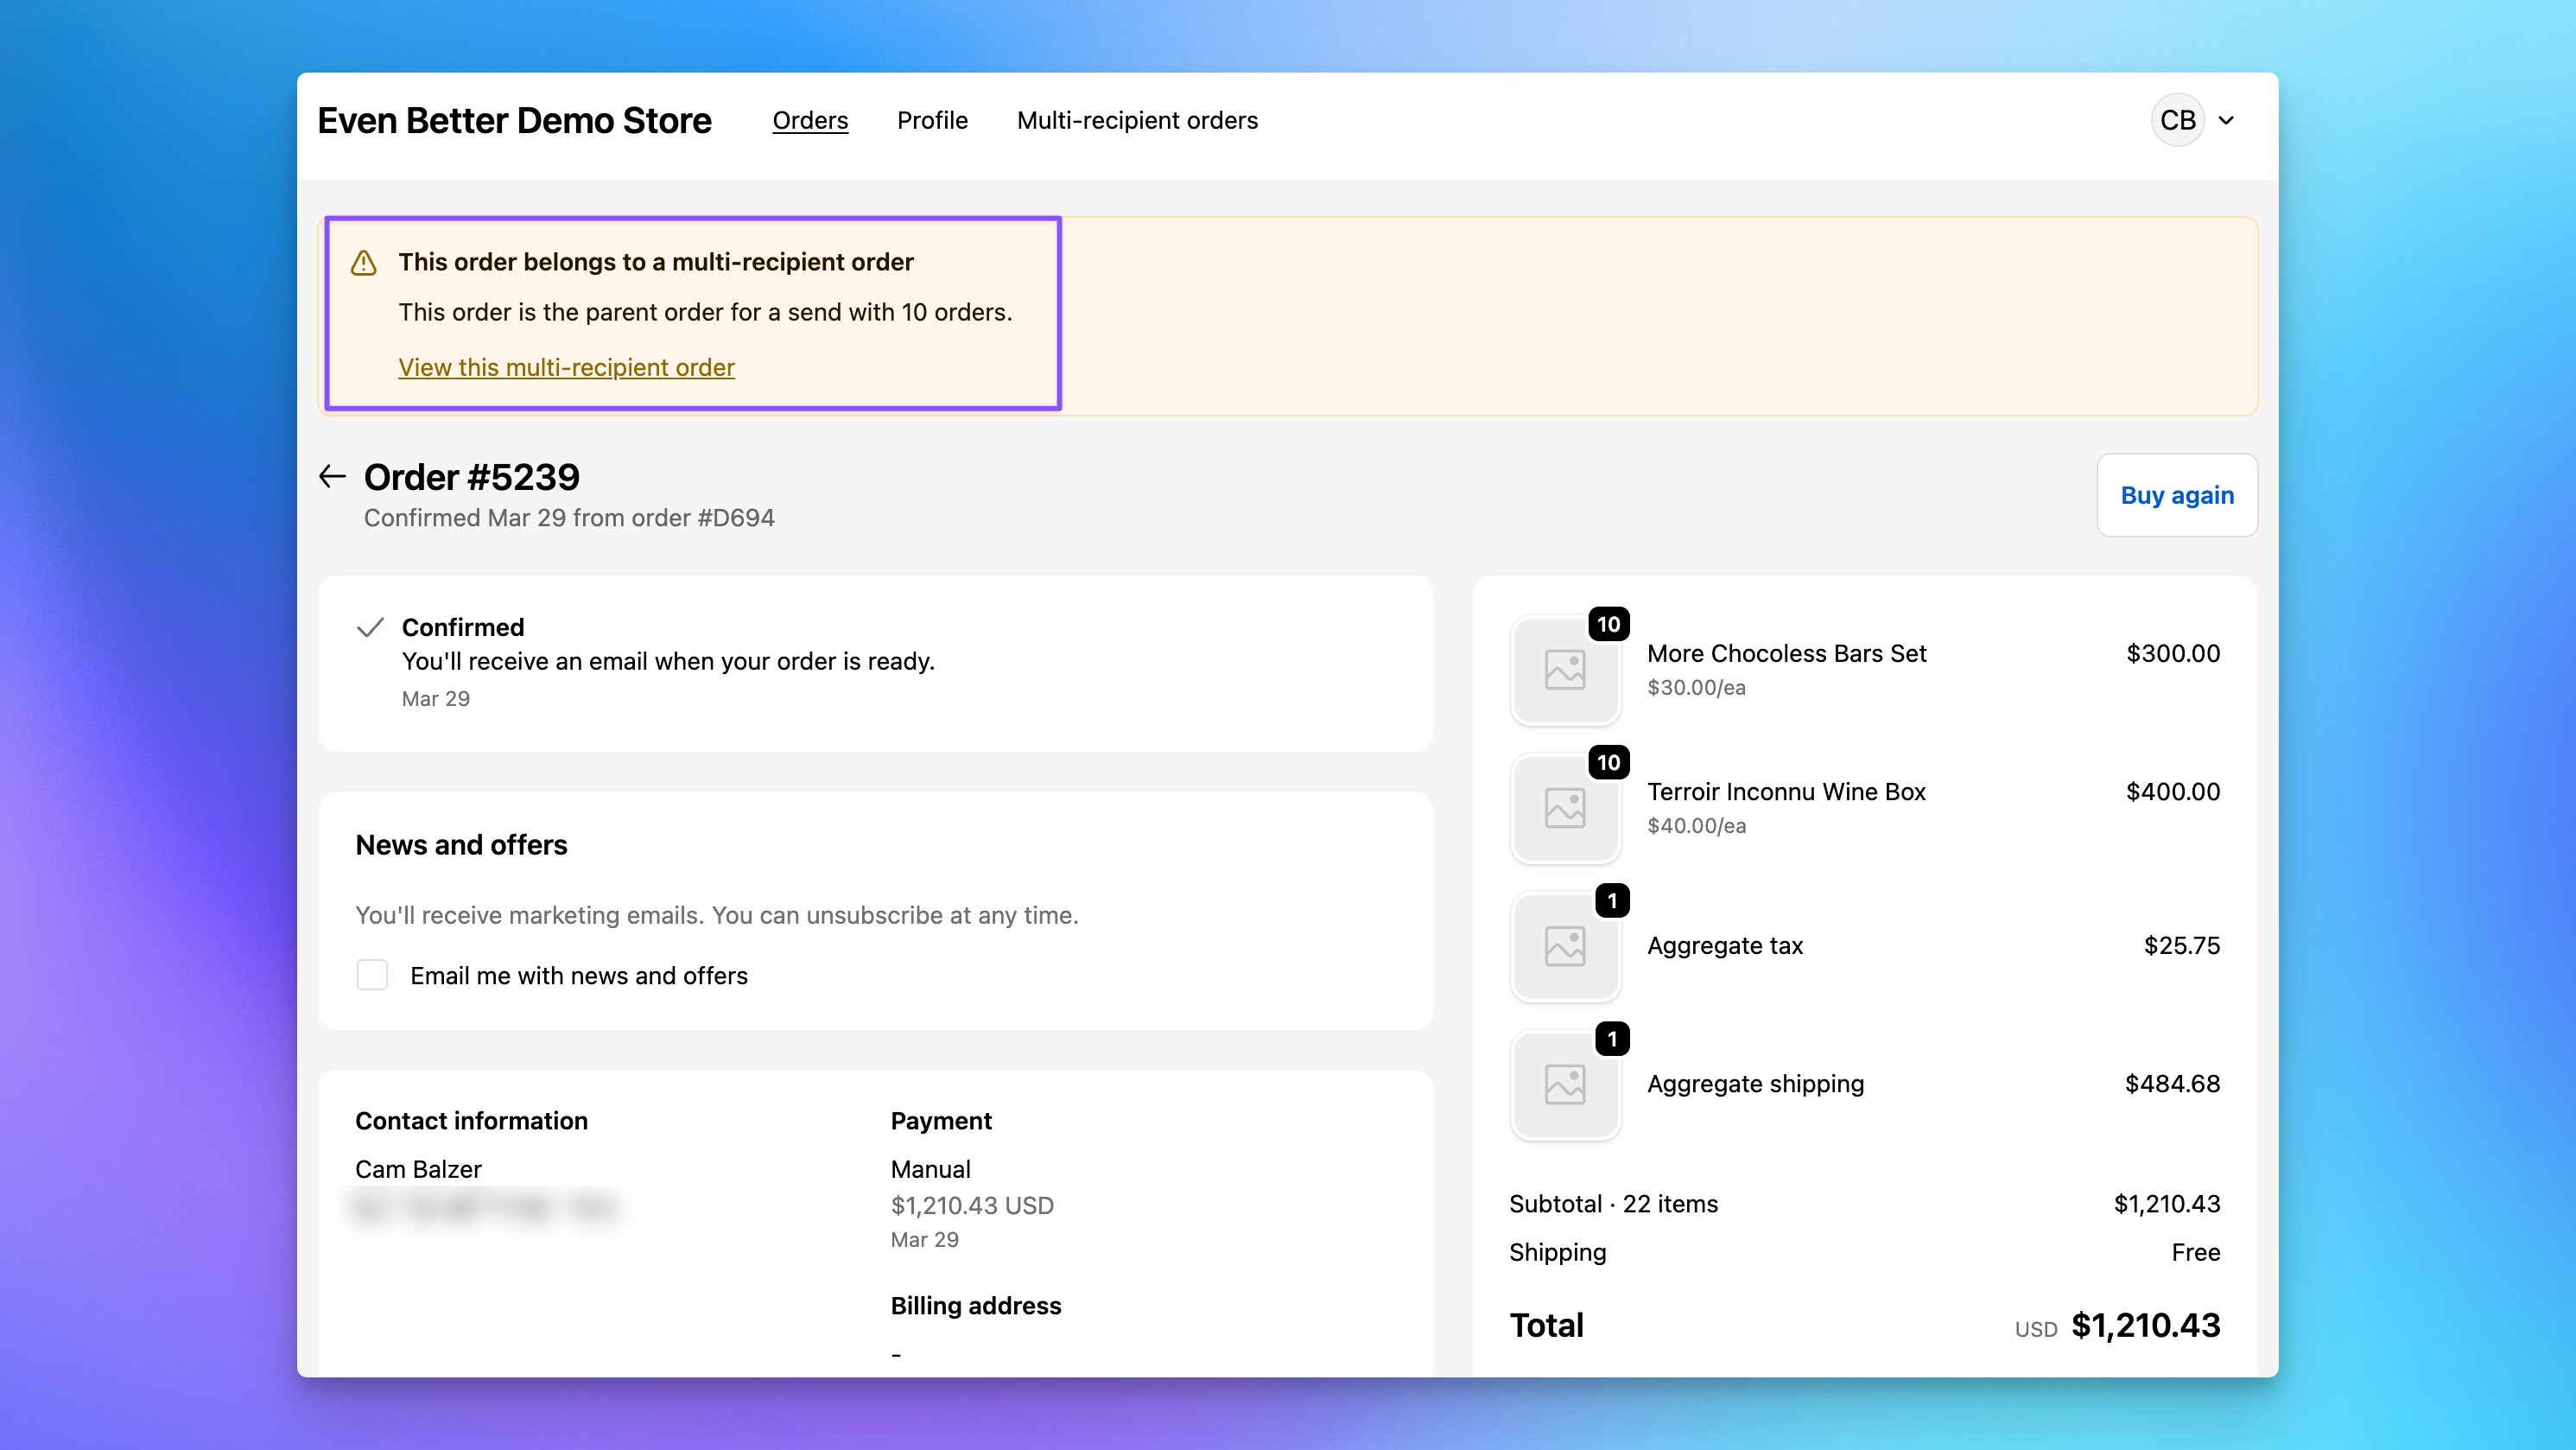
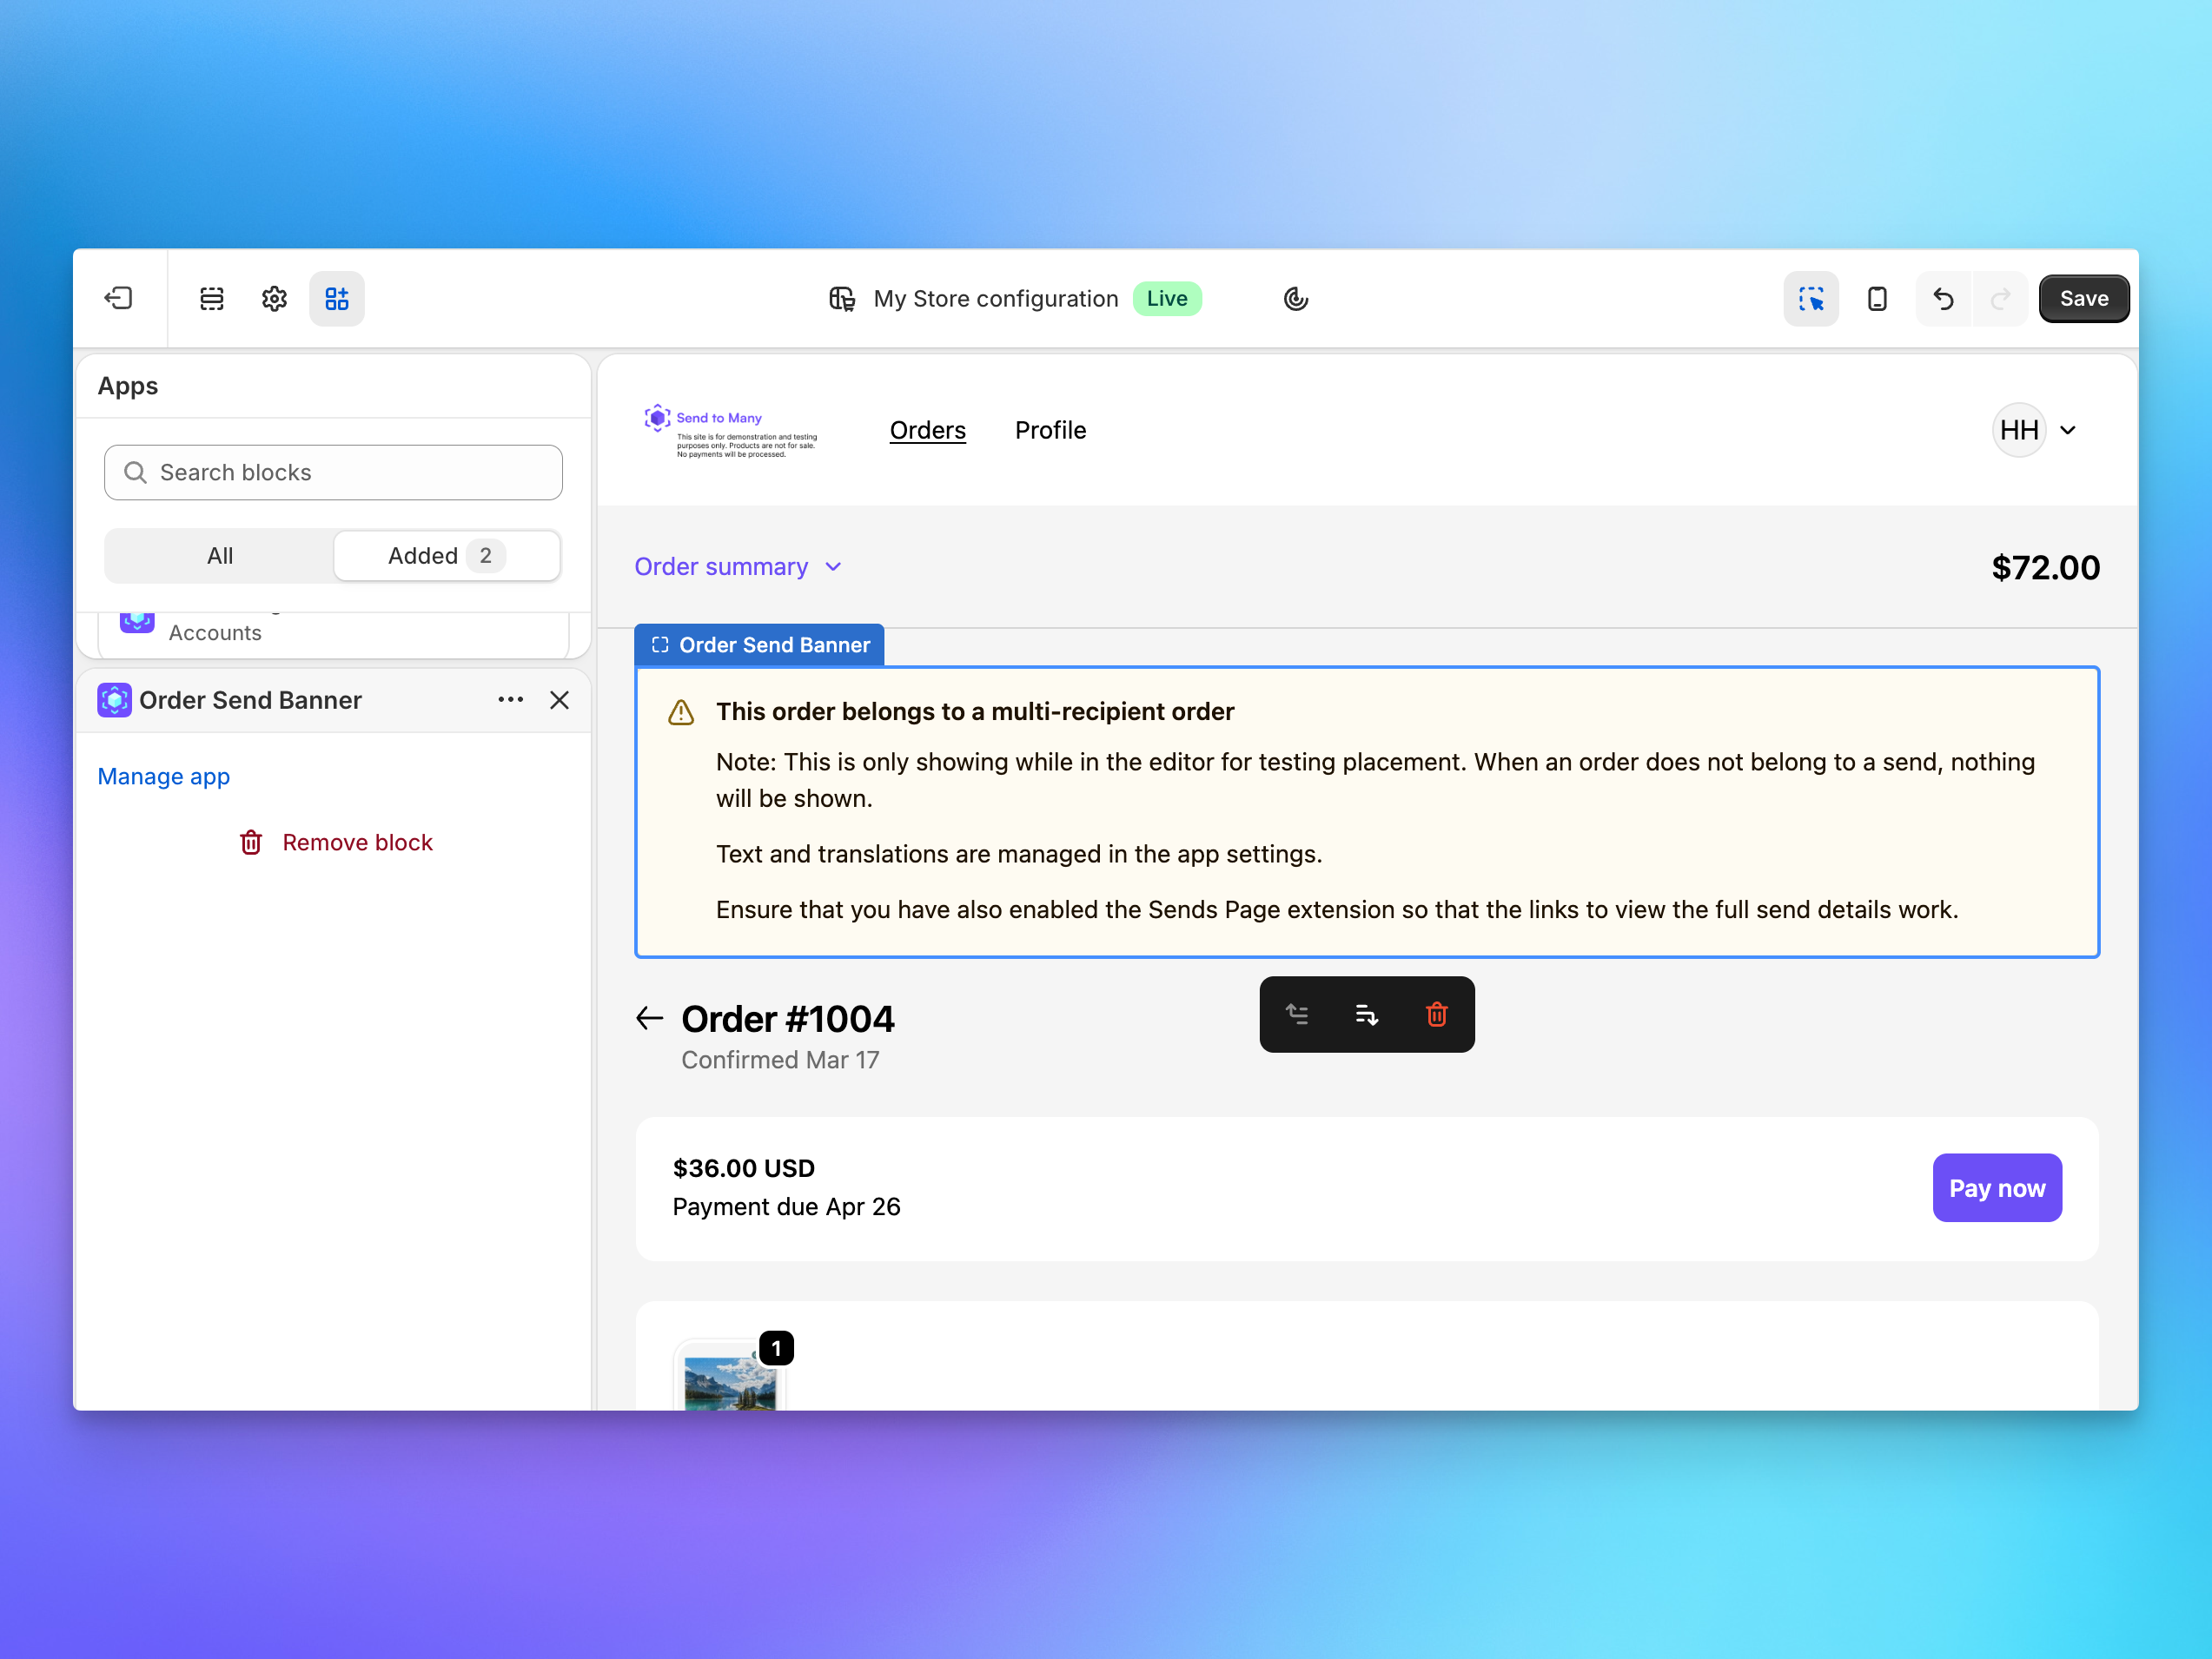
When a customer views an order that belongs to a Send, a banner at the top of the order page explains the connection and links to the full Send.
On an aggregate (parent) order, the banner indicates that this is the parent order for a Send and shows how many recipient orders it includes.
On a recipient (child) order, the banner indicates that this order is part of a multi-recipient Send and links back to the full Send view.
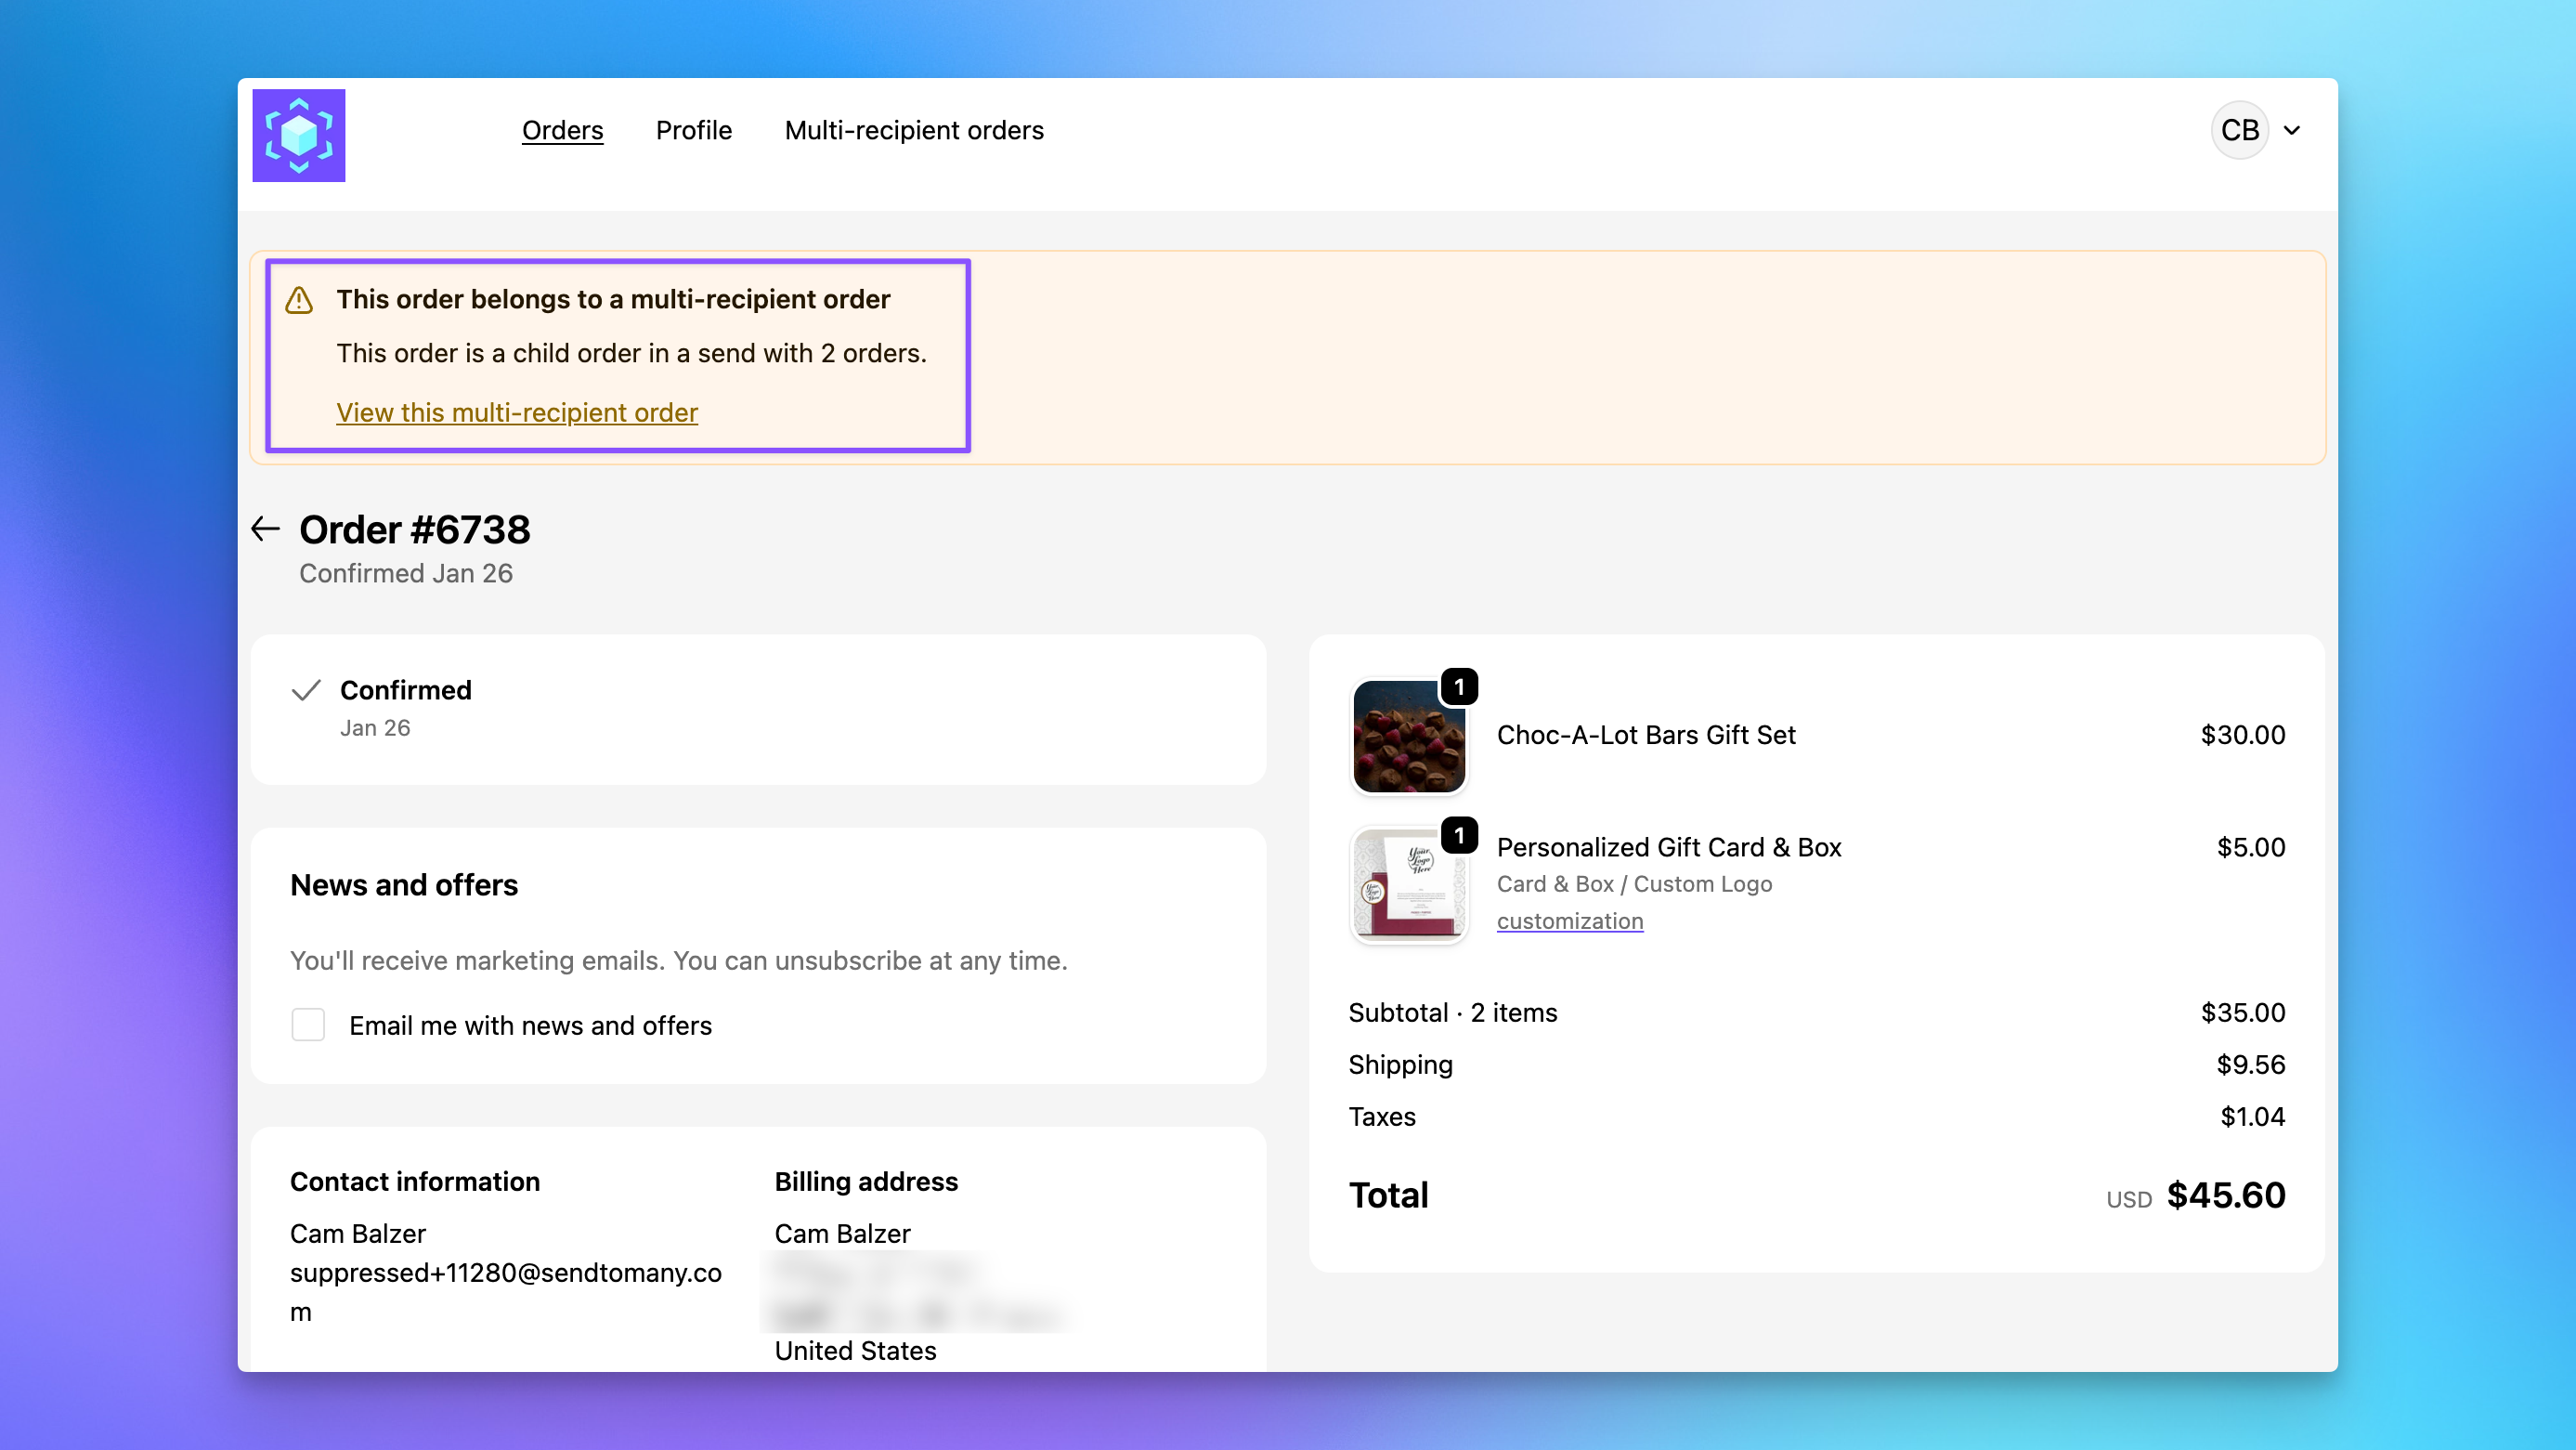
In both cases, the "View this multi-recipient order" link takes the customer to the Send detail on the Sends page. The banner has two placements: the order detail page in the customer account, and the order status (thank you) page right after checkout. It only appears on orders that belong to a Send; regular orders show nothing.
The Sends page
The Send detail view shows contact information, billing address, the products and quantities ordered, subtotal, shipping, tax, and total. Below that, customers see every individual recipient order with the recipient name, location, and order amount. Each recipient order links to its own order detail page.
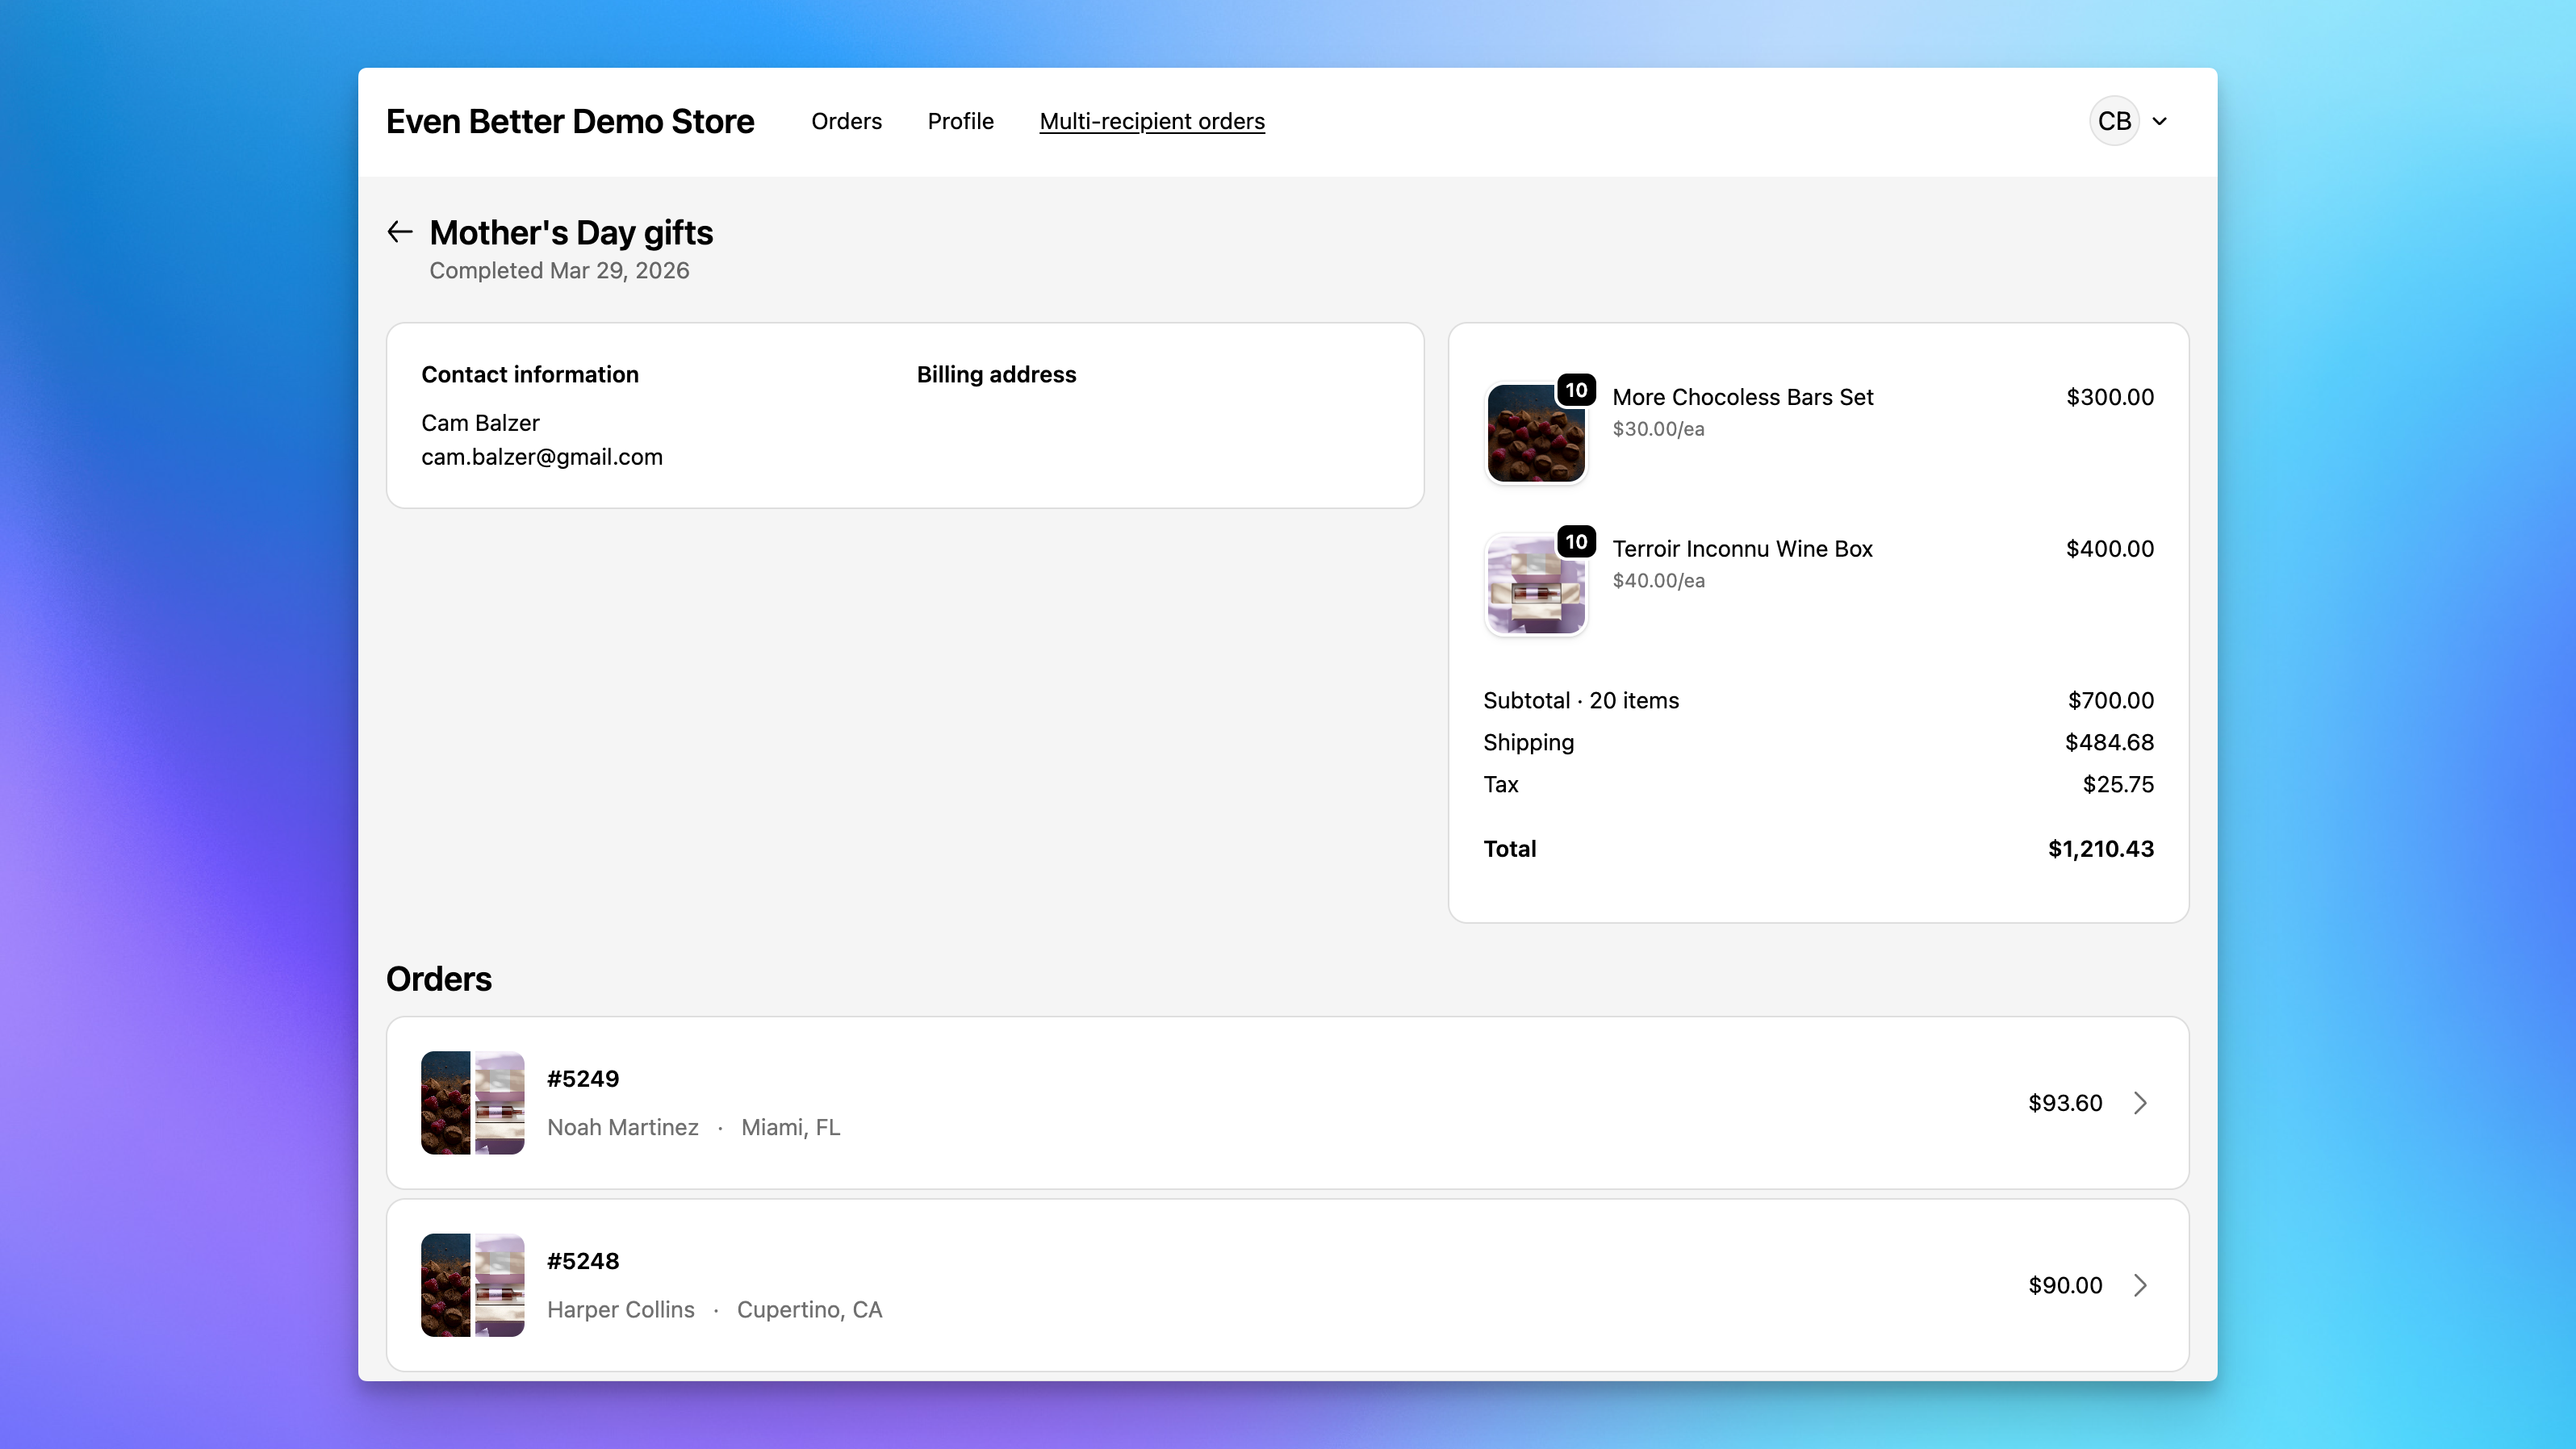
Stepping back from a Send detail shows the customer's full list of Sends associated with their account email address: Send name, date created, number of recipient orders, total value, and status. This list is especially useful for repeat corporate gifting customers who place multiple Sends over time and need a central place to reference past orders.
Send again (beta)
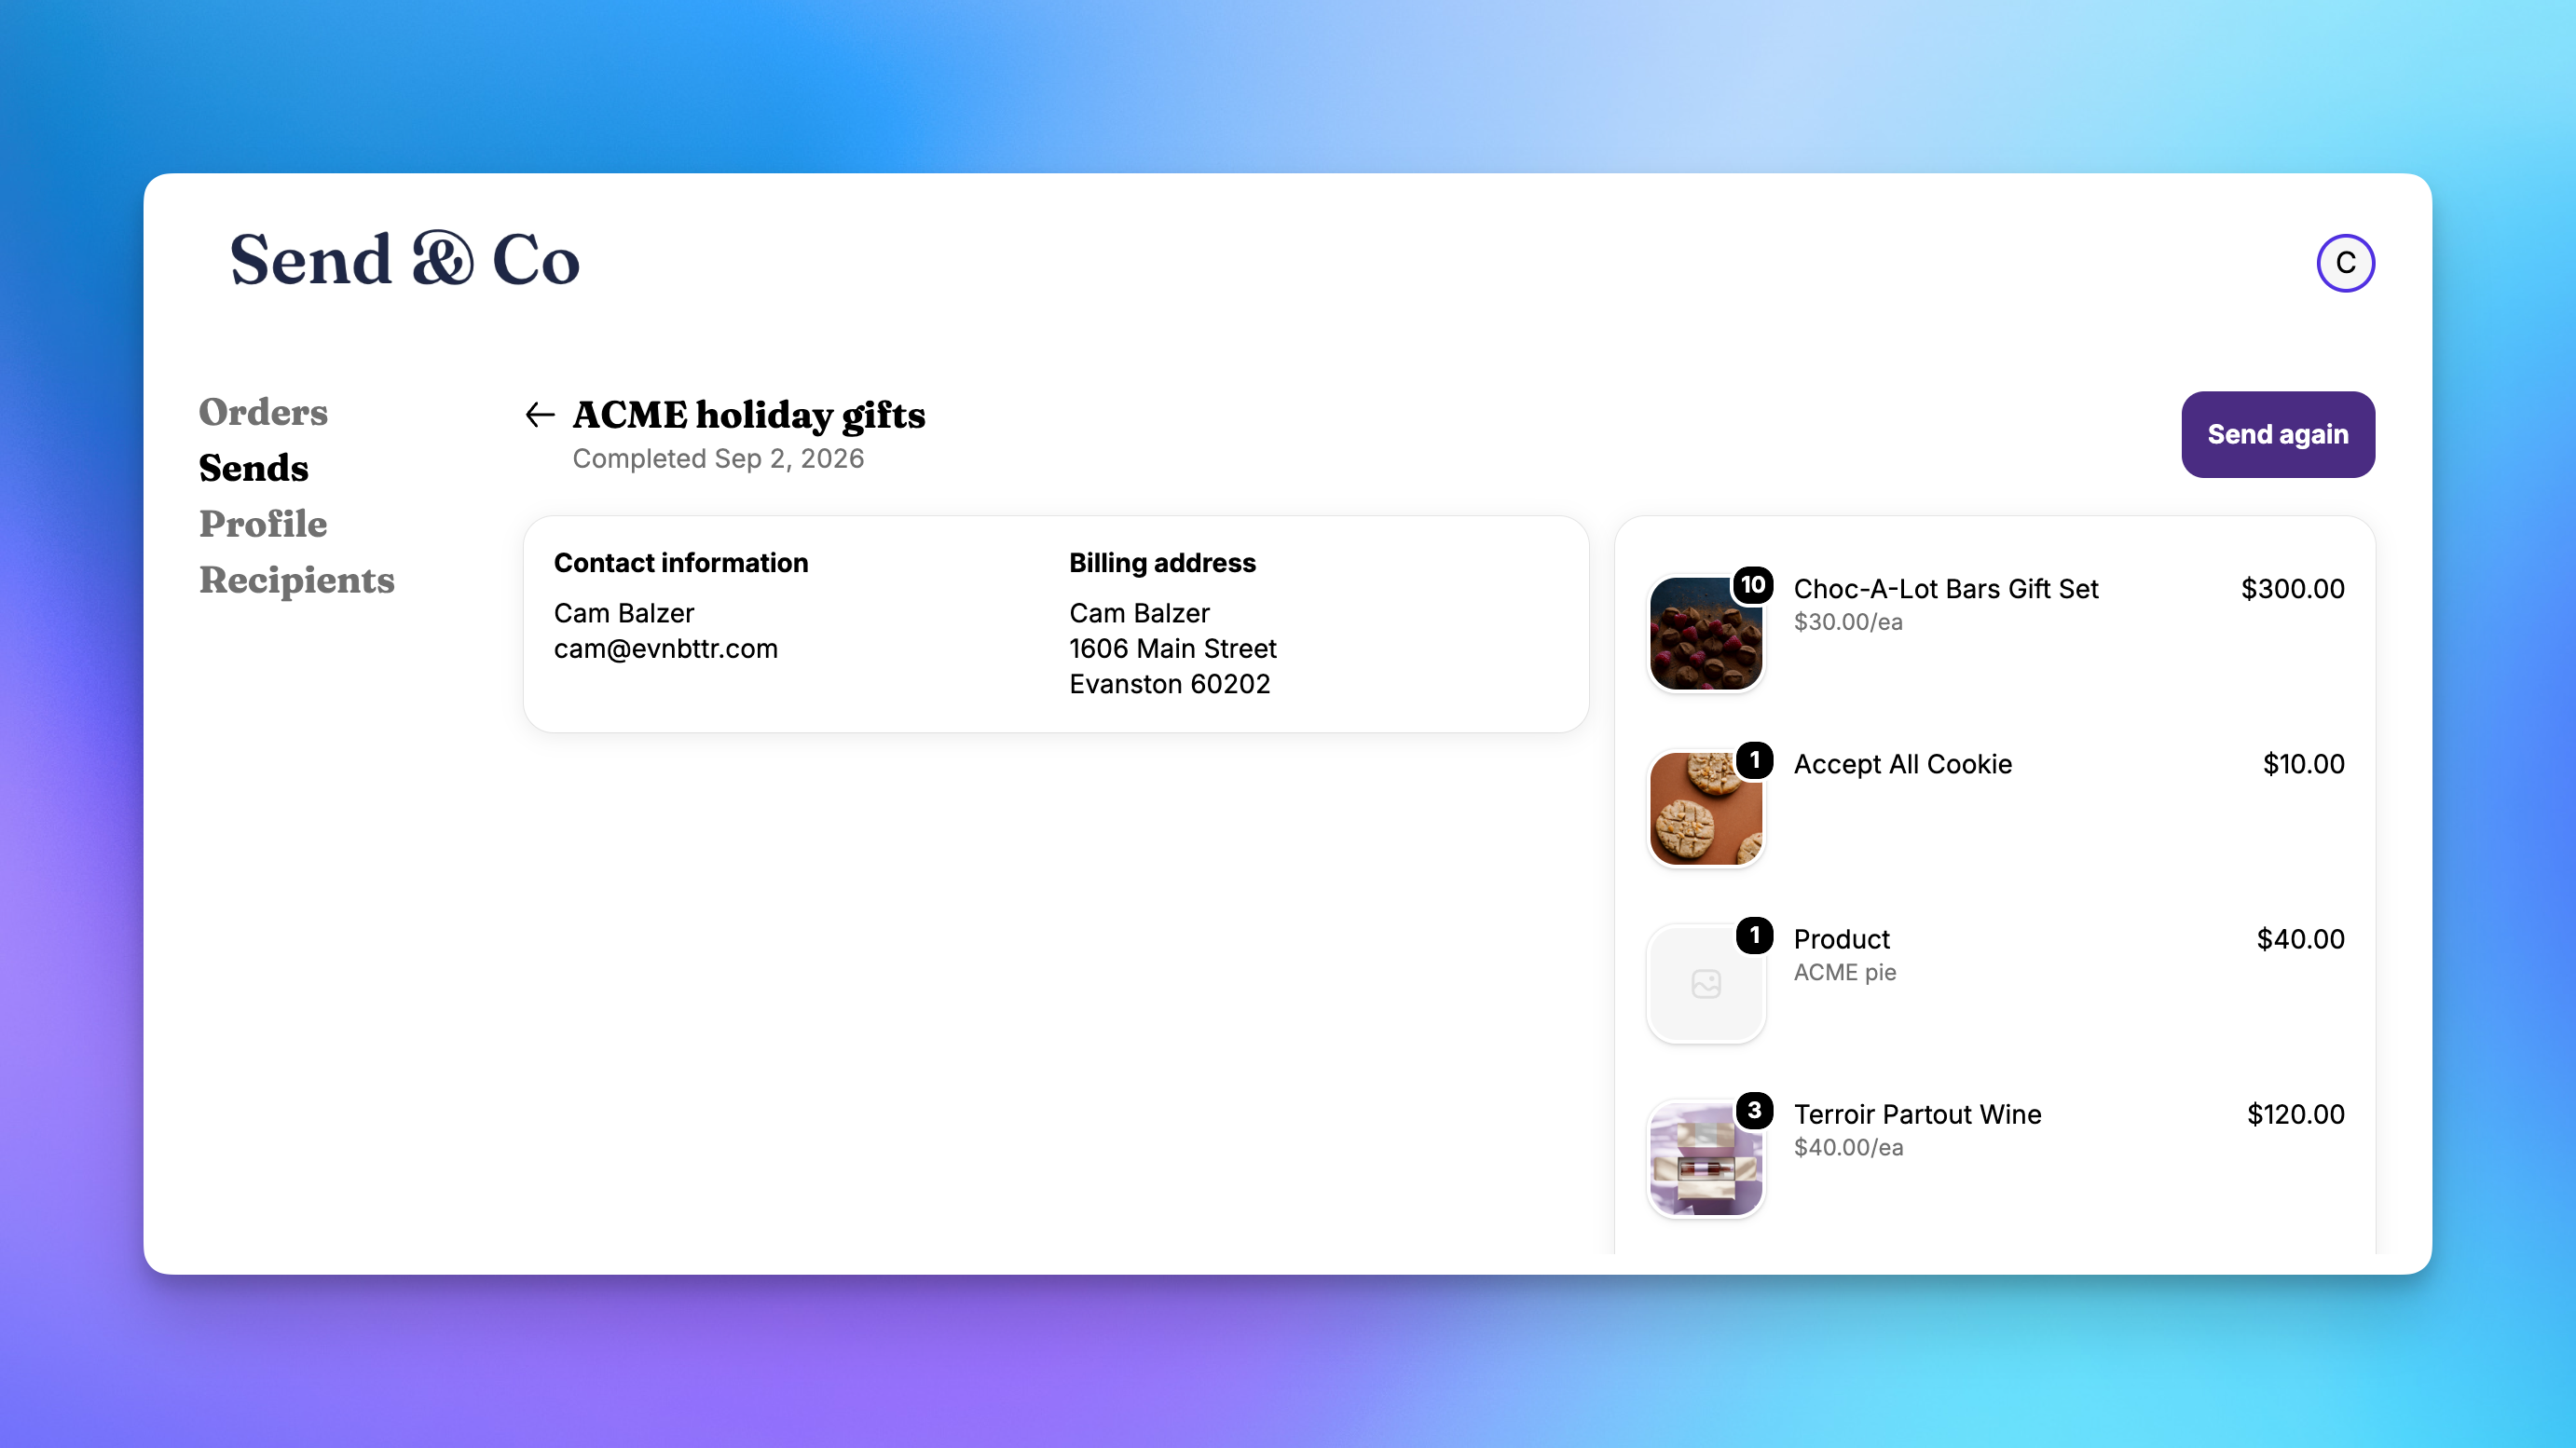
When Send Again is enabled, the Send detail view shows a Send again button on finished Sends. Clicking it reloads that Send's recipients, addresses, products, and gift messages into your multi-recipient cart so the gifter can repeat the order. A companion Recipients Page extension lets customers start a new order by picking from everyone they've shipped to before. See Send Again: Let Customers Repeat a Multi-Recipient Order for setup.
Prerequisites
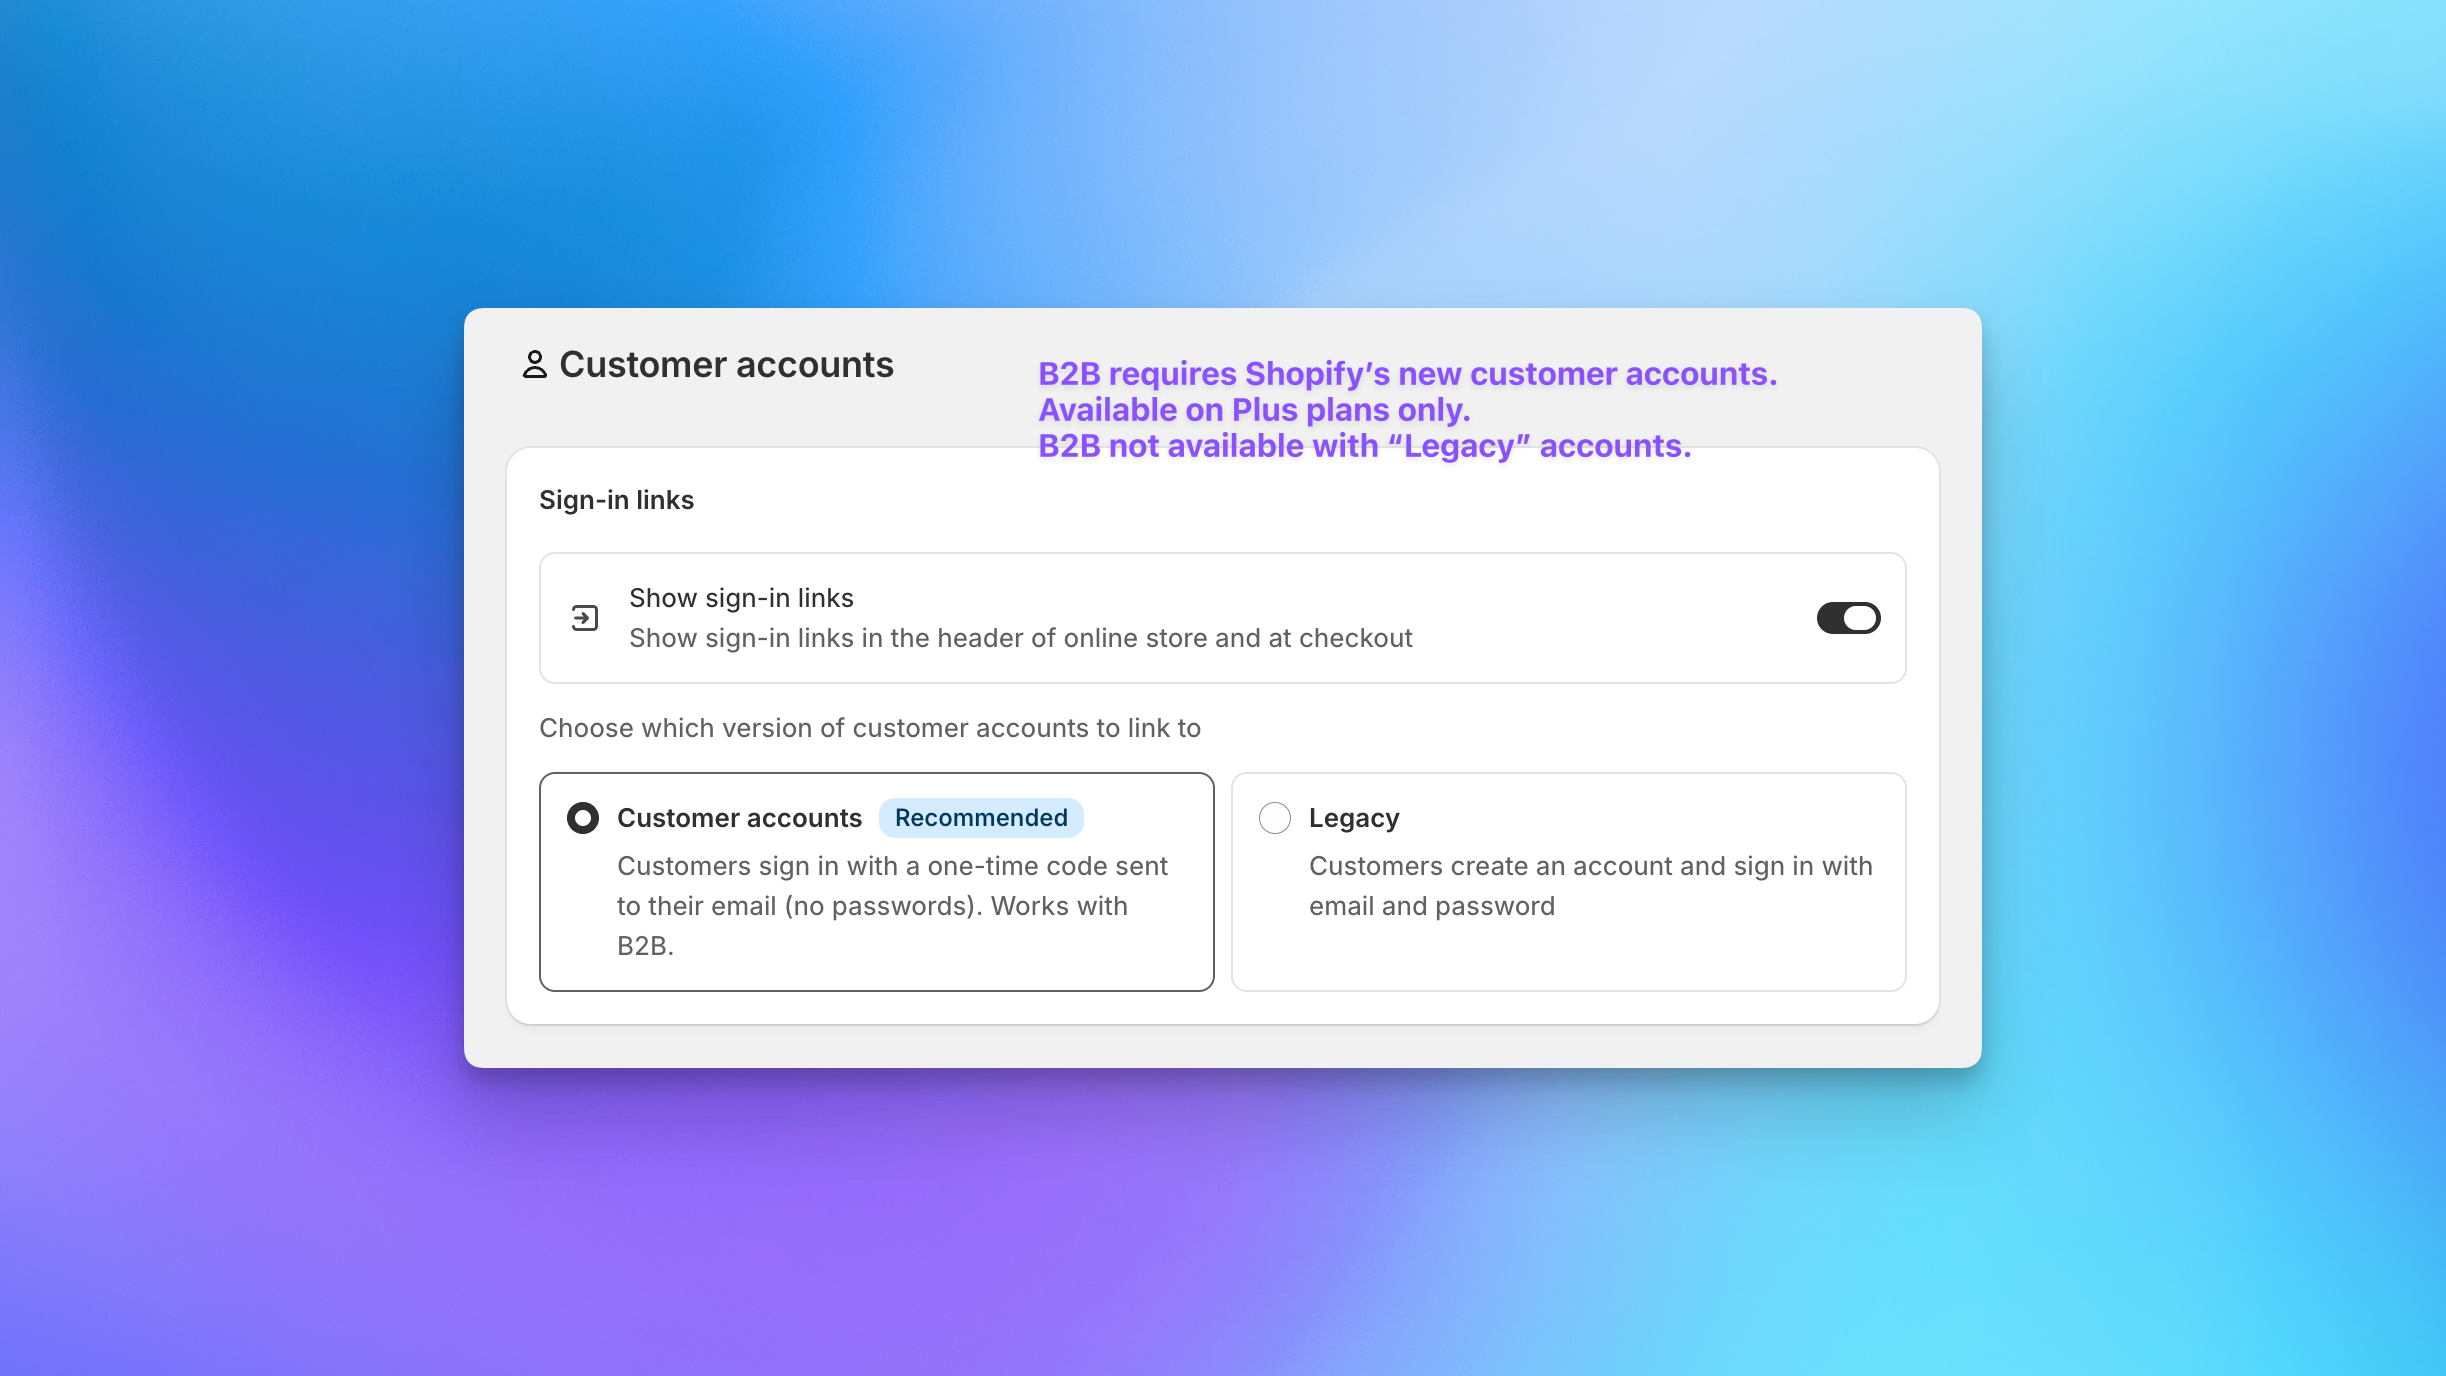
Both extensions require Shopify's new customer accounts. In your Shopify admin, go to Settings > Customer accounts and make sure "Customer accounts" is selected rather than "Legacy".
Setting Up the Extensions
Step 1: Open the customer account editor
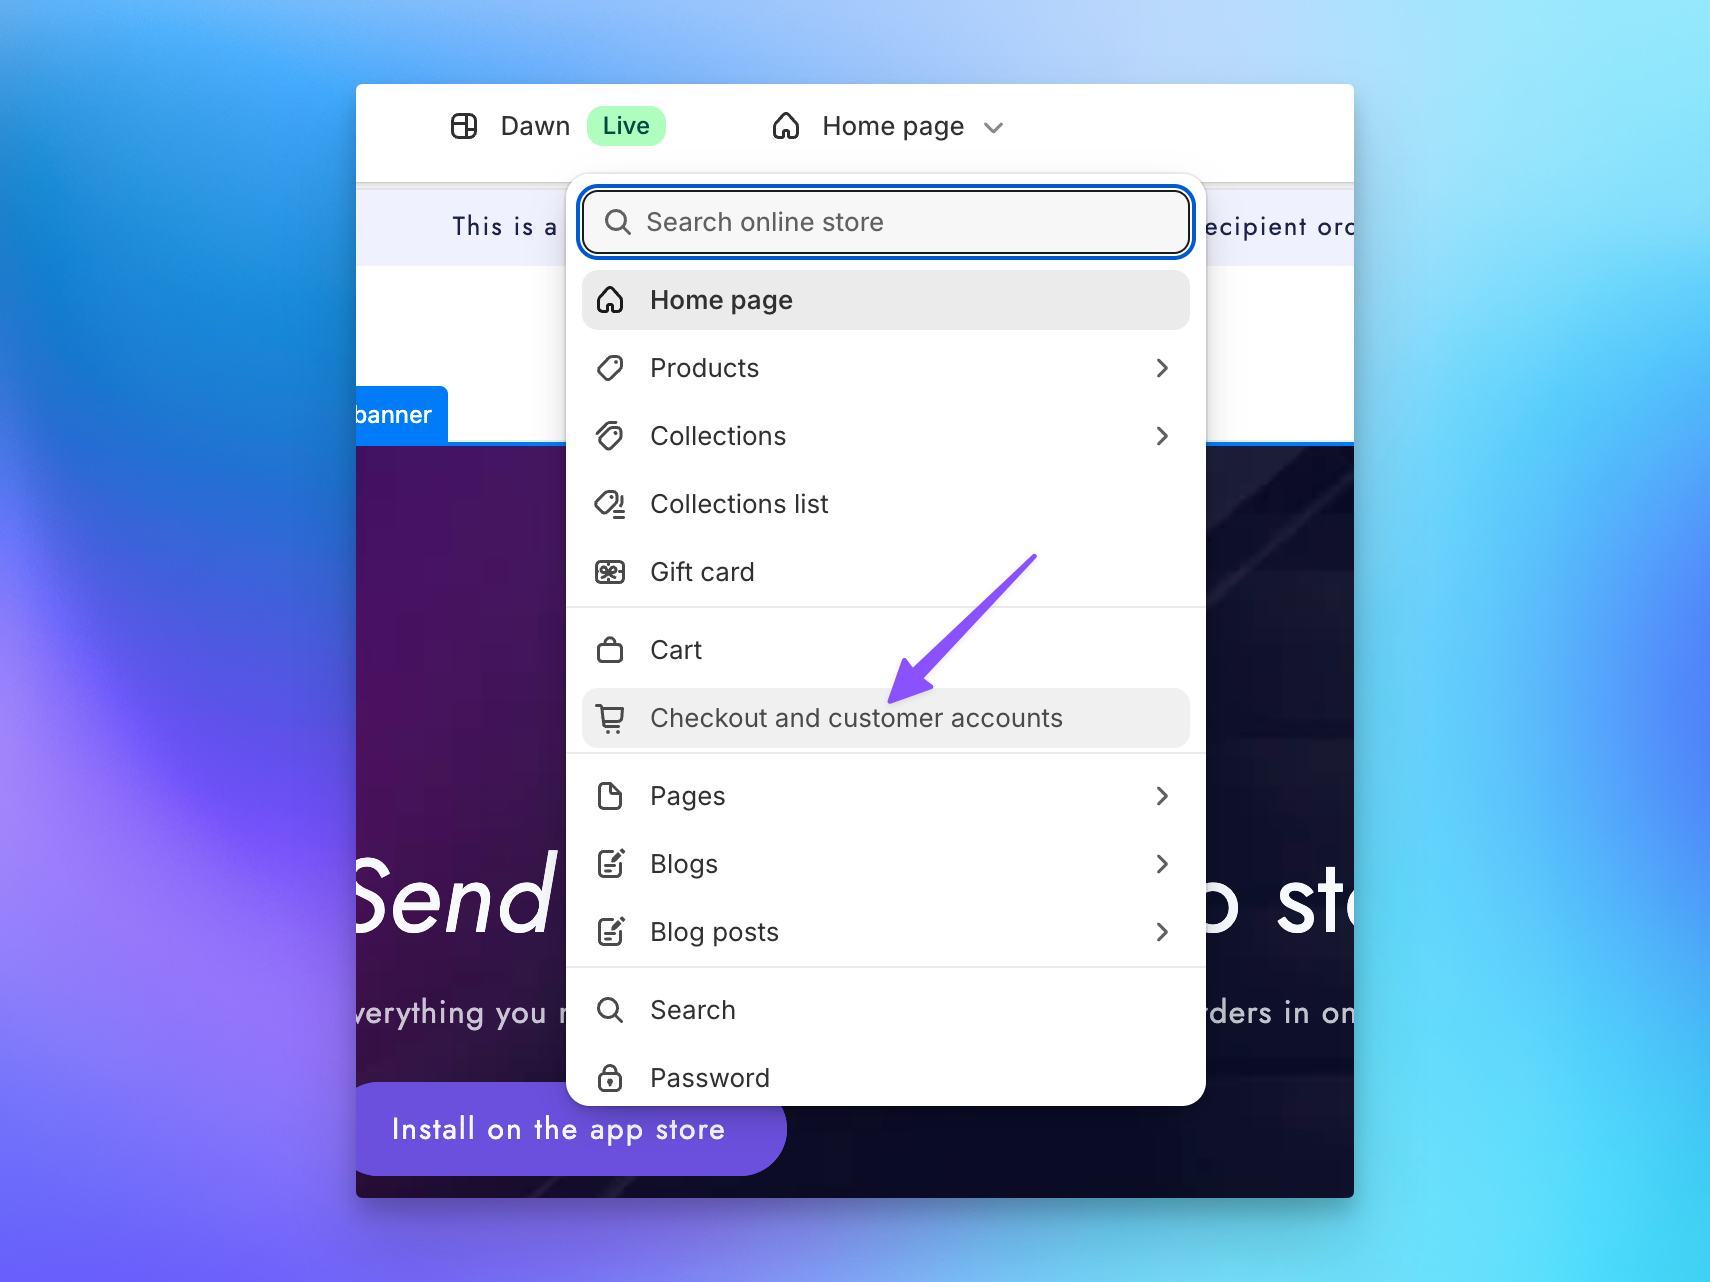
In your Shopify admin, go to Online Store > Themes and click Customize. In the page picker dropdown at the top, select Checkout and customer accounts.
Step 2: Enable the Sends Page and Order Send Banner
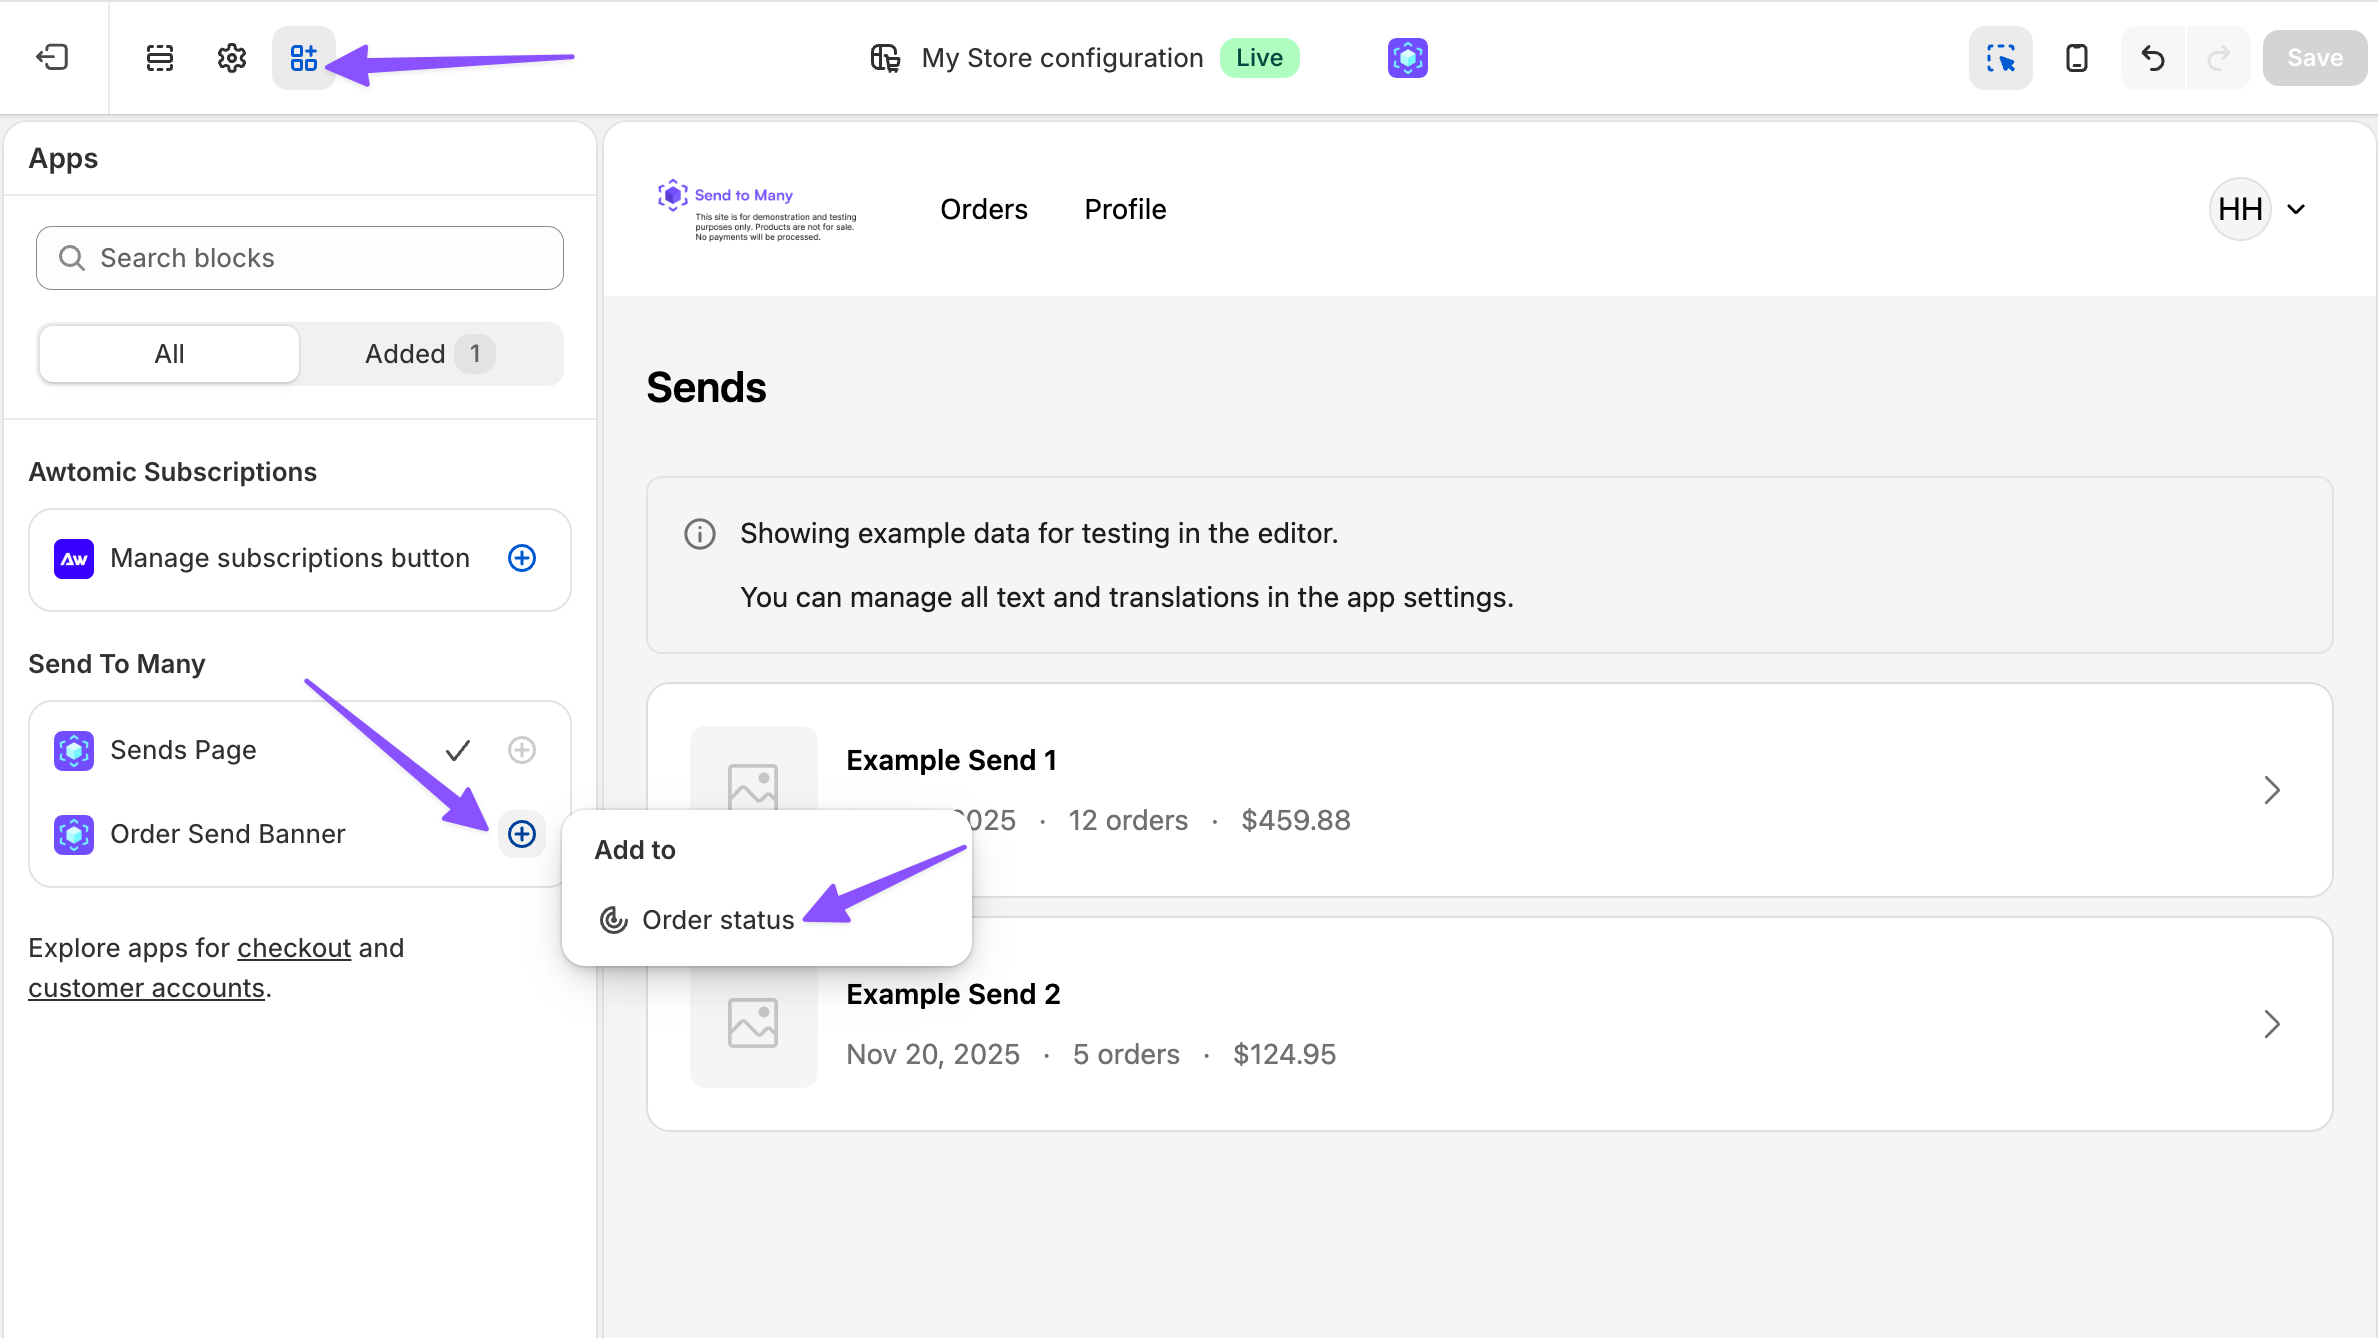
In the customer account editor, find the Apps section in the left sidebar. Send To Many's extensions are listed under your installed apps. Enable both Sends Page and Order Send Banner.
If you plan to use Send Again, enable the Recipients Page extension here as well.
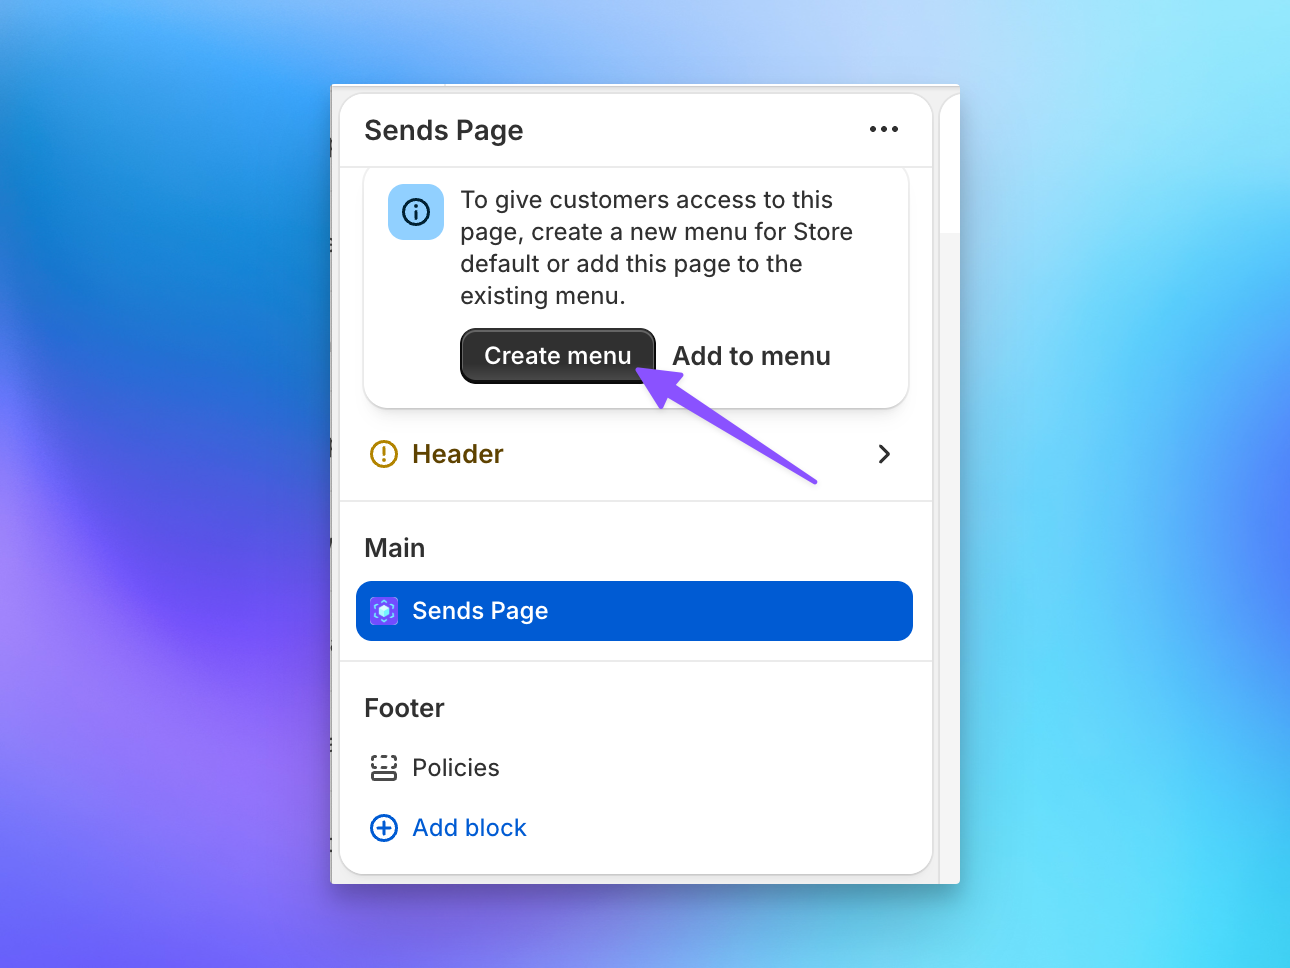
Shopify will prompt you to add the Sends Page to the account navigation menu. You can dismiss this. The banner links customers to the page, so a menu entry isn't required (see Adding the Sends Page to Account Navigation below).
The theme editor shows example data for both extensions so you can preview the layout. This dummy data only appears in the editor, not on the live storefront.
Step 3: Add the banner to the order status page
The Order Send Banner is now active on order detail pages inside the customer account. To also show it on the order status page customers see right after checkout:
- In the same theme editor, navigate to the Order status page template.
- Add the Order Send Banner block from Send To Many. You can also do this from the banner block's "Add to" option in Step 2.
Step 4: Save and publish
Click Save in the theme editor. Both extensions are now live in your customer accounts.
Adding the Sends Page to Account Navigation (Optional)
Most customers reach the Sends page through the banner on an order, or through a link in an order email (see Linking Directly to a Send). A dedicated navigation entry is only worth adding for stores with a high volume of repeat gifting customers who want to browse all of their Sends in one list.
To add it:
- In the customer account editor, click Add to menu on the Sends Page prompt, or open the account navigation menu editor directly.
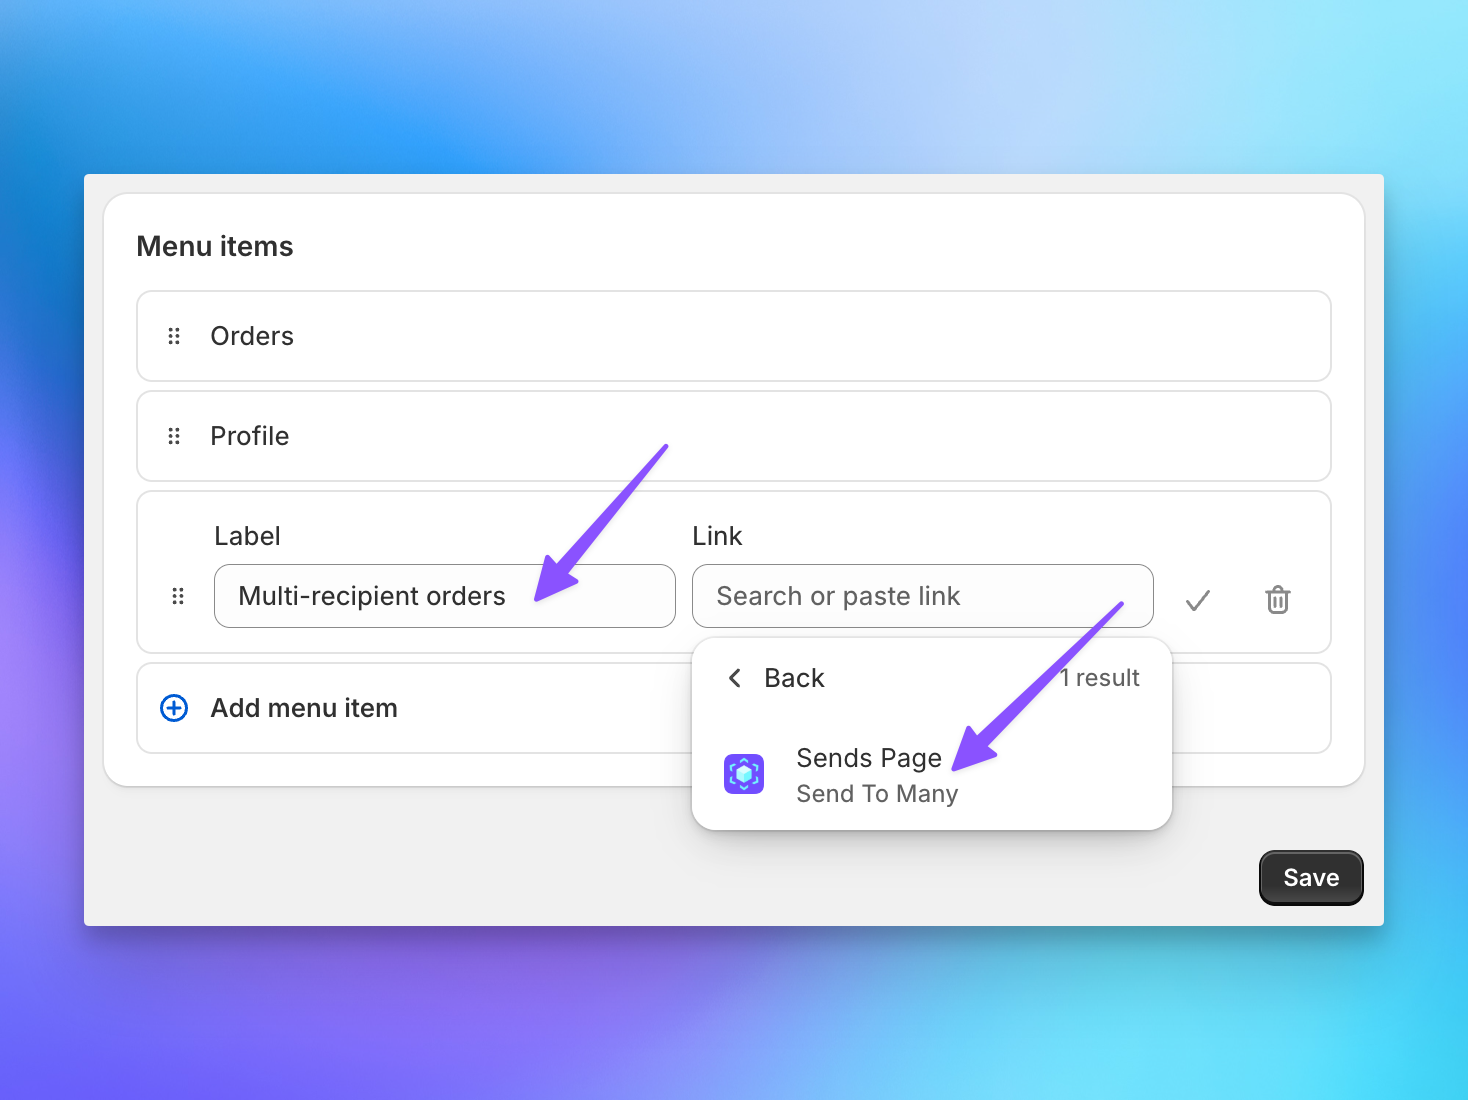
- Set the label that appears in the navigation, for example "Multi-recipient orders" or "Sends". Search for and select the Sends Page from Send To Many as the link target, then save.
Linking Directly to a Send
The Sends page has a stable URL for your store, and you can deep link to a specific Send from anywhere you email a gifter: the Shopify order confirmation for the parent order, a delivery digest, or a manual follow-up. The gifter lands on the Send detail with every recipient, delivery status, and tracking number.
Find your store's Sends page URL. Log in to your storefront as a customer, open an order that belongs to a Send, click the banner link, and copy the URL from the address bar. It looks like one of these, depending on whether your store uses a custom account domain:
https://account.yourstore.com/pages/<page-id>/
https://shopify.com/<your-shop-id>/account/pages/<page-id>/
The long page ID is assigned by Shopify and is unique to the Send To Many Sends page in your store, not to each customer. The same URL works for every gifter.
Append the Send ID. Add ?send= followed by the Send To Many Send ID to open that Send directly:
https://account.yourstore.com/pages/<page-id>/?send=16808
Where the Send ID comes from depends on what's building the link:
- Shopify notification templates: the parent order carries a
Send to Many #<id>tag. Extract it with Liquid and drop it into the link. See How to Customize Shopify Notifications for Send To Many Orders for the snippet. - Delivery digest emails: the Send fulfillment status changed Flow trigger includes a Send ID field. Pass it to your email platform as an event property. See Set Up Delivery Digest Emails with Shopify Flow and Klaviyo.
- Manual emails: the Send ID is shown on the Send in Send To Many.
The Sends page only resolves for the customer who owns the Send, and only while they're signed in. The link is safe to email, but expect a login step. Mention it in the email so the click doesn't feel broken.
For the full picture of what gifters and recipients receive by email, and how the Sends page fits in, see Order & Shipping Notifications for Multi-Recipient Orders.
Text and Translation Customization
All customer-facing text in both extensions is customizable: section headers, labels, status strings, the banner message, and link text. Go to Send To Many > Settings > Text and translations to manage these strings for each language your store supports.
If you've already configured translations for multi-recipient checkout, those settings extend to the customer account extensions as well. See Translate the Multi-Recipient Cart into Your Store's Languages for the export and import workflow.
Related Articles
- Send Again: Let Customers Repeat a Multi-Recipient Order: the Send again button, the Recipients page, and Send Again links for email campaigns.
- Order & Shipping Notifications for Multi-Recipient Orders: control who receives order and shipping emails, and enable the daily delivery digest.
- Set Up Delivery Digest Emails with Shopify Flow and Klaviyo: one daily shipping update per Send, linking to the Sends page.
- How to Customize Shopify Notifications for Send To Many Orders: link the parent order confirmation to the customer's Send.