How to Import Marketplace Orders into Shopify
Import orders from marketplaces and wholesale platforms that don't integrate with Shopify, straight from their CSV export. Apply wholesale pricing with Shopify B2B catalogs or discount codes, and save a Send preset so each import takes minutes.
Many marketplaces and wholesale platforms don't have a Shopify integration. For merchants selling through those channels, orders arrive as a CSV export, and someone on your team re-keys each one into Shopify by hand. That takes 5 to 10 minutes of focus per order, which makes it hard to add more channels or to keep up during peak periods.
Send To Many turns a marketplace's export file into Shopify orders in one import: one recipient order per marketplace order, priced at what the marketplace actually pays you rather than your retail price, and generated into your Shopify store for fulfilment through your existing back-end processes.
This guide covers the one-time setup (company, pricing, presets) and the repeatable import. Once the setup is done, each platform's export is a five-minute job for whoever is on marketplace duty that day.
Before You Start
- Confirm your Send To Many plan. Shopify B2B features in Send To Many are available on the Pro plan (monthly or annual) and higher tiers. See Pricing and Plans or contact support if you're not sure.
- Have a sample CSV export from at least one marketplace on hand. See Formatting Your Upload File for general column guidance.
- Decide with your finance team how each marketplace should be priced in Shopify, how you'd like revenue from these orders to be reflected in Shopify, and whether you'll handle invoicing inside Shopify or through another system. Each of these is covered below.
Choosing How to Price Marketplace Orders
Marketplaces pay you less than your retail price. Some take a fixed commission (for example, 25% off retail including delivery). Others buy at a per-product cost price you've agreed with them, and the margin varies product by product. Send To Many supports both scenarios, and you can use either for a specific platform.
Option A: Shopify pricing catalogs. Best when a marketplace has more complicated pricing, whether calculated for individual products or using a formula like "cost plus 20%" or a fixed amount off, or when you want shipping rates and discounts attached to the platform rather than entered on every import. You set the marketplace up as a company in Shopify with a catalog of its prices. When you select that company on a Send, catalog pricing is applied to every matched product automatically, so nobody has to work out margins by hand on each import.
Option B: Discount codes. Best when a marketplace takes a flat percentage off your retail price. Create a discount code in Shopify for that percentage (for example, MKTPLC1-25 for 25% off), and use this code during the order import workflow. Orders are created at retail price with the discount applied, so the net revenue matches what the marketplace pays you.
If a marketplace's cost prices already include delivery, Option A with free shipping on the Send is the simplest setup. If delivery is charged separately, either option works with a flat or calculated shipping rate on the Send.
You can use a pricing catalog for cost pricing and still add a discount code on the finalize step for a one-off promotion. The discount applies on top of catalog pricing.
Step 1: Set Up a Company and Pricing Catalog in Shopify (Option A)
Skip this step if you're using discount codes only.
Shopify B2B gives you three building blocks: companies (who you're selling to), catalogs (a product list with its own prices), and markets (a group of B2B companies that share catalogs and shipping settings). This section gives the big picture and a suggested setup for marketplaces. For the mechanics of each screen, follow Shopify's own guides linked in each section, starting with the Shopify B2B overview.
What you can do depends on your Shopify plan, but every plan gives you some access to these features:
- Basic, Grow, and Advanced: up to 3 active catalogs. Catalogs are assigned to markets rather than to individual companies, and a market can hold one or more companies. See Managing B2B with Markets.
- Shopify Plus: unlimited catalogs, and catalogs can be assigned directly to a company or company location.
If you have more marketplaces than catalogs, use discount codes for the flat-percentage platforms and reserve catalogs for the ones with per-product cost prices.
Suggested company setup
Create one company per marketplace in Customers > Companies. See Creating companies in Shopify B2B for the steps. A few details matter for marketplace imports:
- One location is enough. Shopify creates a default location when you add the company. Give it the marketplace's billing address.
- Add one customer contact to the location. This is the customer you'll select in Send To Many for every import from this marketplace. Use either a real contact at the marketplace, if you want to send them order confirmations or invoices from Shopify, or an internal email address if you only need a customer record to attach orders to. A plus alias keeps it separate from your own customer record and still delivers to your inbox:
you+mktplc1@yourstore.com. - Tax exemption. If you don't charge the marketplace tax, you can mark the company location as tax exempt in its settings so imported orders are created without tax.
Suggested catalog setup
Create a catalog for each marketplace in Markets > Catalogs and assign it to the marketplace's market (or directly to the company on Shopify Plus). See Creating B2B catalogs for the steps. Two setups cover most marketplace pricing:
- Percentage adjustment: one percentage off retail applied to every product in the catalog. Use this when the marketplace's cost price is a consistent percentage of retail.
- Fixed prices by CSV import: export the catalog, fill in the price column from your agreed cost sheet, and import it back. Fixed prices override the percentage adjustment, so you can combine a default percentage with exact prices on specific products.
Give each catalog a title your team will recognise, such as "Marketplace 1 cost prices" or "Marketplace 1 Christmas 2026 drop 1", and limit it to the products the marketplace can order if that's not your whole range.
Shipping rates
If a marketplace pays a specific delivery rate, you can set up shipping rates for its market in Settings > Shipping and delivery. Those rates then appear as calculated shipping options when you import a Send for that company. See Shopify's shipping documentation. If delivery is already included in the cost prices, skip this and use free shipping on the Send instead.
Marketplace pricing never shows on your storefront. Catalog prices only appear to a customer who is logged in as a contact of that company, and the contact you created is the only one.
Step 2: Create a Send Preset for Marketplace Imports
A Send preset saves the generation settings for a particular uploading scenario, so those uploads are handled the same way every time and you don't have to work out the settings for each one. You can create one marketplace preset to handle every platform, or one preset per marketplace when platforms need different shipping, revenue, or tagging.
In Settings > Send presets, create a custom preset (for example, "Marketplace orders"). The settings below are the ones that matter for marketplace imports. See Bulk Order Generation Settings for every option.
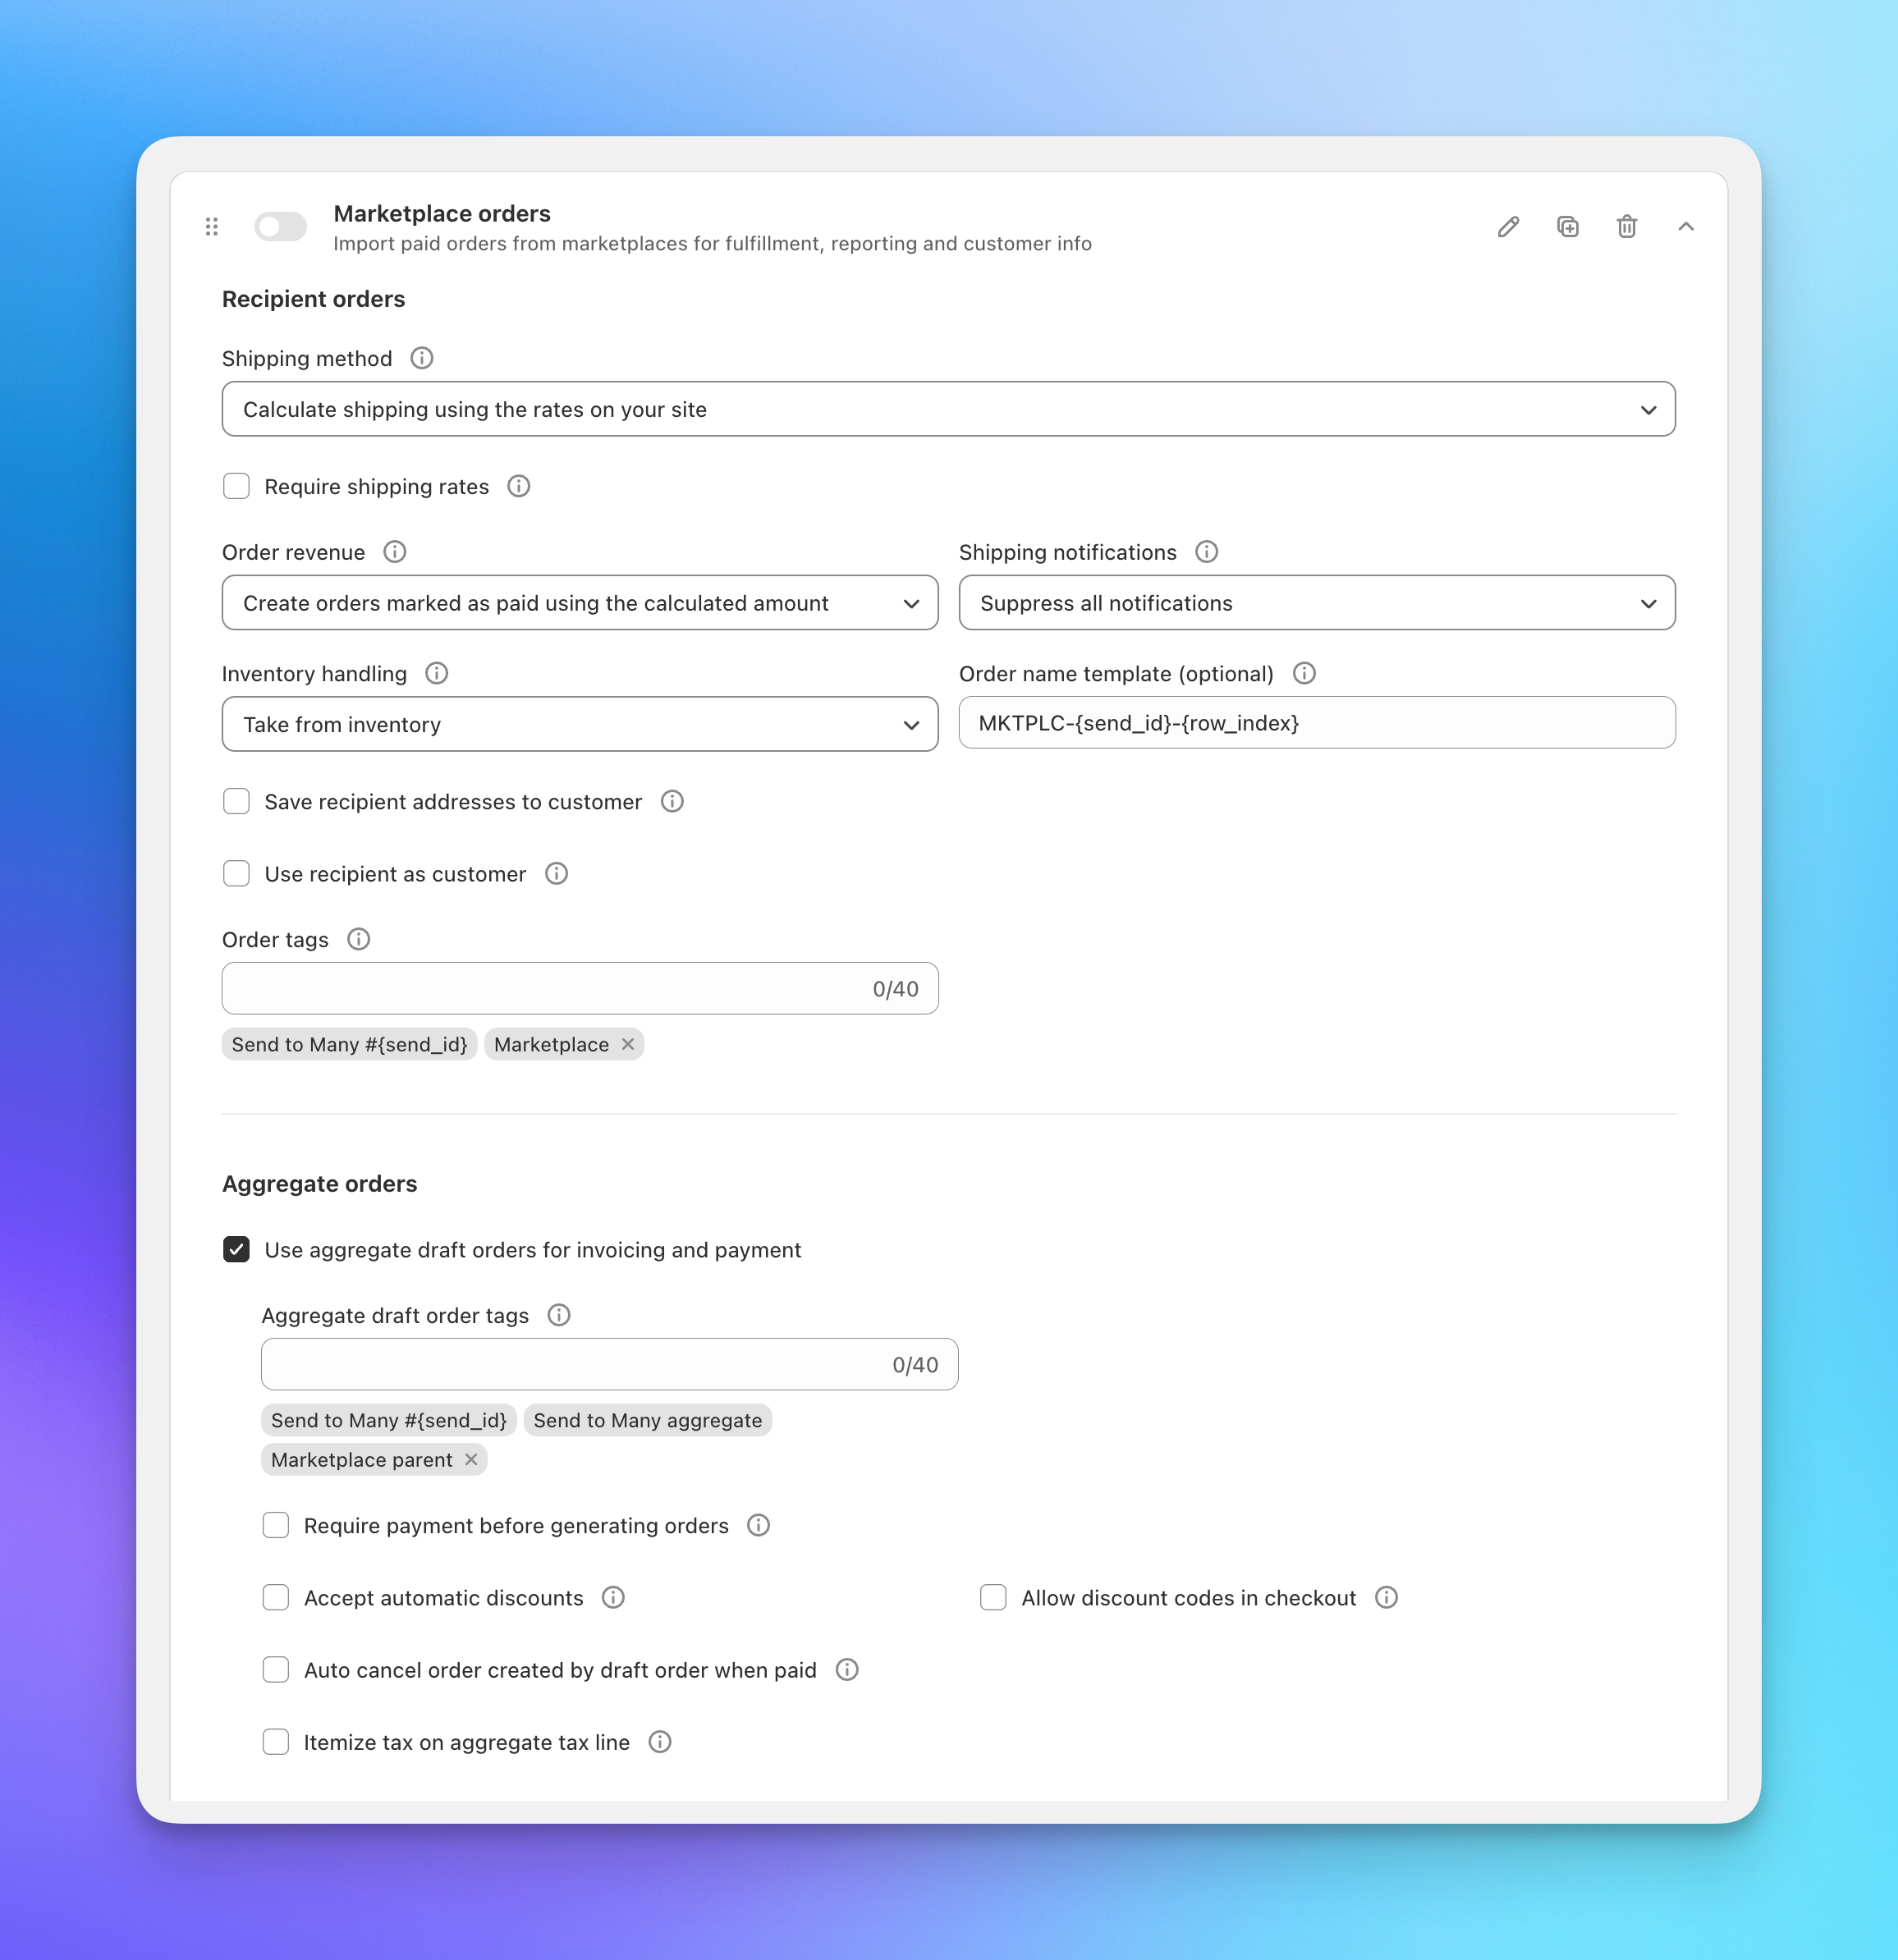
- Shipping method: Calculate shipping using the rates on your site if you attached market-specific rates in Step 1 or charge the marketplace your standard rates. Choose free shipping if delivery is built into the cost prices, or a fixed rate if you charge the marketplace a flat delivery fee.
- Order revenue: Choose based on where you recognise marketplace revenue. Create orders marked as paid using the calculated amount puts the real line item price, shipping, and tax on each recipient order, so the revenue shows in Shopify reports. Use this when Shopify is your sales record. If you recognise marketplace revenue elsewhere (for example, from the marketplace's own remittance reports in your accounting system), choose the zero-dollar option instead. Orders are still created and fulfilled normally, but they carry no revenue in Shopify.
- Shipping notifications: Typically Suppress all notifications. The marketplace sends its own confirmation and dispatch emails to the shopper. If you do need to send emails from your store, you can send them to the recipient or to the customer.
- Inventory handling: Take from inventory, so marketplace orders draw down stock like any other order.
- Order name template: Optional. A template such as
MKTPLC-{send_id}-{row_index}makes marketplace orders easy to spot in your orders list. - Use recipient as customer: Leave off in most cases. The shopper bought from the marketplace, not from you.
- Order tags: Add a general tag such as
Marketplacehere so every import is tagged. You can also add tags to an individual Send on the finalize step, for example the platform name and date for that upload. - Use aggregate draft orders for invoicing and payment: Turn on if you'd like a Shopify invoice per import (see the next section). Leave Require payment before generating orders off unless you want orders held until the invoice is paid.
If you want each marketplace shopper to exist as a customer in your Shopify store, turn on Use recipient as customer. This is a rare setup, and it requires a unique email address for every recipient in the upload. Rows without an email are created with no customer attached. If you have permission to market to these shoppers, the Buyer accepts marketing toggle opts them in. If notifications are set to go to the customer, the recipient receives them, since they are now the customer on the order. See Use recipient as customer for how matching works.
Invoicing each import in Shopify
If your finance team wants a Shopify invoice for every upload, turn on Use aggregate draft orders for invoicing and payment in the preset. On the finalize step of each import you can then generate an aggregate draft order, which is a single Shopify draft order that captures the whole upload.
Because the Send is attached to the marketplace's company location, the draft order picks up that company's B2B settings: catalog pricing, and any payment terms you've set (for example, Net 30). Send the invoice to the marketplace contact from the draft order, or mark it as paid when the marketplace's remittance arrives.
If you'd rather hold orders until the invoice is settled, turn on Require payment before generating orders with Auto-generate orders. Recipient orders then generate as soon as the draft order is paid, marked as paid, or, for B2B customers, when payment terms on the invoice are accepted. For most marketplaces, where goods ship before payment, leave this off so orders generate immediately.
See Shopify B2B Setup and Configuration for payment terms and vaulted cards, and Invoicing and Payment Collection for how aggregate invoices work.
Step 3: Prepare the Marketplace CSV
In most cases you can upload the marketplace's export as is. Send To Many needs one row per shipping address, with the recipient's name, address, and the products on that row. Column names don't matter; you'll map them on the first upload and we'll remember the mapping.
Check these before uploading:
- One row per address. Most marketplace exports already do this. If an export puts each line item on its own row, combine rows that share a shipping address into one row, with extra product and quantity columns for the additional items. See Formatting Your Upload File for how multiple product columns work.
- Product identifiers. A SKU column is ideal. A product or variant name column also works; we'll match it to your catalog.
- Quantity. Include a quantity column next to each product column when a shopper ordered more than one of an item. Without one, we default to one unit per product.
- Custom line item properties. If the marketplace passes personalisation such as engraving text or a gift message, you can upload those columns too and map them as line item properties. See Adding Product Customization During Upload.
Email and phone are optional. Some marketplaces don't share them, and orders generate without them.
If you open the export in Excel before uploading, Excel can strip leading zeros from postcodes and turn phone numbers into scientific notation. Format those columns as Text, or upload the CSV without opening it.
Step 4: Import the Orders
The import itself follows the standard upload workflow. See Import Your First Bulk Order into Shopify for the full walkthrough. These are the details that matter for marketplace imports:
- Send name. Use the marketplace name plus the date (for example, "Marketplace 1 15 Sep"). Consistent names let you filter and export all of a platform's orders later.
- Customer. For Option A, choose the company contact you created in Step 1. Send To Many shows the company and location, and catalog pricing is applied to every matched product on the products step. For Option B, choose any internal customer record.
- Send preset. Select your marketplace preset.
- Column mapping. The first time you upload a platform's export, match each column to a Send To Many field and click Continue. We save that as an Import Format, and the next export from the same platform maps automatically. See Saved Import Formats.
- Finalize. For Option B, click Add discount and enter the marketplace's discount code. Totals recalculate. Add any per-upload tags here. If your preset uses aggregate draft orders, generate the invoice before or after processing, as your finance process requires.
Click Process all orders. One Shopify order is created per marketplace order, tagged and priced according to your preset and pricing setup.
What Happens After You Import
Recipient orders generate in Shopify with the marketplace's pricing, your preset's shipping, and the tags you configured. They flow into your normal fulfilment workflow, so the dispatch team picks and packs them like any other order.
No emails go to the shopper when notifications are suppressed. You update the marketplace with dispatch details as you do today.
You can export everything for a platform. From the Send To Many dashboard, filter Sends by the marketplace name you used in the Send name and export to CSV. The export includes recipient names, addresses, and any email or phone the platform provided, which is useful for comparing marketplace shoppers against your own customer base. See Dashboard and Data Exports.
Keeping Prices Current
When a marketplace approves a new cost sheet, update the catalog before the next import. Export the catalog CSV, update the prices, and import it back, or create a new catalog for the season (for example, "Marketplace 1 Christmas 2026") and switch the market to it. Every import from that point uses the new prices. Discount codes work the same way: edit the percentage in Shopify and the next import picks it up.
Next Steps
- Import Your First Bulk Order into Shopify: the full upload walkthrough referenced in Step 4
- Saved Import Formats: manage the column mappings saved for each marketplace
- Bulk Order Generation Settings: every Send preset option, including tags and order naming
- Shopify B2B Setup and Configuration: payment terms, vaulted cards, and invoicing for B2B customers
- After Order Generation: tracking, fulfilment, and handling failed orders