How to Customize the Shipping Notification for Gift Recipients
Send To Many gives you the option to notify gift recipients when their package ships. Set up checkout to collect recipient emails and a From name, tag recipient orders, and edit Shopify's shipping confirmation to say who the package is from.
A shipping notification is your chance to make a strong first impression on a gift recipient. It's often the first time they hear from your store. Shopify's generic shipping confirmation can spoil that moment, and the gift with it. It says "Your order is on the way" to someone who never placed an order, and it lists what's in the box.
Send To Many gives you full control over who notifications go to: no one, the gifter, or each recipient. Some merchants need the recipient option for deliveries to go smoothly. A butcher shipping frozen items needs the recipient to get the box into a freezer the day it arrives. A winery needs an adult 21 or older at the address to sign for the package. For other merchants, it's a way to build engagement with a new audience.
If you choose the recipient option, think the touchpoint through with both the gifter and the recipient in mind:
- Tell the gifter what you're going to do. They should know at checkout that each recipient gets an email when their gift ships.
- Let the gifter add to the notification. A From name is a good example. The gifter decides how they're identified to their recipients.
- Collect a unique email address for each recipient. The notice goes to the address on that recipient's order.
This tutorial walks you through setting up checkout to collect what the notice needs, then editing Shopify's shipping confirmation so recipient orders get a gift notice. Every other shipping confirmation stays as it is.
Here's an example of a shipping notification written for a gift recipient:
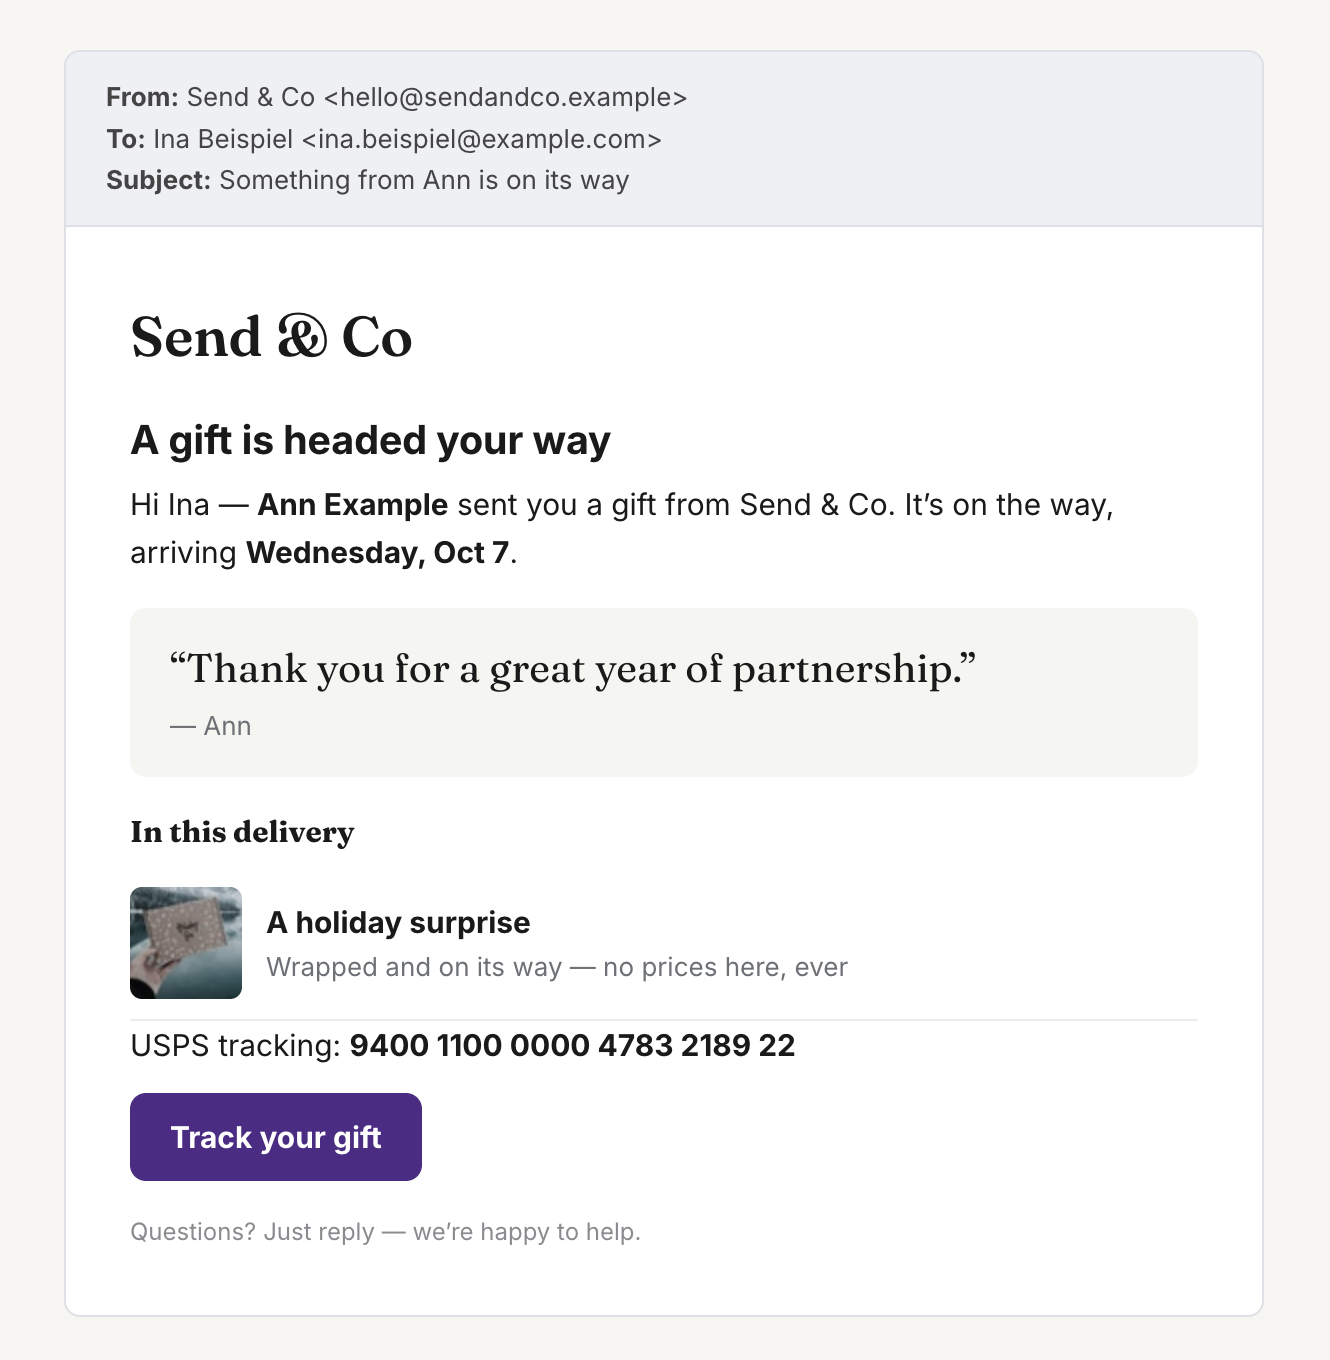
Before you start
- Decide whether recipient notices fit your store. They're a must for frozen, perishable, and signature-required shipments, and optional for everything else. See Order and shipping notifications for multi-recipient orders for how the options compare.
- You'll edit the Shipping confirmation template under Settings > Notifications > Customer notifications in your Shopify admin. Copy the current template code into a text file first so you can restore it.
Step 1: Set up checkout for recipient notices
This step turns the notices on and collects what they need from the gifter. All three settings are in your multi-recipient checkout configuration in Send To Many.
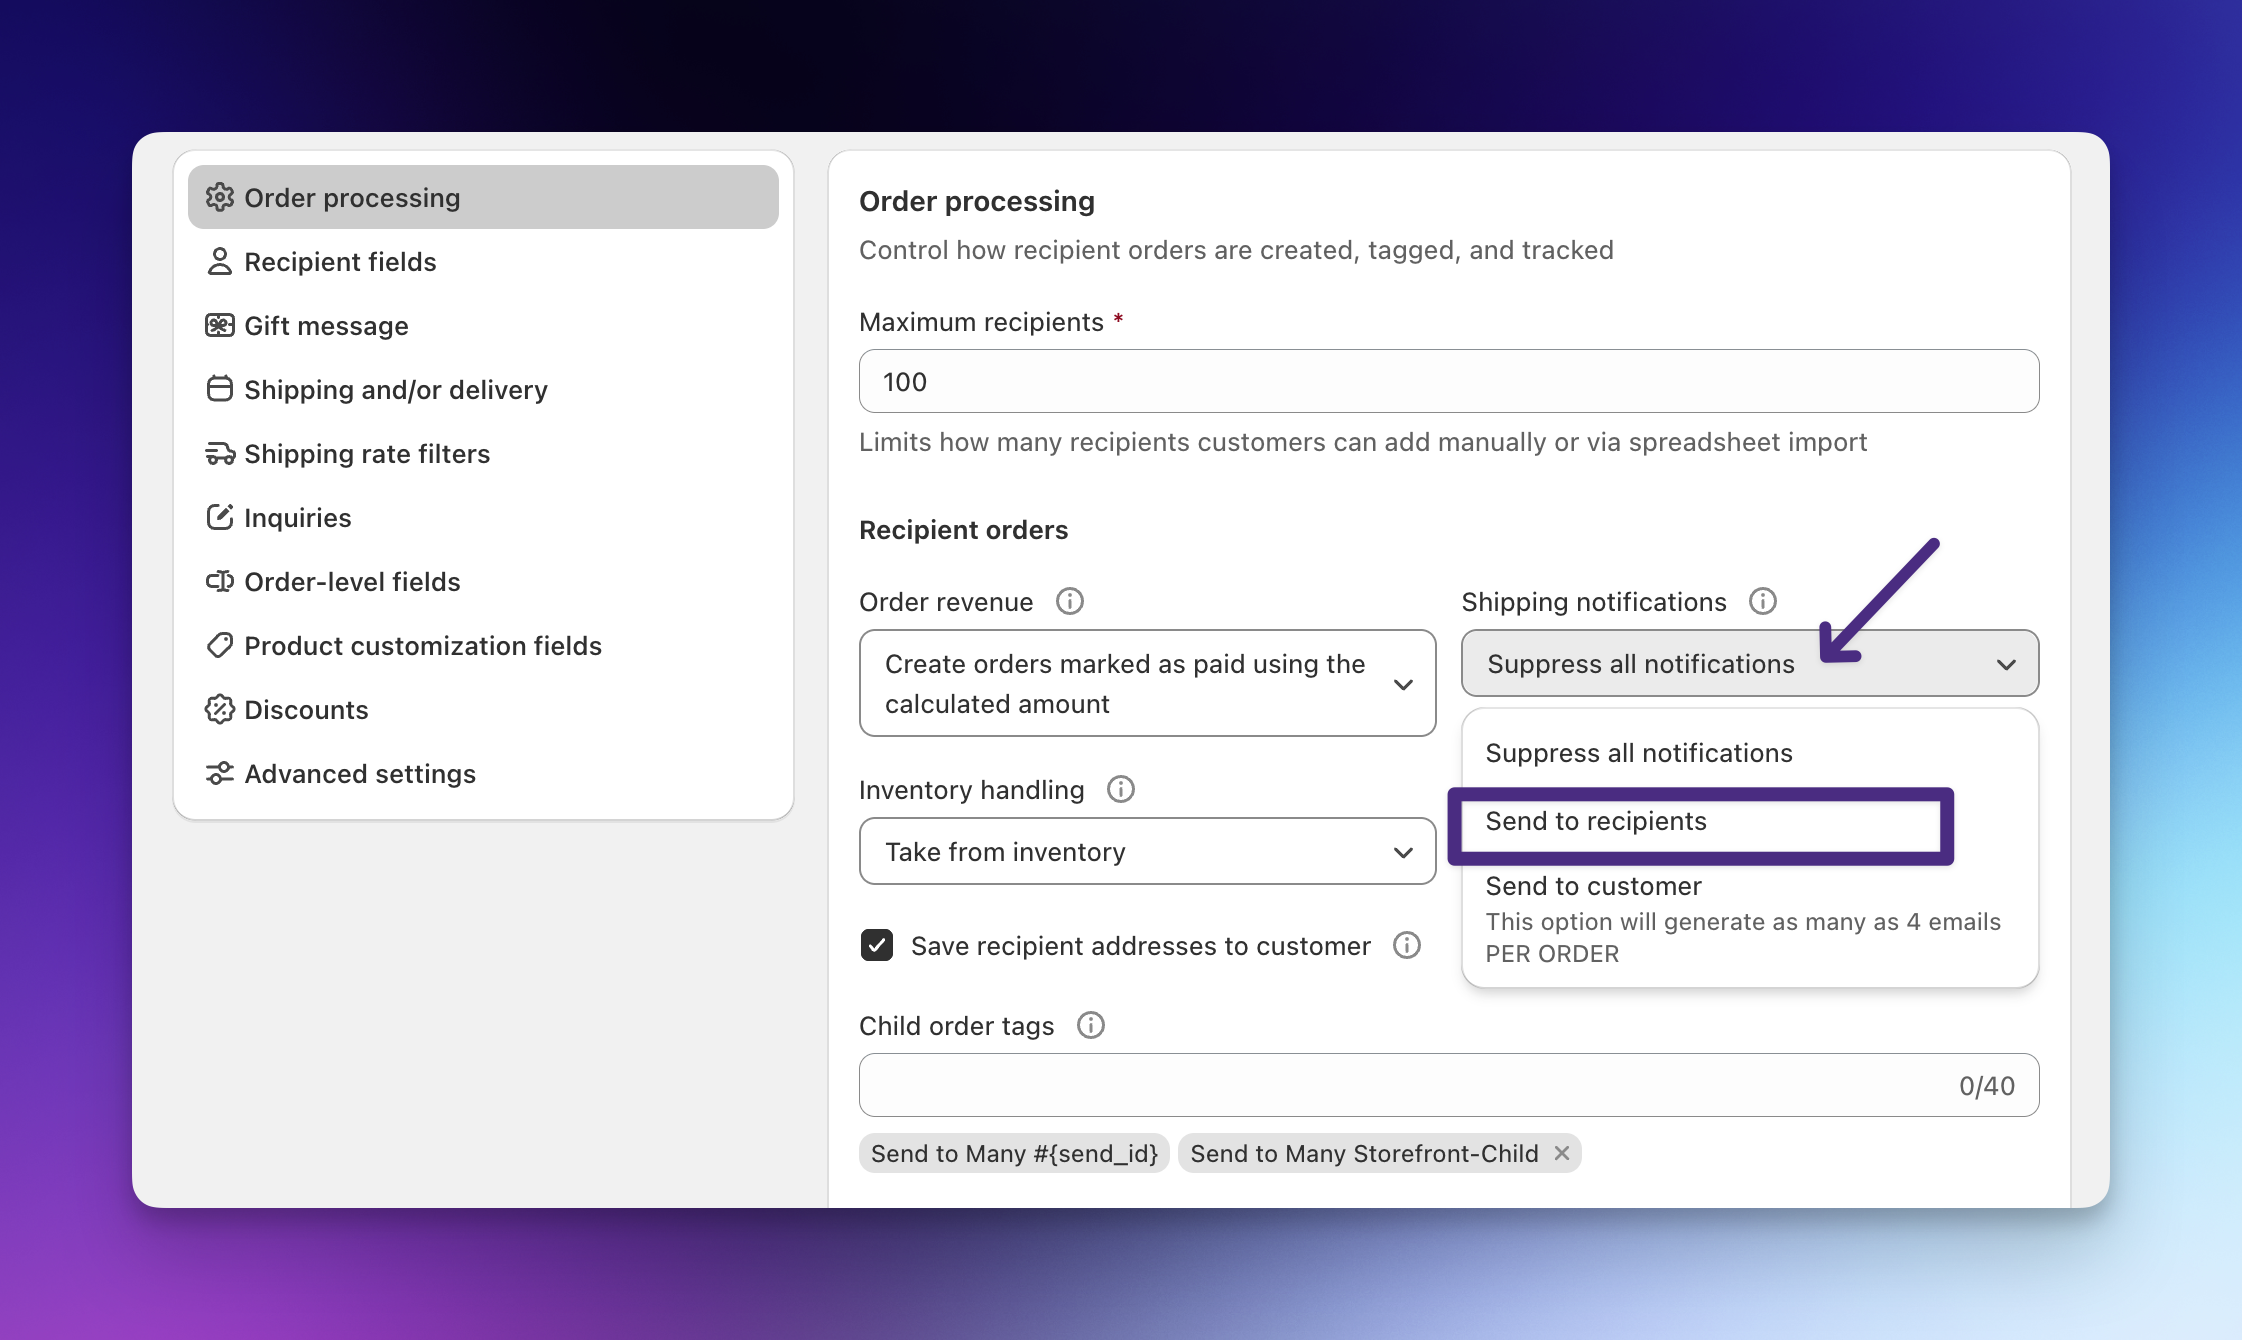
Send notifications to recipients. Go to Order processing and set Shipping notifications to Send to recipients.
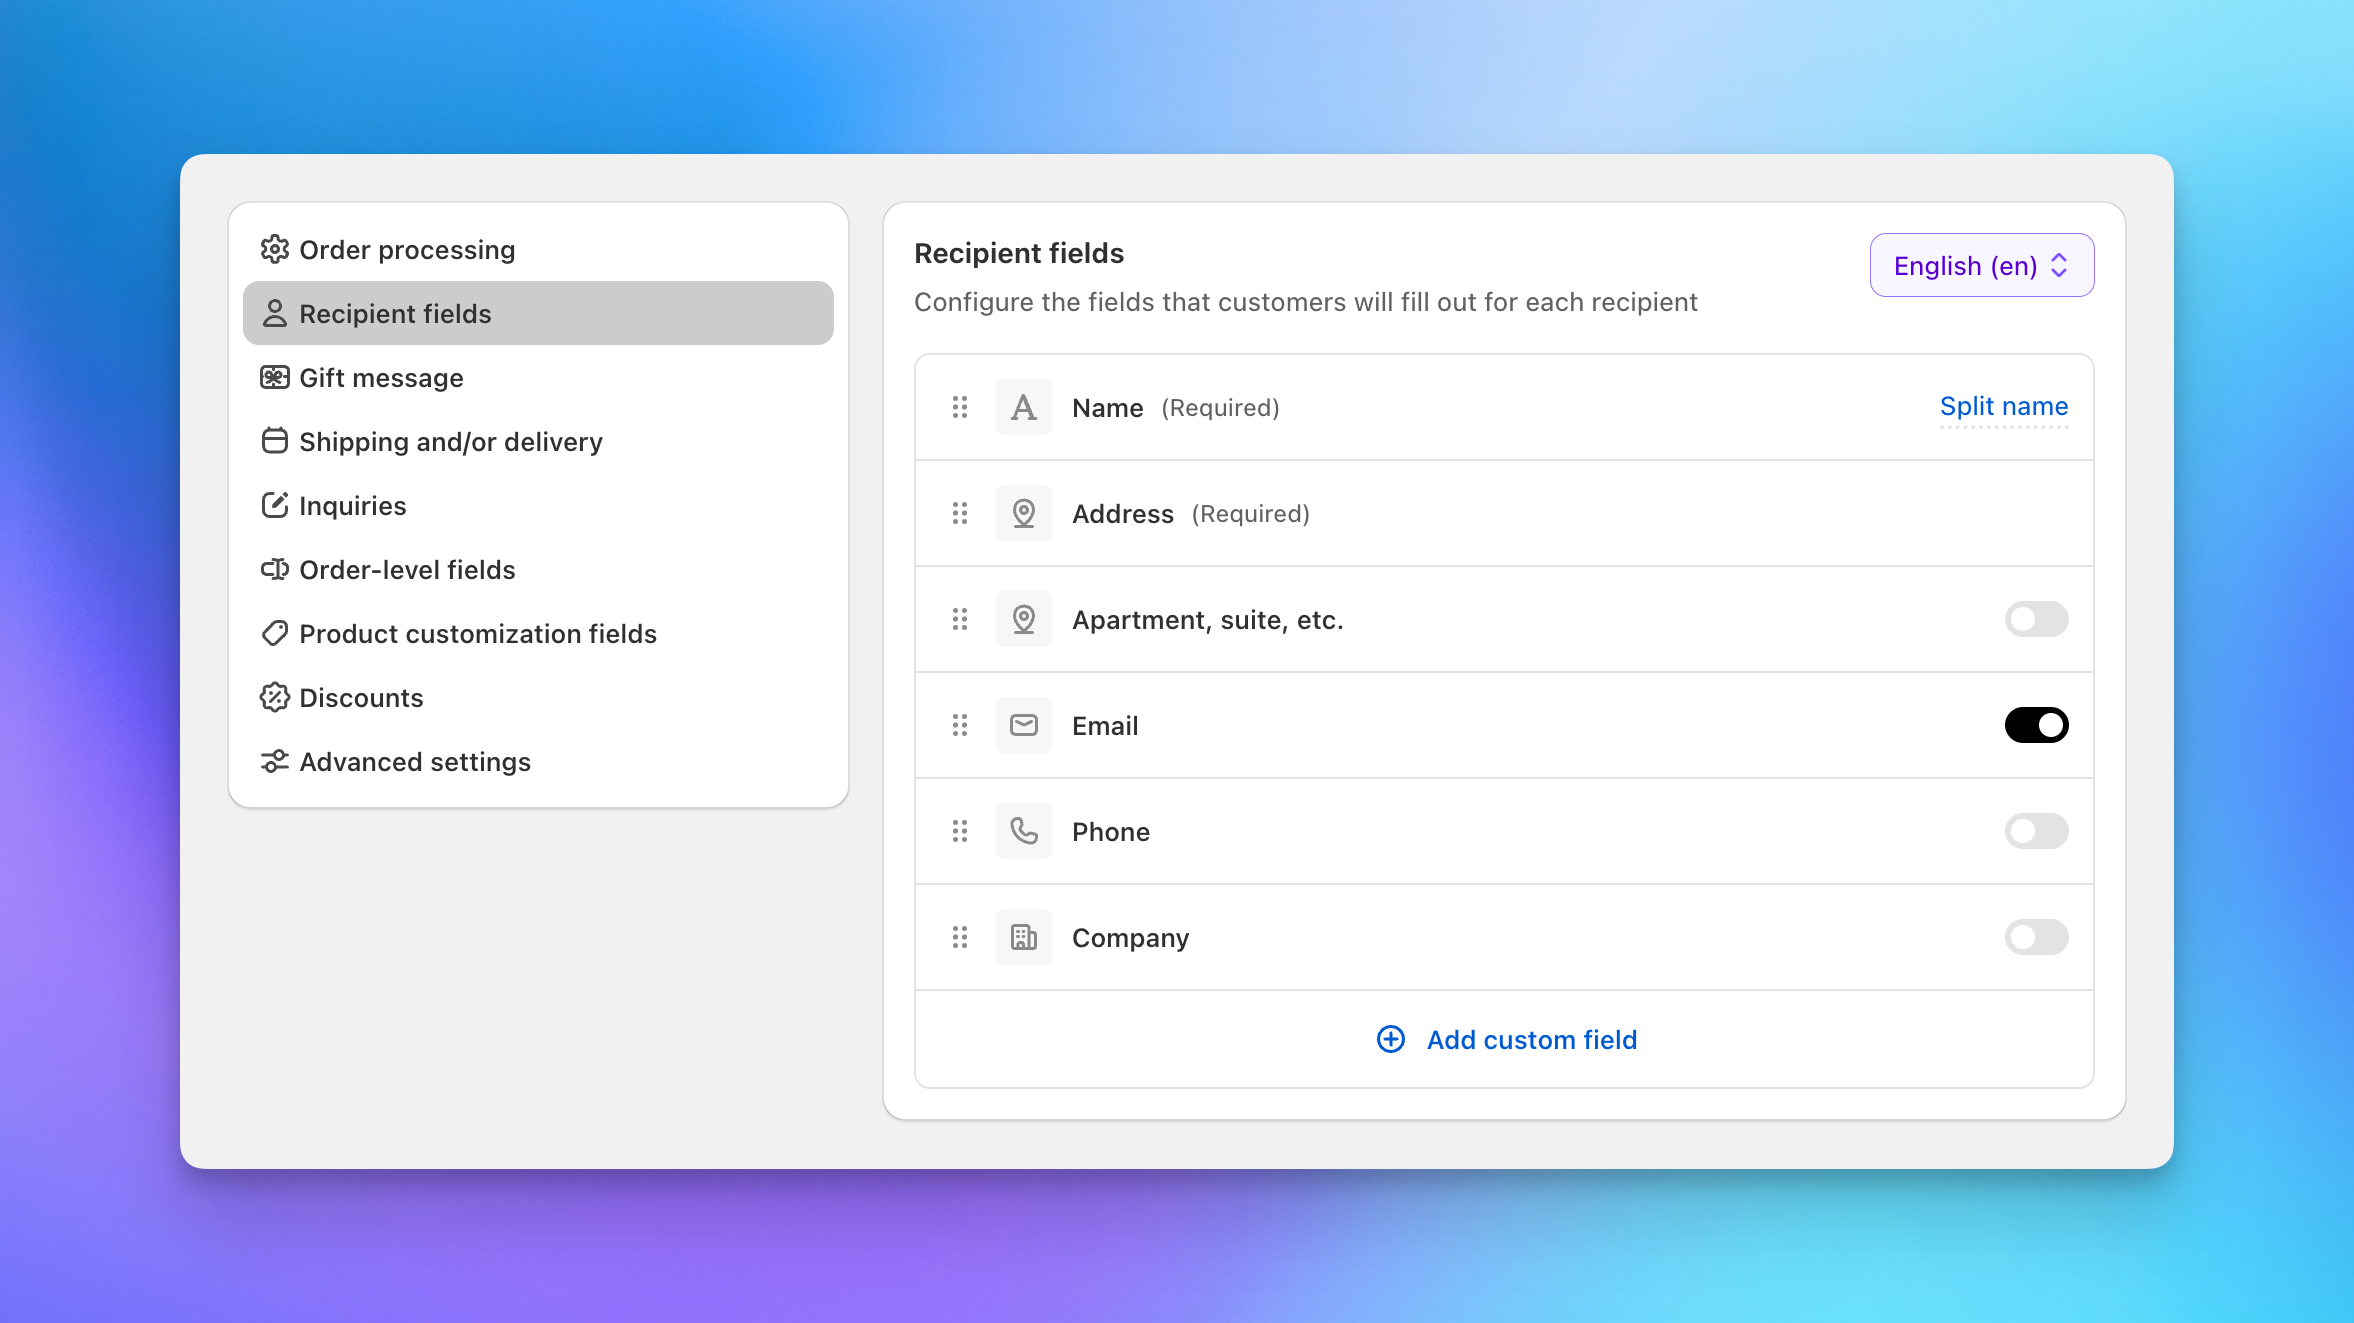
Collect an email address for each recipient. Go to Recipient fields and turn on the Email field. Edit the field's label to tell the gifter why you're asking, for example "Recipient email (we'll let them know when their gift ships)". Each recipient needs their own address. If the gifter enters the same email for everyone, every notice lands in that one inbox.
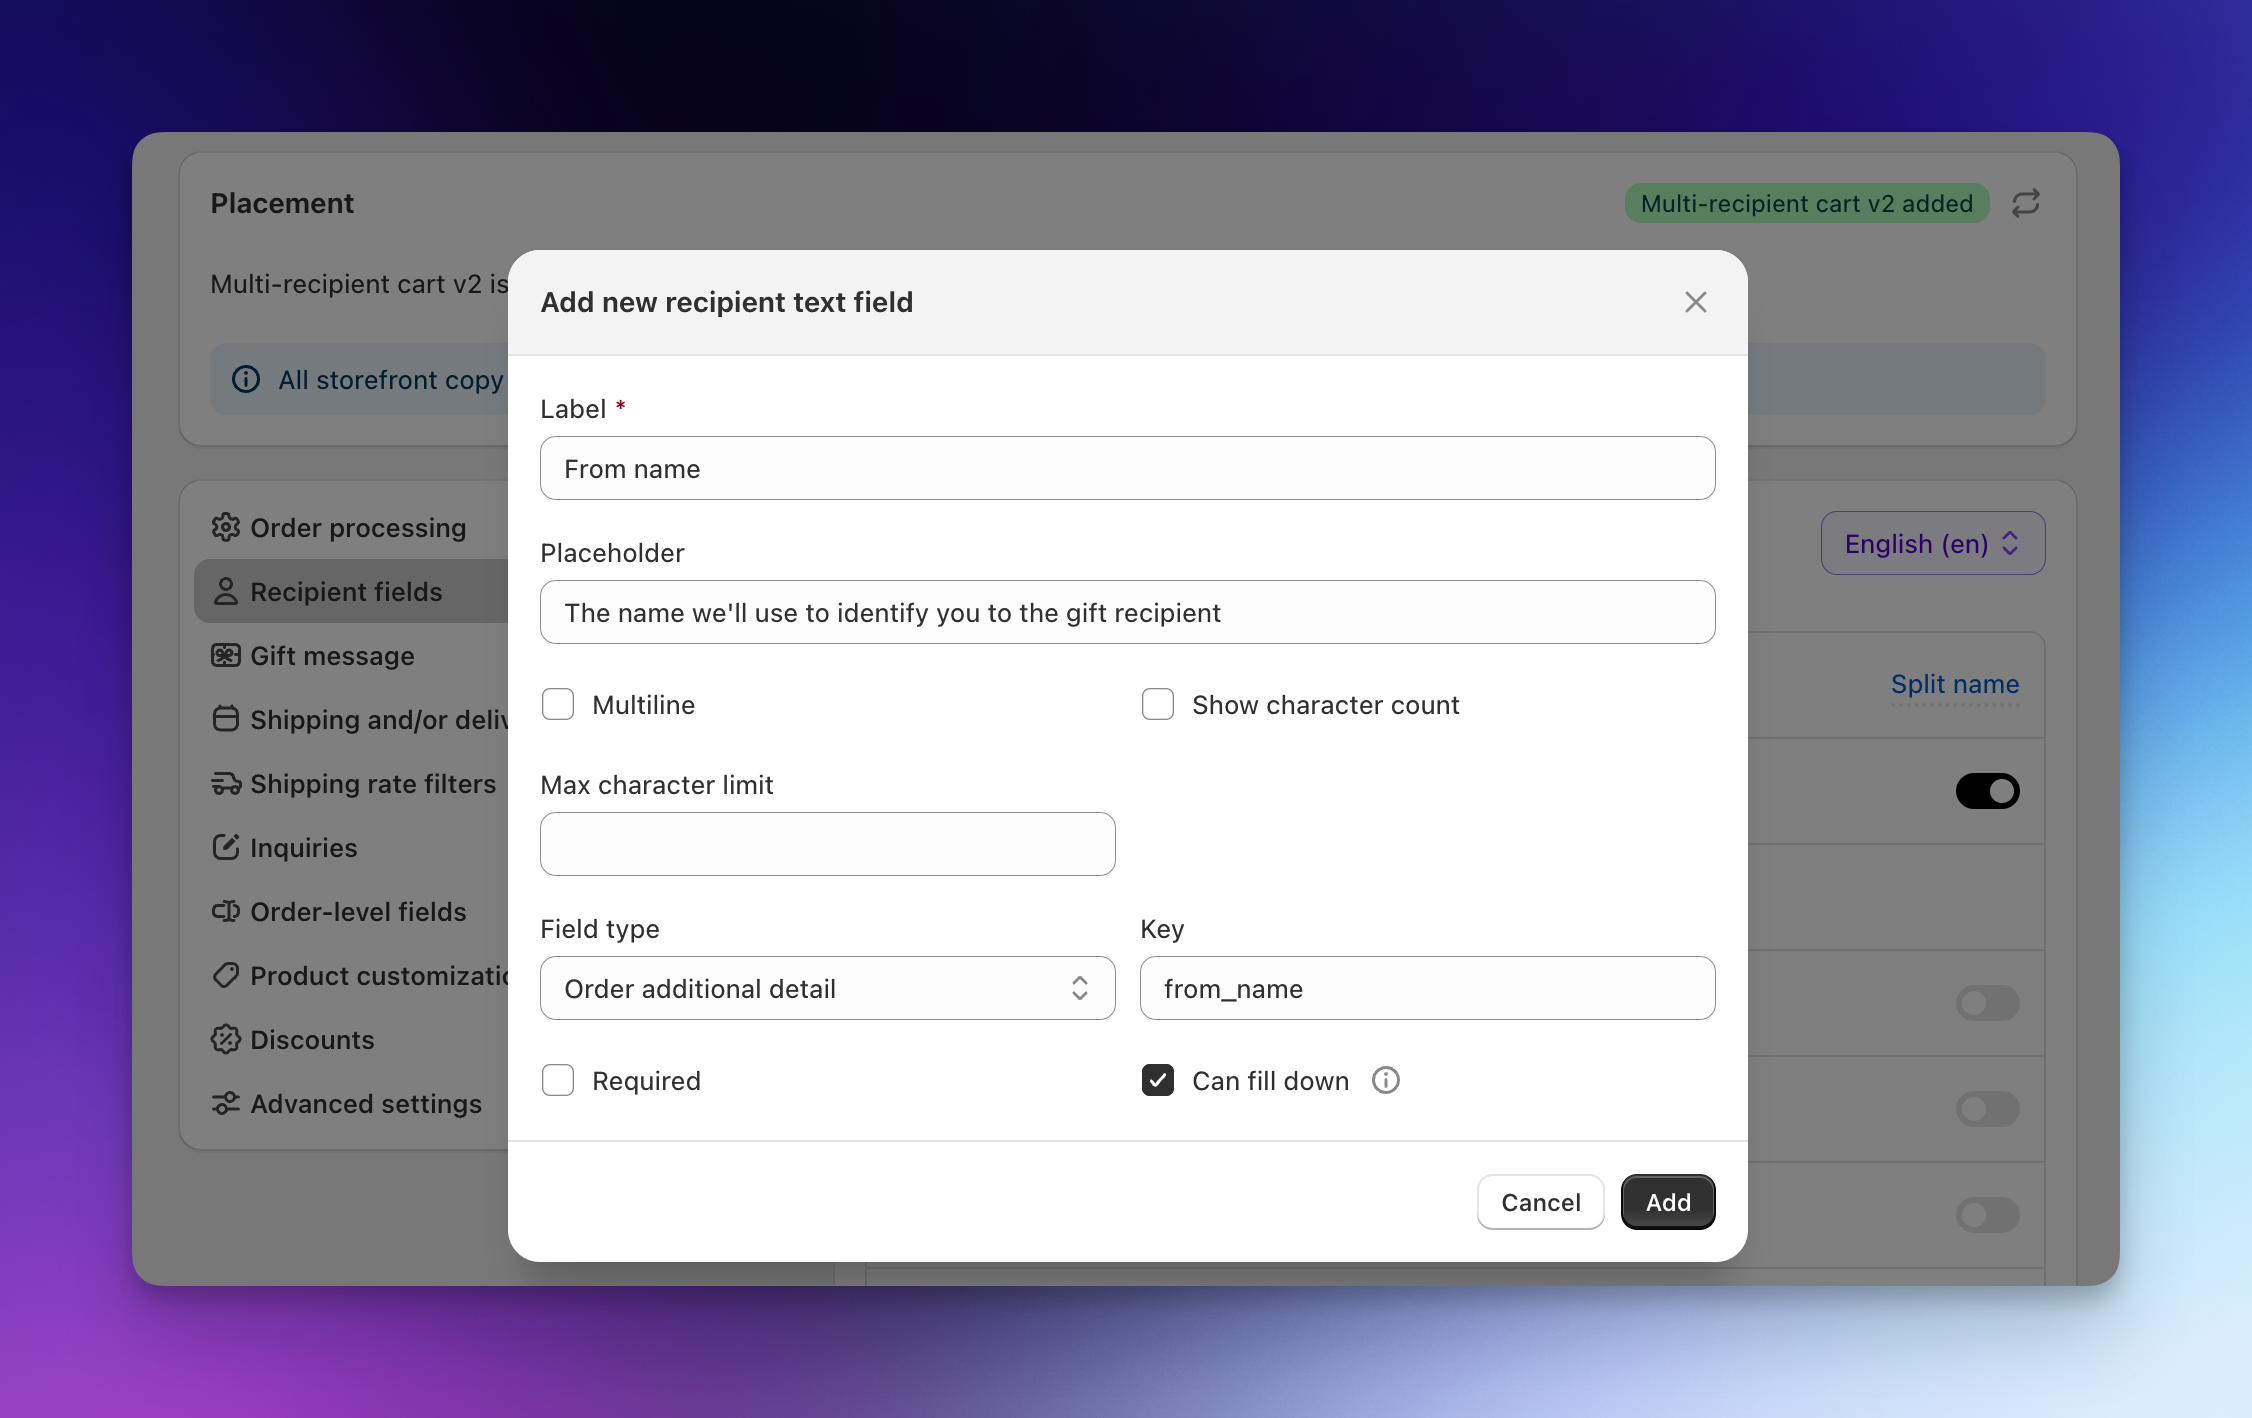
Add a From name field. The From name is how the gifter wants to be identified to their recipients. It's often different from the name on the order, such as "The team at Acme" or "Aunt Carol".
- In Recipient fields, click Add custom field and choose a text field.
- Set the Label to
From name. - Add a Placeholder that tells the gifter how the name is used, for example "The name we'll use to identify you to the gift recipient".
- Set Field type to Order additional detail.
- Set the Key to
from_name. Use lowercase letters and underscores, with no spaces. You'll use this key in the email template. - Check Can fill down so the gifter can enter the name once and apply it to every recipient.
- Click Add.
We save the value on each recipient order as an additional detail under the key you set. Shopify email templates read it as {{ attributes.from_name }}. You can collect other details for the notice the same way. Give each one its own key.
Step 2: Tag recipient orders
The email template needs a way to tell recipient orders apart from your regular orders. Order tags do that.
On the same Order processing screen, find Child order tags. Recipient orders from multi-recipient checkout get the Send to Many Storefront-Child tag by default. Leave it in place, or add a tag of your own such as gift-recipient.
The snippets below use the default tag. If you changed it, use your tag in its place.
Step 3: Customize the shipping confirmation
Open the Shipping confirmation template and make four edits.
Add the detection code. Paste this at the very top of the template:
{% assign is_gift_recipient_order = false %}
{% if tags contains "Send to Many Storefront-Child" %}
  {% assign is_gift_recipient_order = true %}
{% endif %}
{% assign gift_from_name = attributes.from_name %}
If you used a different key in Step 1, change from_name on the last line to match.
Change the heading and intro. Find these two lines in the template:
<h2>{{ email_title }}</h2>
<p>{{ email_body }}</p>
Replace them with:
{% if is_gift_recipient_order %}
  <h2>A package is on its way{% if gift_from_name != blank %} from {{ gift_from_name }}{% endif %}</h2>
  <p>Track your shipment to see the delivery status.</p>
{% else %}
  <h2>{{ email_title }}</h2>
  <p>{{ email_body }}</p>
{% endif %}
If the gifter left the From name blank, the heading reads "A package is on its way".
Change the subject. Replace the email subject with this, keeping your current subject in the else branch:
{% if tags contains "Send to Many Storefront-Child" %}A package is on its way{% if attributes.from_name != blank %} from {{ attributes.from_name }}{% endif %}{% else %}A shipment from order {{ name }} is on the way{% endif %}
The subject is a separate field from the template body, so it repeats the tag check.
Hide the product details. Find the heading <h3>Items in this shipment</h3>. It sits inside a <table class="row section"> block that also lists the products. Wrap that whole block:
{% unless is_gift_recipient_order %}
<table class="row section">
  ...
  <h3>Items in this shipment</h3>
  ...
</table>
{% endunless %}
The tracking number and the tracking button stay in the email.
Step 4: Preview and save
- Click Preview in the template editor and choose a recipient order from a multi-recipient checkout. The heading names the sender, and the items section is gone.
- Preview a regular order. It looks the same as it did before your changes.
- Save the template.
Shopify's order status link in the shipping confirmation includes a pre-authenticated token, so the recipient can open that tracking page from the email even though they aren't the order's customer.
Next steps
- Customize Shopify notifications for Send To Many orders: identify upload orders and tailor shipping confirmations sent to the gifter.
- Set up delivery digest emails: keep the gifter updated with one daily email per Send.
- Configure recipient fields in multi-recipient checkout: field types, fill-down, and storage options.